Python has a built-in module named logging to get the log information for any python application. It is a very useful module for the novice or experienced python programmer to print the status message to the output stream or into a file. Most of the third-party python libraries use this module to generate log information for the python application. How you can use this module is shown in this article by using 25 simple python logging examples.
List of Logging Examples:
- Using getLogger()
- Using basicConfig()
- Using setLevel()
- Using getEffectiveLevel()
- Using isEnabledFor()
- Using debug()
- Using info()
- Using warning()
- Using error()
- Using critical()
- Logging to a file
- Using variable in logging
- Using exception()
- Creating handler
- Using Formatter()
- Using LogRecord getMessage
- Using logRecord attributes — args
- Using logRecord attributes — asctime
- Using logRecord attributes — filename
- Using logRecord attributes — funcname
- Using logRecord attributes — lineno
- Using logRecord attributes — module
- Using logRecord attributes — msg
- Using logRecord attributes — pathname
- Using logging.disable
Using getLogger()
getLogger() function is used to create a logger object. This function can be called with logger name or without a logger name. The default logger name is root. In the following example, the logger object is created with a logger name and without a logger name by using getLogger(). Here, three warning messages will be printed. The root will print as a logger name for the first and second warning message. The third warning message will print with the logger name that is assigned in getLogger() function.
example1.py
import logging
# Print first warning messages
logging.warning(‘This is first warning message’)
#Creating an object
logger=logging.getLogger()
# Print second warning messages
logger.warning(‘This is second warning message’)
#Creating an object
logger=logging.getLogger(‘mylog’)
# Print third warning messages
logger.warning(‘This is third warning message’)
Run the script from the terminal.
Output:
The default logger name is ‘root’ and when the logger object is created without any name then the logger named is also ‘root’. So, the following output will appear after running the script.

Using basicConfig()
basicConfig() function is used to configure the logging options of the root logger. Different types of basic configuration can be done by this function. format, level, filename, etc. are the most used arguments of this function. format is used to format the output of the log message. level is used to set the logging level. filename is used to send the log message output to a file rather than the console. The uses of format and level arguments are shown in the following example.
example2.py
import logging
#Create and configure the logger
logging.basicConfig(format=‘%(message)s’,level=logging.DEBUG)
# Print Test messages before setting level
logging.debug("Print the debugging message")
Run the script from the terminal.
Output:
Here, the message is set in the format argument and the logging level is set to DEBUG. The following debug message will be printed as output after running the script.

Using setLevel()
setLevel() function is used to set the logging level. Six levels can be set by this function. These are DEBUG(10), INFO(20), WARNING(30), ERROR(40), CRITICAL(50) and NOTSET(0). The default level is set to NOTSET when any logger object is created and the messages are processed based on root logger if no logger name is defined. The root logger processes messages for WARNING, ERROR and CRITICAL level by default. How you can change the current logger level by using setLevel() function is shown in the following example. Here, debug and warning messages are printed before and after setting the log level in the script.
example3.py
import logging
#Create and configure logger
logging.basicConfig(format=‘%(message)s’)
#Creating an object
logger=logging.getLogger()
# Print Test messages before setting level
logger.debug("Test debug Message")
logger.warning("Test Warning Message")
# Set the logger level to DEBUG
logger.setLevel(logging.DEBUG)
# Print Test messages after setting level
logger.debug("Test debug Message 2")
logger.warning("Test Warning Message 2")
Run the script from the terminal.
Output:
The first debug message of the script will not print for the default logger level and the second debug message will print for setting the logger level to DEBUG. The following output will appear
after running the script.

Using getEffectiveLevel()
getEffectiveLevel() function is used to retrieve the current log level value. If the current log level is set to NOTSET then the logger object will search the log level of the root logger. If nothing found for root logger, then the log level value of NOTSET will be returned. How you can use getEffectiveLevel() to read the current log level is shown in the following example. Here, this function is called before and after setting the log level.
example4.py
import logging
#Create logger object
logger = logging.getLogger()
#Print the current log level code
print("Current log level code:% d" %(logger.getEffectiveLevel()))
# Set log level to WARNING
logging.basicConfig(level=logging.DEBUG)
#Print the current log level code
print("Current log level code:% d" %(logger.getEffectiveLevel()))
Run the script from the terminal.
Output:
The following output will appear after running the script. The output shows that the default log level is WARNING (30) and the log level is DEBUG(10) after setting the level.

Using isEnabledFor()
isEnabledFor() function is used to check any log level is enabled or disabled currently. The following example will first check the INFO level is enabled or not. INFO and DEBUG levels are not enabled by default. So the output of isEnableFor() function will be false. Next, log level is set to INFO and isEnabledFor() will return true for the last statement.
example5.py
import logging
#Create logger Object
logger = logging.getLogger("MyLog")
#Check the INFO level is enable or not
print ("INFO level is enabled: % s" %(logger.isEnabledFor(logging.INFO)))
# Set log level to INFO
logging.basicConfig(level=logging.INFO)
#Check the INFO level is enable or not
print ("INFO level is enabled: % s" %(logger.isEnabledFor(logging.INFO)))
Run the script from the terminal.
Output:
The following output will appear after running the script.

Using debug()
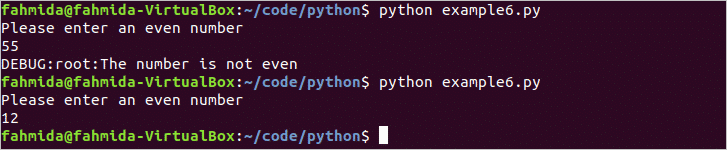
debug() function is used to print detail information after diagnosing problems of the script. The numeric value of DEBUG level is 10 and you have to set this level for making debug() function active. The use of this function is shown by a simple script in the following example. Here, the log level is set to DEBUG to print the debug message. check_even() function is defined to check the input number is even or odd. If the number is not even then the function will issue a debug message otherwise none.
example6.py
import logging
# Set log level to DEBUG
logging.basicConfig(level=logging.DEBUG)
#Declare function to checking number
def check_even(n):
#Check the number is even or not
if n%2 != 0:
#Print debug message
logging.debug("The number is not even")
#Take a number from the user
n=input("Please enter an even numbern")
#Call the function
check_even(int(n))
Run the script from the terminal.
Output:
The script is executed for times with an even number an odd number. When 55 is taken as input then it prints the debug message and when 12 is taken as input then no message is passed.
Using info()
info() function is used to provide a successful or general message to the user for confirming that the code is working properly. The numeric value of INFO level is 20 and you have to set this level before using info() function. The use of this function is shown in the following example. Here, two numeric values are assigned into two variables x and y. A custom function ‘addition’ is declared to calculate the sum of x and y. info() function is used to call the function and print summation result.
example7.py
import logging
# Set log level to INFO
logging.basicConfig(level=logging.INFO)
#Assign two values to x and y
x=30
y=20
#Declare a function named addition
def addition(x, y):
#Add two numbers
return (x+y)
#Print the summation values as info message
logging.info("Sum of % d and %d is % d" %(x, y, addition(x,y)))
Run the script from the terminal.
Output:
Here, no logger object is created. So, the default logger is root and the sum of x and y is 50. The following output will appear after running the script.

Using warning()
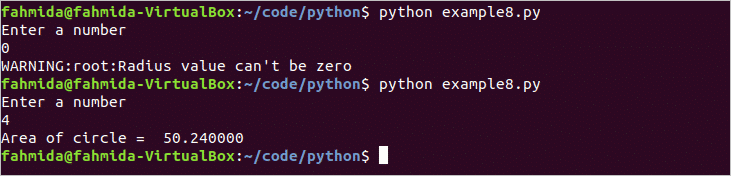
warning() function is used when an unexpected problem occurs or to warn the user for the future problem. The numeric value of WARNING level is 30. warning() function works for the default logger. The use of this function is shown in the following example. Here, the log level is set to WARNING at the beginning of the script. This script will calculate the area of the circle based on taken radius value. If the radius value is zero, then a warning message will print otherwise the area of the circle will print.
example8.py
import logging
# Set log level to INFO
logging.basicConfig(level=logging.WARNING)
#Read the radius value as input
r=input("Enter a numbern")
#Declare a function named
def area(radius):
#Check the radius value
if radius == 0:
#Print warning if the radius is zero
logging.warning("Radius value can’t be zero")
else:
#Calculate the circle area
print("Area of circle = % d" %(3.14*radius**2))
#Call the function
area(int(r))
Run the script from the terminal.
Output:
The script is executed two times in the output with the radius values, 0 and 4. The warning message is printed when the radius value is 0 and the area value is printed when the radius is 4.
Using error()
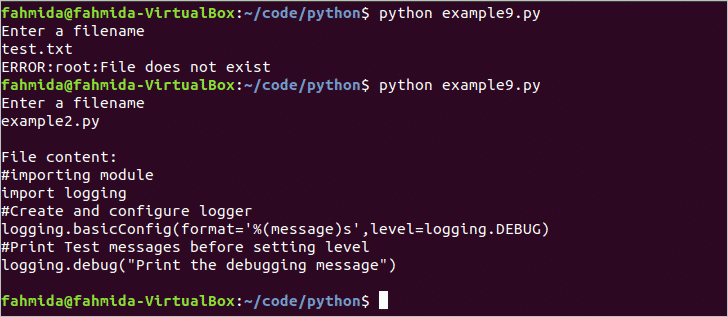
error() function is used when any serious problem exists in the script. The numeric level of ERROR is 40. error() function works for the default logger. The following example shows the use of the error() function. The function of the script is to take an existing filename as input and print the content of the file. os.path module is used to read any file in python. So, this module is imported first. Here, if the filename that will take as input doesn’t exist in the system then the error message will be printed otherwise the content of the file will be printed.
example9.py
import os.path
from os import path
#import logging module
import logging
# Set log level to ERROR
logging.basicConfig(level=logging.ERROR)
#Read the radius value as input
fn=input("Enter a filenamen")
#Declare a function named
def readfile(filename):
#Check the file exist or not
if path.exists(filename) == 0:
#Print error message if the file not exist
logging.error("File does not exist")
else:
#Read and print the file if exist
fh = open(filename, "r")
print("nFile content:n% s" %(fh.read()))
#Call the function
readfile(fn)
Run the script from the terminal.
Output:
The script is executed two times in the following output. For the first time, the filename that is given as input doesn’t exist in the system and the error message is printed. For the second time, the filename that is taken as input exists in the system and the content of the file is printed.
Using critical()
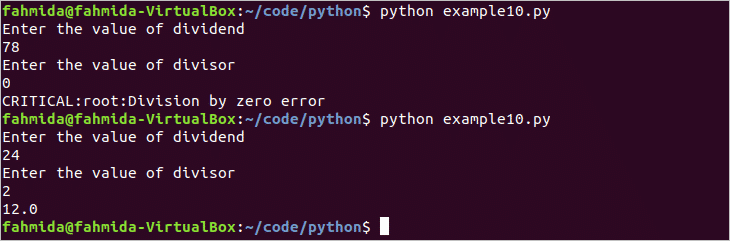
critical() function is also used for indicating the serious problem that may stop the execution of the script. The log level of CRITICAL is 50. critical() function works for the default logger. The use of this function is shown in the following example. Here, two input values will be taken from the user as dividend and divisor. If the divisor value is 0 then a critical error will occur and a critical message will be printed.
example10.py
import logging
# Set log level to CRITICAL
logging.basicConfig(level=logging.CRITICAL)
#Take the dividend value
dividend=int(input("Enter the value of dividendn"))
#Take the divisor value
divisor=int(input("Enter the value of divisorn"))
try:
#Divide the numbers
print(dividend/divisor)
except ZeroDivisionError:
#Print the critical message
logging.critical("Division by zero error")
Run the script from the terminal.
Output:
The script is executed two times in the following output. When 78 and 0 are taken as input then the critical error message is printed. When 24 and 2 are taken as input then 12.0 is printed as output.
output.
Logging to a file
The output of the logging shows in the console by default configuration. But you can store the output of the logging into a file by using the filename argument of basicConfig() function. How you can store logging information into a file is shown in the example. Here, ‘my.log‘ is assigned as filename and stored in the filename argument of basicConfig(). The logging level is set to DEBUG. After running the script, ‘my.log’ file will be created and log messages will be stored in the file.
example11.py
import logging
#Set the log filename
filename = ‘my.log’
#Set the log filename and level
logging.basicConfig(filename=filename,level=logging.DEBUG)
#Print messages to the file
logging.debug(‘Debug message’)
logging.info(‘Info message’)
logging.error(‘Error Message’)
Run the script and view the content of my.log file from the terminal.
$ cat my.log
Output:
The following output will appear after running the script.

Using variable in logging
Any data from the script can be added to the log by using the variable in Python. This example shows how you can pass any python variable in the log message. This following script will take two string inputs from the users as username and password. If the input values match the values mentioned in the script, then it will print an error log message passed with the value of errmsg variable. If the values don’t match, then it will print an info log message with the value of the same variable.
example12.py
import logging
#Create logger
logger = logging.getLogger(‘mylog’)
#Take two input in the variable ‘username’ and ‘password’
username=input("Enter usernamen")
password=input("Enter passwordn")
#Configure logging with format and level
logging.basicConfig(format=‘%(message)s’,level=10)
”’Check the username and password are valid or not. Assign
success message for valid user and error message for the invalid user
into the variable ‘errmsg’. ‘errflag’ variable will set 1 for error
and 0 for success.
”’
if username == ‘fahmida’ and password == ‘secret’:
errflag=0
errmsg = ‘Authentication successful’
else:
errflag=1
errmsg = ‘Authentication failed’
#Print log message based on ‘errflag’
if errflag:
logger.error(‘%s : Invalid user’,errmsg)
else:
logger.info(‘%s : valid user’,errmsg)
Run the script from the terminal.
Output:
The script is executed two times with the valid data and invalid data in the following output. When ‘admin’ and ‘secret’ are passed as username and password which are invalid data then it stored a failure message into the variable, errmsg. When ‘fahmida’ and ‘secret’ are passed as username and password as input which are valid data then a success message is stored in the variable, errmsg. The value of errmsg is printed with the log error message for failure and with the log info message for success.

Using exception()
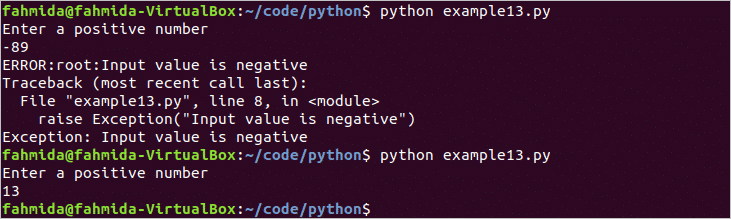
exception() function is used in logging if python script contains exception handler code. It works like error() function of logging. The difference is that exception() function displays the stack trace along with its output. The use of this function is shown in the following example. The following script will take a numeric value as input and raise an exception if the input value is negative. Here, exception() function will print the exception message catch by exception.
example13-py
import logging
#Take an input
number = int(input("Enter a positive numbern"))
try:
#Check the input value is positive or negative
if number < 0 :
raise Exception("Input value is negative")
except Exception as e:
#Print the exception message
logging.exception(e)
Run the script from the terminal.
Output:
When the script is executed with the value -89 that is negative then it has thrown an exception and printed the stack trace and exception output. When the script is executed with the value 13 that is positive, then no message is printed.
Creating handler
Log entries can be handled in different ways by using different handlers. The most commonly used handlers for logging are FileHandler and StreamHandler. FileHandler is used to send the log entries to a file and StreamHandler is used to send the log entries to console. The uses of these handlers are shown in the following example. In this script, DEBUG level is set for FileHandler object and INFO level is set for StreamHandler object. For this, debug and info messages will be stored in the logdata.log file and info message will be print in the console.
example14.py
import logging
#Create logger
logger = logging.getLogger(‘mylog’)
#Set logging level
logger.setLevel(logging.DEBUG)
#Create StreamHandler object
cHandler = logging.StreamHandler()
#Set level for StreamHandler
cHandler.setLevel(logging.INFO)
#Create FileHandler object
fHandler = logging.FileHandler(‘logdata.log’)
#Set level for FileHandler
fHandler.setLevel(logging.DEBUG)
#Add FileHandler object to logger
logger.addHandler(fHandler)
#Add StreanHandler object to logger
logger.addHandler(cHandler)
#Print log messages
logger.debug(‘Print debug message’)
logger.info(‘Print info message’)
Run the script and view the content of ‘logdata.log’ file from the terminal.
$ cat logdata.log
Output:
The following output will appear after running the script.

Using Formatter()
Formatter() function is used to configure the content and structure of log data. How you can use Formatter() function to configure the log data of FileHandler object is shown in the following example. Here, Formatter() is used to format the log data with creation time, logger name and log message. mylog.log file will be created after executing script and the formatted log messages will be stored in the file.
example15.py
import logging
# Create a custom logger
logger = logging.getLogger()
# Create handlers
file_handler = logging.FileHandler(‘mylog.log’)
#Set handler log level
file_handler.setLevel(logging.DEBUG)
# Create formatters
file_format = logging.Formatter(‘%(asctime)s – %(levelname)s – %(message)s’)
#Add formatter to the handler
file_handler.setFormatter(file_format)
#Add handlers to the logger
logger.addHandler(file_handler)
#Print log messages
logger.warning(‘Warning message’)
logger.error(‘Error message’)
Run the script and view the content of ‘logdata.log’ file from the terminal.
$ cat mylog.log
Output:
The following output will appear after running the script.

Using LogRecord.getMessage()
When anything is logged by the logger then LogRecocd object is created automatically. makeRecord() function can be used to create LogRecord object manually. LogRecord object contains many attributes and getMessage() function. When the LogRecord object is created manually then getMessage() returns the message of LogRecord object based on the arguments passed by the user. The following example shows the use of getMessage() function.
Example16.py
import logging
#Create LogRecord object
logrec = logging.LogRecord(‘Mylogger’, 10, ‘/home/fahmida/python/example2.py’, 4,
‘Python Logging Tutorial’, (), None)
#Call getMessage() to print message
print(logrec.getMessage())
Run the script from the terminal.
Output:
The following output will appear after running the script.

Using LogRecord attributes — args
args attribute stores the arguments passed to the LogRecord object. The values of args are merged with msg attribute to produce the value of message attribute when LogRecord object creates automatically. The attribute value of args can be read by creating a LogRecord object manually. In the following example, a LogRecord object named logRecord is created manually by user-defined data and the value of the argument is printed by args attribute.
example17.py
import logging
#Create custom log record
logRecord = logging.LogRecord(‘MyNewLog’,30,‘python/code/example1.py’,6,
‘Python Logging Tutorial’,‘test’,”)
#Print args value
print(logRecord.args)
Run the script from the terminal.
Output:
The following output will appear after running the script.

Using LogRecord attributes — asctime
asctime attribute is used to store the time when any LogRecord creates. It stored the date, time and times in milliseconds after creating any logger object. The following example shows the use of this attribute. The format of this attribute is ‘%(asctime)s’.
example18.py
import logging
#Create logger with name
logger = logging.getLogger(‘mylog’)
#Set the formatting to read ‘asctime’ attribute
lFormat = ‘%(asctime)s’
#Configure logging with format
logging.basicConfig(format=lFormat)
#Print log message
logger.warning(‘It is a warning message’)
Run the script from the terminal.
Output:
The following output will appear after running the script.

Using logRecord attributes — filename
filename attribute is used to retrieve the portion of the filename from the path. The following example shows the use of this attribute. The format of this attribute is ‘%(filename)s’.
example19.py
import logging
#Set the formatting to read ‘message’ and ‘filename’ attributes
lFormat = ‘%(message)s – %(filename)s’
#Configure logging with format
logging.basicConfig(format=lFormat)
#Print log message
logging.error(‘The error message occurred in the file’)
Run the script from the terminal.
Output:
The following output will appear after running the script.

Using logRecord attributes — funcName
funcName attribute is to retrieve the function name from where logging is called. The following example show the use of this attribute. Here, the logger object is created in the function, mylog_func(). The format of this attribute is ‘%(funcName)s’.
example20.py
import logging
#Declare function
def mylog_func():
#Set the formatting to read ‘message’ and ‘funcName’ attributes
lFormat = ‘%(message)s – %(funcName)s’
#Configure logging with format
logging.basicConfig(format=lFormat)
#Print log message
logging.critical(‘The logger is called from the function’)
#Call the function for logging
mylog_func()
Run the script from the terminal.
Output:
The following output will appear after running the script.

Using logRecord attributes — lineno
lineno attribute is used to retrieve the line number from where the logging is called. It will return a numeric value. The following example shows the use of this attribute. The format of this attribute is ‘%(lineno)s’.
example21.py
import logging
#Set the formatting to read ‘message’ and ‘lineno’ attributes
lFormat = ‘%(message)s – %(lineno)d’
#Configure logging with format
logging.basicConfig(format=lFormat,level=20)
#Create logger
logger = logging.getLogger()
#Print log message
logger.info(‘The logging call is issued at lineno’)
Run the script from the terminal.
Output:
The following output will appear after running the script.

Using logRecord attributes — module
module attribute is used to retrieve only the filename without an extension from the file path. The following example shows the use of this attribute. The format of this attribute is ‘%(module)s’.
example22.py
import logging
#Set the formatting to read ‘message’ and ‘module’ attributes
lFormat = ‘%(message)s – %(module)s’
#Configure logging with format and level
logging.basicConfig(format=lFormat,level=logging.INFO)
#Print log message
logging.info(‘The name of the file without extension is’)
Run the script from the terminal.
Output:
The following output will appear after running the script.

Using logRecord attributes — name
name attribute is used to retrieve the logger name that is used in getLogger() function. The following example shows the use of this attribute. The format of this attribute is ‘%(name)s’.
example23.py
import logging
#Set the formatting to read ‘message’ and ‘name’ attributes
lFormat = ‘%(message)s – %(name)s’
#Configure logging with format and level
logging.basicConfig(format=lFormat,level=logging.INFO)
#Set the logger name
logger = logging.getLogger(‘MyLog’)
#Print log message
logger.info(‘The logger name is’)
Run the script from the terminal.
Output:
The following output will appear after running the script.

Using logRecord attributes — pathname
pathname attribute is used to retrieve the path of the file location. The following example shows the use of this attribute. The format of this attribute is ‘%(pathname)s’.
example24.py
import logging
#Set the formatting to read ‘message’ and ‘pathname’ attributes
lFormat = ‘%(message)s : %(pathname)s’
#Configure logging with format and level
logging.basicConfig(format=lFormat,level=logging.INFO)
#Print log message
logging.info(‘File location’)
Run the script from the terminal.
Output:
The following output will appear after running the script.

Using logging.disable
disable() function is used to disable all logging call for the specific level. For example, if it is called with INFO level then all the log messages of INFO, WARNING, ERROR and CRITICAL will be ignored for all loggers. The use of this function is shown in the following example. The warning message is enabled for the default logger. So, the second warning message will not be printed after disabling the WARNING level.
example25.py
import logging
#Create and configure logger
logging.basicConfig(format=‘%(message)s’)
#Creating an object
logger=logging.getLogger()
# Print Test messages before disabling
logger.warning("Test warning message 1")
logging.disable(logging.WARNING)
logger.warning("Test warning Message 2")
Run the script from the terminal.
Output:
The following output will appear after running the script.

Conclusion
Logging information helps the coder to identify the various problems of the code and solve the issue quickly. The python programmer must learn python logging options to make their code more appropriate. The basic uses of python logging are shown in this article by using 25 different examples. I hope this article will help the readers to apply to log data in their python code properly.