Cách gắn set proxy cho điện thoại android, oppo, giả lập android, Ldplayer Bằng Proxydroid

20/09/2023

HƯỚNG DẪN SỬ DỤNG PROXY TRÊN GIẢ LẬP BẰNG ỨNG DỤNG PROXYDROID

Hôm nay, chúng ta sẽ cùng tìm hiểu cách sử dụng Proxy trên giả lập bằng ứng dụng ProxyDroid. Viêc này sẽ giúp bạn bảo mật thông tin khi truy cập Internet tốt hơn. Mời bạn tham khảo bài viết!

CÁC KHÁI NIỆM CƠ BẢN

PROXY LÀ GÌ?

Proxy là cổng trung gian giữa thiết bị (điện thoại/máy tính) và internet. Khi dùng Proxy, địa chỉ IP sẽ được thay đổi. Nhờ đó, truy cập mạng của bạn sẽ tăng tính bảo mật.

Proxy còn mang đến rất nhiều lợi ích, như:

  • Hỗ trợ doanh nghiệp quản lý nhân viên. Nhiều doanh nghiệp sẽ chặn một số trang web như Facebook,.. để nhân viên tập trung làm việc
  • Là công cụ thúc đẩy bán hàng online hiệu quả. Proxy sẽ tạo uy tín và tăng tương tác cho nhà bán hàng
  • Tăng tốc độ SEO, marketing. Bằng cách fake IP, chúng ta có thể dùng proxy nuôi tài khoản Facebook, Tiktok, Instagram, hàng loạt,…
  • Sử dụng internet an toàn, tránh bị xâm nhập, lộ thông tin cá nhân
  • Dễ dàng vào các trang web bị chặn IP nước ngoài

TÌM HIỂU ỨNG DỤNG PROXYDROID

ProxyDroid là một ứng dụng trên điện thoại. Nó giúp bạn cài đặt, thiết lập Proxy điện thoại Android.

Để sử dụng Proxy trên giả lập, trước tiên, bạn tải ứng dụng LDPlayer về máy tính. (LDPlayer là phần mềm giả lập Android. Phần mềm này cho phép chạy game, ứng dụng Android trên máy tính).

Xem thêm: MUA PROXY Ở ĐÂU ĐẢM BẢO TỐC ĐỘ VÀ GIÁ THÀNH PHẢI CHĂNG?

HƯỚNG DẪN SỬ DỤNG PROXY TRÊN  ANDROID

Hướng dẫn tải và cài đặt ứng dựng Proxydroid để fake ip trên giả lập android

Để cài ứng dụng này trên giả lập Android, chúng ta có 2 cách.

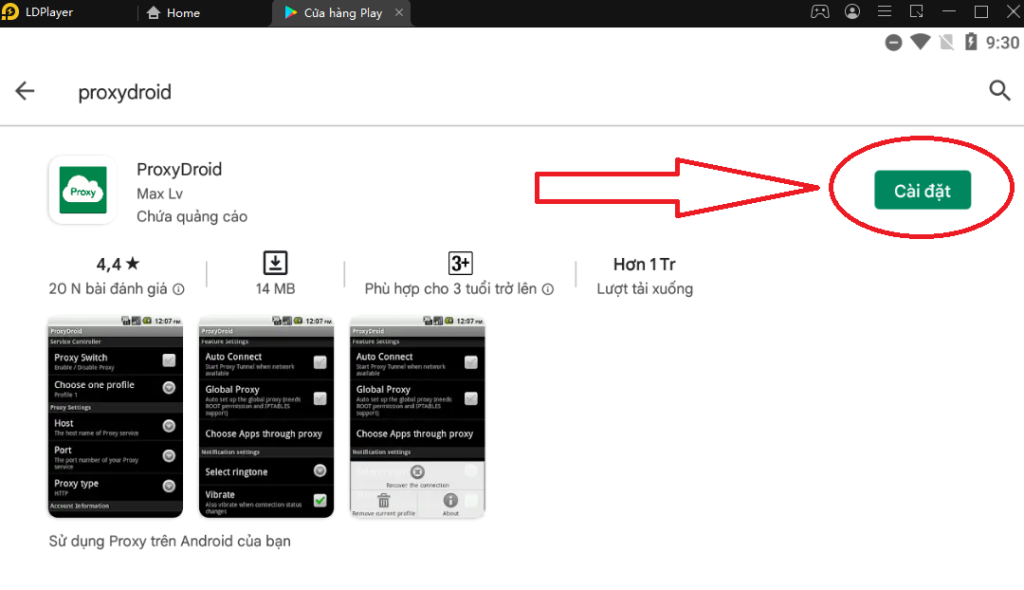
Cách Một là đăng nhập tài khoản google vào CHPlay trên giả lập android, sau đó tìm kiếm app ProxyDroid như hình dưới nhé

Fake ip chơi game trên giả lập android

Sau khi tìm kiếm chúng ta tiến hành chọn app và cài đặt nó theo hình dưới nhé

Cách hai là tải trực tiếp file APK và cài luôn. Các bạn hãy vào link TẢI VỀ

Sau khi tải về, các bạn copy file apk vừa tải về đó và pass và giả lạp. Hệ thống tự động cài cho bạn xài luôn nhé

Hướng dẫn sử dụng ứng dụng ProxyDroid

Sau khi cài xong, bạn mở ứng dụng lên nhé

Fake ip chơi game trên giả lập android

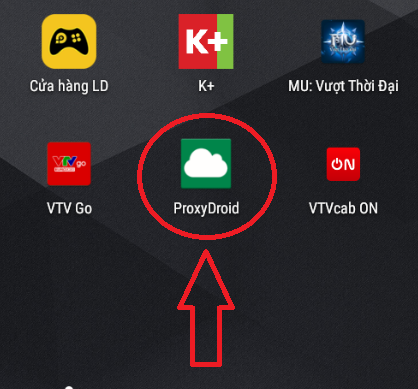
Sau khi mở lên bạn chọn như hình dưới đây nhé

Sau đó bạn điền thông tin theo các ô chúng tôi có đánh dấu nhé

Fake ip chơi game trên giả lập android

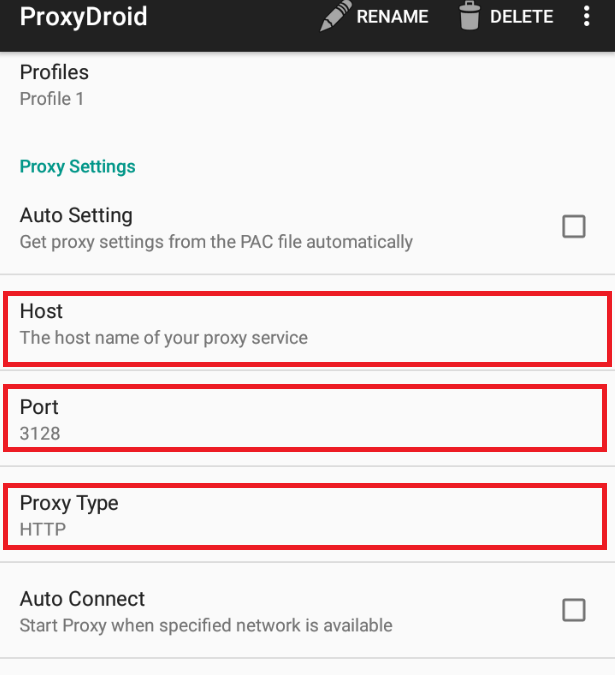
Lưu ý: Khi sử dụng bạn cần phải mở app này và tắt các ứng dựng fake ip khác đang cài trên giả lập bạn nhé


Bước 5:

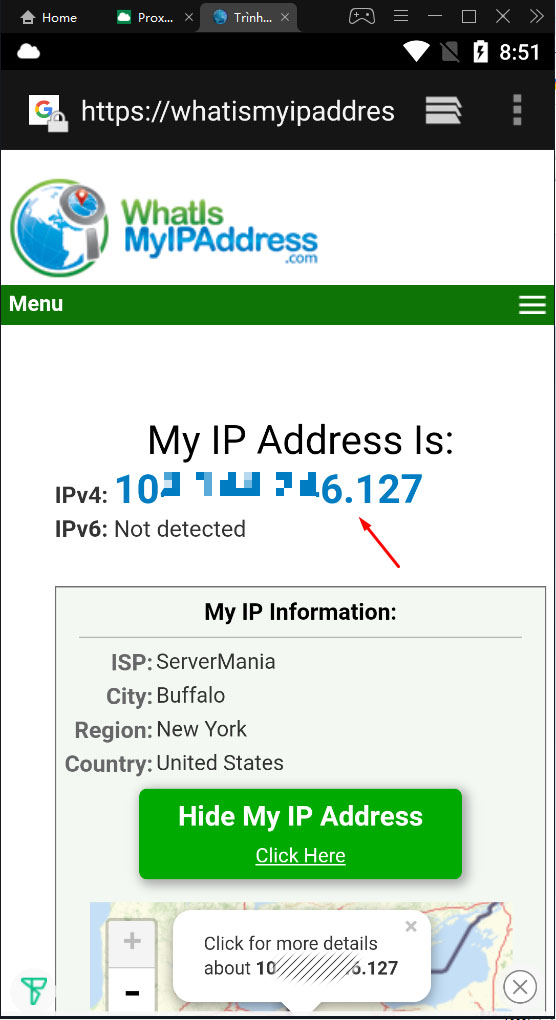
Bạn truy cập vào địa chỉ https://www.whatismyipaddress.com/ để kiểm tra xem phần mềm đã thiết lập sử dụng proxy trên giả lập thành công hay chưa.

Cuối cùng, kiểm tra xem địa chỉ IP đó có giống với IP bạn đã thiết lập hay không.

check IP để sử dụng proxy trên giả lập

Sau khi thiết lập xong, bạn có thể sử dụng proxy trên giả lập để truy cập mạng Internet và sử dụng bình thường.

Chúc bạn cài đặt thành công!

Hướng dẫn mua proxy, mua socks5 giá rẻ để Fake ip chơi game trên giả lập android

Hiện nay có rất nhiều trang bán proxy và socks5. Chúng tôi với kinh nghiệm 5 năm kinh doanh trong nghề. Hiện chúng tôi cũng được đánh giá khá cao trên các trang tin chính thống, các diễn đàn và hội nhóm. Nên các bạn có thể yên tâm về chất lượng proxy/socks5 mà chúng tôi cung cấp nhé. Chúng tôi chỉ cung cấp proxy/socks ipv4, ip dùng riêng(private), ip tĩnh và có thể gia hạn được bạn nhé.

Mọi thông tin chi tiết các bạn có thể liên hệ với chúng tôi thông qua các kênh thông tin liên hệ dưới đây nhé.

ONET IDC thành lập vào năm 2012, là công ty chuyên nghiệp tại Việt Nam trong lĩnh vực cung cấp dịch vụ Hosting, VPS, máy chủ vật lý, dịch vụ Firewall Anti DDoS, SSL… Với 10 năm xây dựng và phát triển, ứng dụng nhiều công nghệ hiện đại, ONET IDC đã giúp hàng ngàn khách hàng tin tưởng lựa chọn, mang lại sự ổn định tuyệt đối cho website của khách hàng để thúc đẩy việc kinh doanh đạt được hiệu quả và thành công.
Bài viết liên quan

XZ Compression Tutorial

Many built-in command-line compression tools are available in Linux operating system. XZ is one of the popular data compression tools that works like any other standard compression tools, such as gzip, bzip2 etc. XZ command compresses and decompresses the file which is mentioned in the command with XZ. If any file name is not mentioned in the XZ command then the command reads data from standard input and after processing the data, write the data in standard output. XZ can compress or decompress one or more files at a time. Normally it removes the original file after compression and removes decompressed file after decompression. You can keep both compressed and uncompressed files by using some options. How you can use XZ command for compressing and decompressing file is shown in this tutorial. Run the following command to find out the options of XZ command. $ xz –help Select some files that you want to test xz command. Here, the files of myDir folder are used for compressing and decompressing with xz command. Run ls -l command to show the list of files with detail information. $ ls -l Compress single file You can compress any simple file by giving the file name with xz command. After compression, xz command deletes the original file. Here, b1.sh file is compressed and created the compressed file named b1.sh.xz. $ xz b1.sh $ ls -l Compress multiple files You can compress multiple files using xz command by separating each file with space. Here, two compressed files, loop2.sh.xz and myfile.txt.xz are created after deleting loop2.sh and myfile.txt. $ xz loop2.sh myfile.txt $ ls -l Compress file by keeping original file If you want to keep original file with compress file then run xz command with –k option. Here, comment2.sh.xz file is created without removing comment3.sh file. $ xz -k comment3.sh $ ls -l Decompress file Like compression, when you decompress any file with xz command then it delete decompressed file after decompression.  Here, b1.sh file is created after decompressing b1.sh.xz file. –d option is used with xz command to decompress any compressed file. $ xz -d b1.sh.xz $ ls -l Decompress file by keeping compressed file You have to use –k option with unxz command to keep the decompressed file with original file after decompression. After running the following command, loop2.sh.xz file will not be removed. $ unxz -k loop2.sh.xz $ ls -l Compress multiple file in a single file If you want to create single compression file for multiple files then you need to use –c option. The following command will create new.xz compressed file after compressing b1.sh and FirstJava.class files. $ xz -c b1.sh FirstJava.class > new.xz $ ls -l Retrieve information of compressed file You can retrieve information of any compressed file by using –l option. Here, new.xz file is created by compressing two files. The following information shows that the original size of both files is 604 bytes and after compression the size is 548 bytes.  You can decompress this file by using previous decompression options. $ xz -l new.xz One of the major limitation of xz compression tool is that it can compress file only. You can’t compress any folder by using xz. This tool can’t also be used for creating password protected compressed file. There are other tools on Linux to create password protected compressed file. One of them is rar package. You can easily install trial version of rar package on Linux to create and open archive files. You can read the tutorial on rar package from the following link. ...
29/12/2020

Vimrc Tutorial

In this article, we’re going to dive deep into the vimrc file of Vim. Once you’re inside the vimscript, it’s easy to mess things up. That’s why this rule of thumb will always be helpful in your journey with Vim. Don’t put any line in vimrc that you don’t understand. Vimrc location There are two places where the vimrc is situated. System vimrc: /etc/vimrc User vimrc: ~/.vimrc Vim reads both of them when launching and modifies the environment accordingly. The system vimrc file forces the Vim configuration for all the users in the system. That’s why it’s never a good practice to use the system vimrc for any changes UNLESS it’s necessary. For all sorts of purpose, use the user vimrc. It’s the safest way to play around and customize whenever you feel like it. A matter of fact – most of the advanced Vim users use the user vimrc for modifying Vim behavior on the go. Vimrc syntax As mentioned earlier, vimrc is nothing more than a script powered by vimscript. If you’re interested in vimscript, there are tons of tutorials all over the internet. At first, create a vimrc file at the home directory. touch ~/.vimrc Next up, open the file with the help of Vim. vim .vimrc Or, inside Vim, use the following command. :e ~/.vimrc Vim syntax highlighting I prefer having this option at the very first on my vimrc file. syntax on Want some cool-looking color schemes? Vim offers some preinstalled color scheme. Check out all the available color schemes of Vim. ls /usr/share/vim/vim81/syntax | grep .vim To enable a syntax highlighting by default, declare it in vimrc. colorscheme <colorscheme> Tabs and spaces Proper indentation is really important for any text editing, especially with programming. As a matter of fact, a big chunk of Vim users uses this editor for programming purposes. Python heavily depends on proper indentation. Bash scripts also require precise indentation. So, you want to have a proper indentation system to set your code in the right path. Set the size of the Tab. Note that this option will only change the visual appearance of Tab, not the actual character. set tabstop=4 Here, the size of per Tab will be equal to 4 spaces. Don’t forget to set the number of effective tabs when you’re editing. Essentially, Vim will insert 4 spaces when you hit <TAB>. set softtabstop=4 When you’re navigating through <TAB> space, the cursor will jump from one end to another. If you want to turn the <TAB> space into normal spaces, use the following one. set expandtab At this point, <TAB> is effectively a shortcut for telling Vim to “insert 4 spaces” where the cursor is. UI tweaks Here are some awesome tweaks to elevate your Vim sessions to another level. At first, line number. It doesn’t sound like much but line number can help easier navigation through the text file, especially in programming when you’re debugging a program. set number When working with Vim, there’ll be the necessity of running a multitude of commands. Sometimes, some plugin disables this feature. The following one will show the command in the bottom bar, no matter what. set showcmd Puzzled where your cursor is? Use this command for highlighting the line where the cursor is. set cursorline The next declaration enables Vim to identify specific file types and load the filetype-specific indent files. filetype indent on Who doesn’t love autocompletion? It makes life a LOT easier, especially when you’re in need of running a lot of commands. Vim happens to be heavily dependent on various commands. Why not have the autocomplete menu? set wildmenu Vim loves redrawing the screen, especially during things it shouldn’t, for example, when running a macro. The next option will tell Vim not to bother redrawing the screen during those important tasks, leading to a smoother and faster macros. set lazyredraw If you’re programming, there will be a LOT of brackets, right? Major IDEs highlight the matching brackets for easier coding. Vim can also do that by default. Just tell Vim to behave that way. set showmatch Searching Searching is one of the basic functions that we need to use on a regular basis. Vim offers one of the finest ways of searching within a text file. To improve your search experience, add these into your vimrc file. set incsearch set hlsearch The first option is to start highlighting as soon as you start typing for search. The next option tells Vim to highlight the search results. Once you search, Vim keeps the highlight for the rest of the session unless you enter “:noh” or “:nohlsearch”. How about binding this function with a key combo? nnoremap <leader><space> :nohlsearch<CR> This binds the command “:nohlsearch” with ,<spacebar> combo. Folding This one greatly improves the quality of life for programmers. It allows folding code blocks for easier navigation through the code. set foldenable The next option is to open most folds by default. set foldlevelstart=10 If the value is set to 0, then all the folds would be closed. For value 99, all the folds would be open. So, 10 ensures that only heavily nested blocks are folded. It would be nice to have a shortcut for opening/closing folds, right? Let’s bind it to the spacebar. nnoremap <space> za This next option tells Vim to fold based on indentation. For Python programmers, this is like a blessing. set foldmethod=indent There are other values for the “foldmethod” variable: syntax, diff, manual, marker, expr etc. For further information on these, consult the Vim help. :help foldmethod Movement If you’re using Vim, I assume that you’re already familiar with the basic cursor movement. In this section, we’ll just check out some useful key binding to lessen the work. nnoremap j gj nnoremap k gk These 2 lines enable to move around visually. Traditionally, if there would a very big line, you would have to go right/left to reach the desired location. Now, the long line will be visually wrapped. “j” will no longer skip the “fake” part of the visual line. Plugin manager This is the core of my daily Vim experience. The world of Vim is so much colorful, thanks to the solid pathway for Vim plugin development. Vim has been around for more than a decade. With such a long time at hand, Vim plugin ecosystem is extremely mature, stable and reliable. The popularity of Vim plugins is so widespread that there need to be even plugin managers to properly manage them! In this tutorial, I’ll be showing the installation and configuration of Vundle on vimrc. If you’re not familiar with Vim plugin or want further information, check out the usage of Vim plugin. Git is essential if you’re interested in Vundle and other Vim plugins. Install Git in your system. Now, set Vundle in your system. git clone https://github.com/VundleVim/Vundle.vim.git ~/.vim/bundle/Vundle.vim It’s time to make the vimrc tweaks to enable Vundle and other plugins. set nocompatible filetype off set rtp+=~/.vim/bundle/Vundle.vim These are required by Vundle to operate properly. Now, it’s time to put some plugins. There are numerous Vim plugins out there. Use Vim Awesome to find out your favorite one. call vundle#begin() call vundle#end() filetype plugin indent on Saving vimrc Once you’re complete, save the vimrc file, reload Vim and you’re good to go! :w :so % Comments If you followed the entire guide, you’ll notice that there are plenty of commenting out there. While comments are really not necessary for a vimrc file, it can actually benefit the user in properly maintaining the script. If you come to your vimrc after a couple of months and forget what these codes are for, you’re in big trouble. Commenting helps to keep everything together with proper documentation and hints. “ <type something> Final thoughts These are just some simplistic Vim enhancements. There are plenty of ways you can customize Vim in your own way. Just make sure not to put any line in your vimrc that you don’t understand. Enjoy! ...
29/12/2020

Notepad++ Alternatives For Linux

This article aims to introduce you to some of the most popular Notepad++ alternatives for Linux including the installation, basic features and functions. Nano textmode Notepad++ Alternative for Linux Nano is probably the most user friendly text processor for terminal. It comes included by default in most popular Linux distributions. To create a text file just invoke nano and the file name like in the following example: # nano <filename> Some of Nano functions include: CTRL + G or F1 = get help. CTRL + X or F2 = save file and exit. CTRL + O or F3 = Write out. CTRL + W or F6 = Find a specific string or specific text in the file. CTRL + K or F9 = cut current line. CTRL + C  = Cancel the operation.  vim textmode Notepad++ Alternative for Linux Vim is the evolution of the old vi text editor for terminal, it isn’t as user friendly as nano. Despite being among the most popular text editors together with Nano, Vim doesn’t come by default on distributions like Debian. To install it as root or invoking sudo run: # apt install vim -y For a fast view you can run it: # vim As you see the initial screen tells you :q + ENTER is required to exit. In case you need help you can type :q + ENTER. To save and exit you can press :wq and to exit without asking confirmation :q!. Emacs GUI Notepad++ Alternative for Linux Emacs is a text editor for GUI based on key bindings, it is fully customizable, and is a great tool oriented to avoid the mouse while writing on a GUI. It has specific features for programming such as: Content-aware editing modes, including syntax coloring, for many file types. Complete built-in documentation, including a tutorial for new users. Full Unicode support for nearly all human scripts. Highly customizable, using Emacs Lisp code or a graphical interface. A packaging system for downloading and installing An entire ecosystem of functionality beyond text editing, including a project planner, mail and news reader, debugger interface, calendar, and more. Source: https://www.gnu.org/software/emacs/ Despite leading the market together with the most popular text editors Nano and vim, emacs doesn’t come by default on distributions like Debian. To install it as root or invoking sudo run: # apt install emacs -y You can run emacs both from your apps menu or from terminal: The initial screen will show a tutorial for new users to get started: You can access some Emacs video tutorials by LinuxHint at: How to Install EMACS on Ubuntu Emacs Themes Emacs Commands, One by One Tutorial Gedit GUI Notepad++ Alternative for Linux Gedit is GNOME’s text editor, it comes by default with GNOME. Gedit text editor Features: Full support for internationalized text (UTF-8) Configurable syntax highlighting for various languages (C, C++, Java, HTML, XML, Python, Perl and many others) Undo/Redo Editing files from remote locations File reverting Print and print preview support Clipboard support (cut/copy/paste) Search and replace with support of regular expressions Go to specific line Auto indentation Text wrapping Line numbers Right margin Current line highlighting Bracket matching Backup files Configurable fonts and colors A complete online user manual A flexible plugin system which can be used to dynamically add new advanced features Source: https://wiki.gnome.org/Apps/Gedit. Atom GUI Notepad++ Alternative for Linux  Atom is a text and code editor developed by GitHub and available for Linux, mac and Windows, it supports plugins to add functionalities. To begin download your package from https://atom.io/. Debian and Debian based users must download the .deb while Red Hat based distributions the .rpm package. Save the package into your pc. To install Atom on Debian run: Note: the following instructions include a dependency error due library libgconf-2-4 and the troubleshooting process: # dpkg -i <package> In this case: # dpkg -i atom-amd64.deb If you got a similar error due dependencies, run: # apt install -f After installing dependencies run the dpkg command again to install Atom: # sudo dpkg -i atom-amd64.deb Geany GUI Notepad++ Alternative for Linux Geany is another text and code editor supporting over 50 programming languages, it also supports plugins to add functionalities and support many file types. Geany doesn’t come included in Debian by default but it is available in the repositories, to install it just run: # apt install geany -y Once installed Geany can be launched from the apps menu: Geany default view: Geany features include: Syntax highlighting Code folding Symbol name auto-completion Construct completion/snippets Auto-closing of XML and HTML tags Call tips Many supported filetypes including C, Java, PHP, HTML, Python, Perl, Pascal (full list) Symbol lists Code navigation Build system to compile and execute your code Simple project management Plugin interface (see Plugins) Source: https://www.geany.org/about/geany/. I hope you found this brief article on Notepad++ Alternatives for Linux useful. Related articles Configuring Nano Text Editor with nanorc Vim vs Emacs: Detailed Comparison Emacs Org Mode, Part 1 Installing Atom Text Editor on Debian 10 Working with JSON Documents in ATOM editor Color Picker in Atom Editor Best Text Editors for Ubuntu ...
29/12/2020
Bài Viết

Bài Viết Mới Cập Nhật

SỰ KHÁC BIỆT GIỮA RESIDENTIAL PROXY VÀ PROXY DATACENTER
17/02/2024

Mua Proxy v6 US Private chạy PRE, Face, Insta, Gmail
07/01/2024

Mua shadowsocks và hướng dẫn sữ dụng trên window
05/01/2024

Tại sao Proxy Socks lại được ưa chuộng hơn Proxy HTTP?
04/01/2024

Mua thuê proxy v4 nuôi zalo chất lượng cao, kinh nghiệm tránh quét tài khoản zalo
02/01/2024