Anaconda is a distribution of the Python programming language, which is used by data scientists all over the world. Anaconda python also includes an environment manager and a package manager. All of this is free of charge because Anaconda Python is an open source project.
If you’re interested in Anaconda Python and would like try it out, or use it on Ubuntu 17.10 Artful Aardvark, you can do so very easily. This is what this article is about. I am going to show you step by step how to install and configure Anaconda Python on Ubuntu 17.10 Artful Aardvark. Let’s get started.
Downloading Anaconda Python
To download the Anaconda Python, go to https://www.anaconda.com , the official website of Anaconda Python.

Click on the green “Download” button on the top right corner, it will take you to the download page. Scroll down a little bit and select Linux. By default, Linux should be selected if you’re using Ubuntu or any other Linux distribution.

As of this writing, the latest version of Anaconda is 5.01 and you can download Python 3.6 or Python 2.7. I will go for Python 3.6 version of Anaconda 5.01. Anaconda is available for 32bit or 64bit operating systems. If you click on “Download”, the correct installer should be downloaded. If you want to be extra sure, just click on the 64bit or 32bit download links below the “Download” button. It’s a pretty big file. Wait till the file is downloaded.
Installing Anaconda Python
To install Anaconda Python, go to the directory where you downloaded Anaconda Python and run the following commands from the terminal:
“cd ~/Downloads”
“sudo bash Anaconda3-5.0.1-Linux-x86_64.sh”

Once you press <Enter>, you should see something like this:

Press <Enter> again and you should see this license agreement window. Keep pressing <Enter> or <SpaceBar> to go forward.

Once you see the following prompt, stop pressing <Enter> or <Space> and type in ‘yes’ and press <Enter>

Then Anaconda Python will ask you for a location where it will be installed. A good option Is ‘/opt/anaconda3’, but you can leave it as it is if you like. I will just go with the default.
Once you press <Enter>, the installation should begin. Wait a few minutes for it to complete.

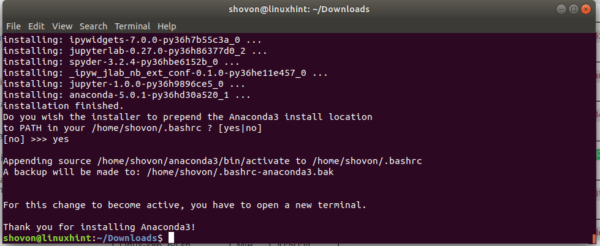
Once the installation is complete, it should ask you whether it should add the path of your Anaconda Python to the PATH environment variable in your .bashrc file. Type in ‘yes’ and press <Enter>

At this point the installation is complete. You should see the following window.
Now close your terminal and open another terminal (Ctrl+Alt+T on Ubuntu). Then can verify your installation by running the following command:
“conda –version”

So Anaconda Python is installed and working correctly on Ubuntu 17.10. Even though it’s tested on Ubuntu 17.10, it should work the same way on other Linux distributions. Thanks for reading this article.