Change Swap Size in Ubuntu

29/12/2020
In the case of Linux, the swap file is an important part. It’s not a must-have option but having one is crucial for a number of purposes. Generally, when installing the system, you have to declare the size of the swap file. The recommended size is 4GB but you can either decrease or increase it depending on your demand. Today, let’s have a look at changing the swap size in Ubuntu.

Note – Running all these commands require root privilege, so I recommend running a “root” terminal.

sudo -s

Finding out available swap file(s)

Before we get to change the swap, let’s find out how much swap size we have.

swapon -s

According to the result, the system has a swap file at “/swapfile”.

For manipulating the swap file, we have to disable it first.

swapoff -a

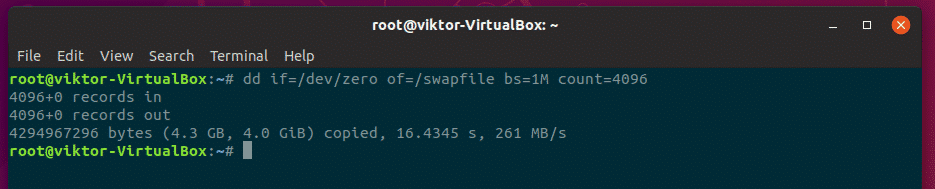
Now, change the size of the swap file –

dd if=/dev/zero of=/swapfile bs=1M count=4096

Here, the total size of the swap file will be bs*count = 1M x 4096 = 4GB

Make the “/swapfile” usable again –

mkswap /swapfile

Turn on the swapfile –

swapon /swapfile

After restarting your system, check out the result –

swapon -s

Deleting the swap file

If your RAM space is high enough, then you probably want to get rid of the swap file. If that’s your case, then let’s get rid of the swap file!

Don’t worry! I’ll also show you how to set a completely fresh swap file.

For deleting the swap file, run the following commands –

swapoff -v /swapfile

Remove the swap file entry from “/etc/fstab” file. It should be the last line of the file.

gedit /etc/fstab

Now, time to remove the actual swap file.

rm -v /swapfile

Don’t forget to restart your system!

For getting back the swap file, use the following commands –

dd if=/dev/zero of=/swapfile bs=1M count=4096

# Adding permission where only root user can read the swap file

chmod 600 /swapfile

# Setup the file for swap space

mkswap /swapfile

swapon -v /swapfile

Edit the “/etc/fstab” file and add the following line at the end of the file –

/swapfile swap swap defaults 0 0

Restart your system.

Voila! Your swap file is back!

What if you had a swap partition? You have to perform actions on the partition itself. That’s more troublesome than just simply managing your swap files directly using the methods above, right?

I recommend deleting the “swap” partition and use the above method to create a new swap file.

ONET IDC thành lập vào năm 2012, là công ty chuyên nghiệp tại Việt Nam trong lĩnh vực cung cấp dịch vụ Hosting, VPS, máy chủ vật lý, dịch vụ Firewall Anti DDoS, SSL… Với 10 năm xây dựng và phát triển, ứng dụng nhiều công nghệ hiện đại, ONET IDC đã giúp hàng ngàn khách hàng tin tưởng lựa chọn, mang lại sự ổn định tuyệt đối cho website của khách hàng để thúc đẩy việc kinh doanh đạt được hiệu quả và thành công.
Bài viết liên quan

How to Install DEB Packages on Ubuntu

The package files of Ubuntu have the extension .deb and it’s also called DEB files. On Ubuntu, there are many ways to...
29/12/2020

How to Install a .deb File on Ubuntu

Different software of Linux used to be distributed as only source code many years ago. We had to compile the software from...
29/12/2020

Transform Your Ubuntu GNOME Desktop – Install OpenBox Ubuntu

In this guide, you will get to see how to install Openbox on Ubuntu so you can transform your Ubuntu 17.04 GNOME desktop...
12/02/2020
Bài Viết

Bài Viết Mới Cập Nhật

VPS treo game là gì? Thuê VPS treo game giá rẻ, không lo giật lag
02/06/2025

 BitBrowser – Best Anti-Detect Browser!
26/05/2025

Dịch Vụ Xây Dựng Hệ Thống Peering Với Internet Exchange (IXP)
04/04/2025

Dịch Vụ Triển Khai VPN Site-to-Site & Remote Access
04/04/2025

Dịch Vụ Thiết Lập Hệ Thống Tường Lửa (Firewall)
04/04/2025