How to Change Screen Resolution on Ubuntu

29/12/2020
Screen resolution is an important factor in enjoying your system. For allowing us, humans, to perform tasks, we have to have a way to interact with the machine. Monitors are almost the most important parts of the I/O framework. Each monitor has a specific resolution. When your system sends the output to the screen, your monitor stretches the image to fit the screen. If your system sends the right resolution of frames, then your monitor will provide the best display output. Otherwise, you’ll see clutters and/or lags; simply put, your system won’t be usable at all.  Let’s check out changing your screen resolution on Ubuntu – one of the most popular Linux distros of all!

Changing the resolution

Before changing the resolution, make sure that your system contains all the latest graphics driver. Get the latest driver of NVIDIA, AMD or Intel.

Go to GNOME menu.

Search for “resolution”.

Open “Displays” from “Settings” section.

Here, you’ll have the option of changing the resolution.

Click on the “Resolution” section.

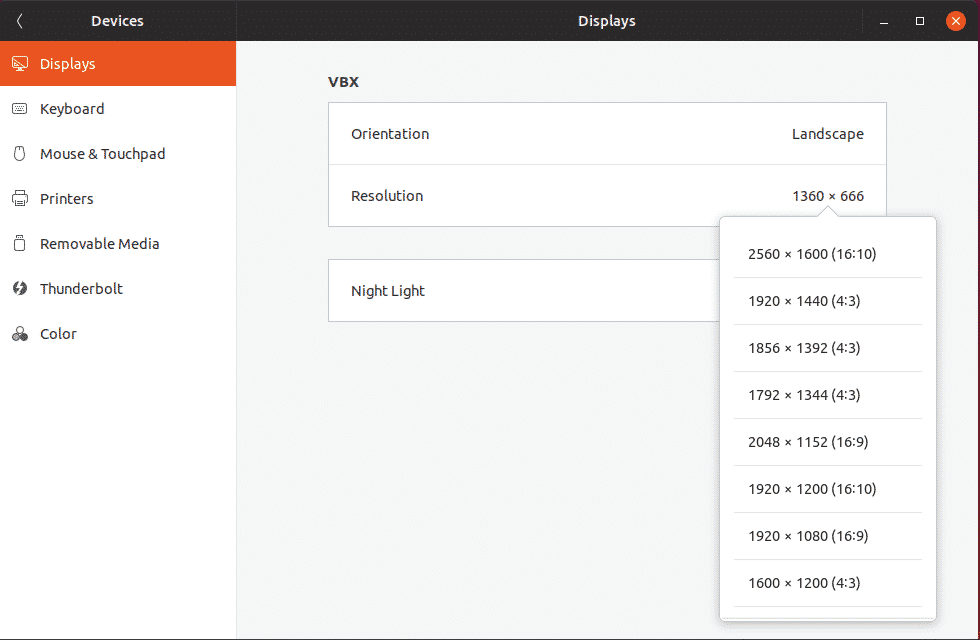
There are a number of available resolutions. By default, the present one should be your system’s resolution. Here are some of the most popular screen resolutions with their acronyms.

  • Standard HD (720p) – 1280 × 720 px
  • HD (1080p) – 1920 x 1080 px
  • Quad HD (1440p) – 2560 x 1440 px
  • 4K – 3480 x 2160 px

Once you’ve selected the option, you’ll notice the “Apply” button on the top-right corner of the window.

After applying the option, the system will wait for 15 seconds for your surety to change the resolution. If you don’t decide to change, the system will revert back to the default resolution again. Sometimes, you may have chosen a wrong resolution with the revert option way out of the screen. In that case, the countdown can save you a lot of trouble.

After applying the resolution, it’s better to restart your system for letting all the apps to adjust to the new resolution.

ONET IDC thành lập vào năm 2012, là công ty chuyên nghiệp tại Việt Nam trong lĩnh vực cung cấp dịch vụ Hosting, VPS, máy chủ vật lý, dịch vụ Firewall Anti DDoS, SSL… Với 10 năm xây dựng và phát triển, ứng dụng nhiều công nghệ hiện đại, ONET IDC đã giúp hàng ngàn khách hàng tin tưởng lựa chọn, mang lại sự ổn định tuyệt đối cho website của khách hàng để thúc đẩy việc kinh doanh đạt được hiệu quả và thành công.
Bài viết liên quan

Install and Get Started with PowerShell on Ubuntu

PowerShell is a task based configuration tool used for automation and configuration of Windows operating system. It is...
29/12/2020

Hướng dẫn hack băng thông 4G Viettell bằng Cách tạo Server V2ray Dùng Data 4G miễn phí

V2ray là gì? V2ray là một phần mềm giúp bạn tạo ra khả năng kết nối mạng riêng tư dựa vào cách...
27/05/2021

How to install Qt 5.9.1 (Qt Creator 4.3.1 included) on Ubuntu 17.04

Qt 5.9.1 the most recent release, is a cross-platform application framework that is widely used for developing apps with...
28/12/2020
Bài Viết

Bài Viết Mới Cập Nhật

Điều khoản dịch vụ” (Terms of Service)
05/07/2025

Hướng dẫn fake ip bằng phần mềm SStap
10/06/2025

VPS treo game là gì? Thuê VPS treo game giá rẻ, không lo giật lag
02/06/2025

 BitBrowser – Best Anti-Detect Browser!
26/05/2025

Dịch Vụ Xây Dựng Hệ Thống Peering Với Internet Exchange (IXP)
04/04/2025