
Fig 1: Apache IP based VirtualHost.
Name Based VirtualHost: In name based VirtualHost, an Apache server has a single IP address and multiple domain names configured for each website. In a DNS server, each of these domain names are assigned the IP address of the Apache server. Depending on what domain name the client used, the server returns different websites.

Fig 2: Apache name based VirtualHost.
In this article, I am going to show you how to configure the Apache name based VirtualHost. I will be using Ubuntu 18.04 LTS for the demonstration. But it should work on any modern Linux distribution with little to no change. So, let’s get started.
Installing Apache 2 Web Server:
Apache 2 web server is available in the official package repository of Ubuntu 18.04 LTS. So, you can easily install it with the APT package manager.
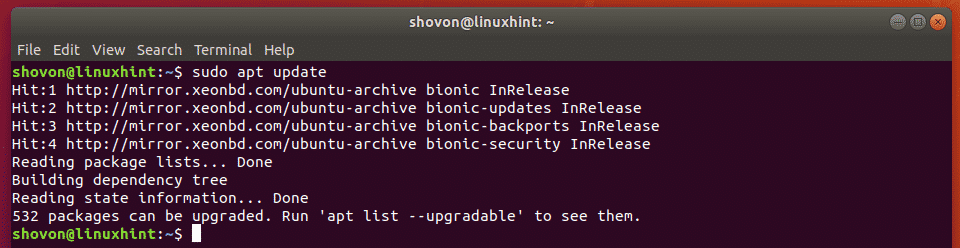
First, update the APT package repository cache with the following command:
Now, run the following command to install Apache 2 web server:

Now, press y and then press <Enter> to continue.
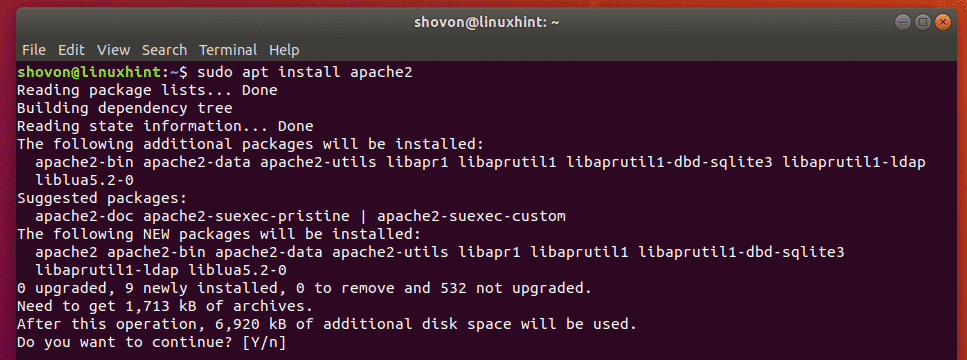
Apache 2 web server should be installed.

Configuring DNS:
Now, you have to configure the DNS server to map the domain names that you want to use for VirtualHost to the IP address of your Apache server.
You can find the IP address of your Apache server with the following command:
As you can see, the IP address in my case is 192.168.21.166. It will be different for you. So, make sure to replace it with yours from now on.

If you want to learn how to configure Apache VirtualHost locally, then you can use the /etc/hosts file for local DNS/name resolution.
To configure local DNS resolution, open the /etc/hosts file with nano as follows:

Now, add the line as marked in the screenshot below to the file. Then press <Ctrl> + x followed by y and <Enter> to save the file.

Now, local name resolution should work.
Directory Structures:
I want to keep all the website data of my Apache VirtualHost in a specific directory /www. Here, I want to create a directory for each user. Each user will have his/her own public_html/ and logs/ directory as well.
For example, for 3 users bob (example1.com), alice (example2.com), linda (example3.com), the directory structure is as follows:
– example1.com/
– www/
– public_html/
– index.html
– logs/
– example2.com/
– www/
– public_html/
– index.html
– logs/
– example3.com/
– www/
– public_html/
– index.html
– logs/
An easy way to do that is to create a template or skeleton directory and put the directory structure there. Then create each users using this skeleton directory.
First, copy the contents of the default skeleton directory /etc/skel to another directory /etc/skel-www as follows:

Now, navigate to the new skeleton directory as follows:

Then create the desired directory structure inside the skeleton directory as follows:

You can also create a default index.html file in the public_html/ directory if you want.

Now, create the /www directory with the following command:

Creating Users:
Now, you can create the user bob for www.example1.com as follows:
/bin/bash –gid www-data –skel /etc/skel-www bob

The same way, create the user alice for www.example2.com as follows:
–gid www-data –skel /etc/skel-www alice
Again, create the user linda for www.example3.com as follows:
–gid www-data –skel /etc/skel-www linda

Here, I assigned the primary group of each user to www-data. By default, Apache server runs as this group. If I hadn’t done that, Apache server won’t be able to access the files in the public_html/ directory and create log files in the logs/ directory.
Configuring Apache VirtualHost:
Now, you are ready to configure Apache VirtualHost for 3 users bob (www.example1.com), alice (www.example2.com) and linda (www.example3.com).
The default Apache site configuration directory on Ubuntu is /etc/apache2/sites-available.
Now, navigate to the directory /etc/apache2/sites-available/ as follows.

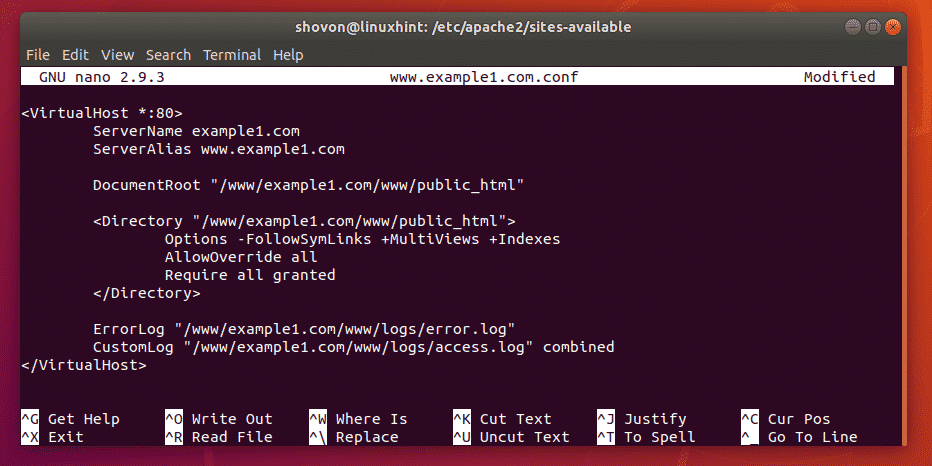
First, create a new configuration file for bob www.example1.com.conf as follows:

A text editor should be opened.
Now, type in the following lines.
ServerAlias www.example1.com
DocumentRoot "/www/example1.com/www/public_html"
<Directory "/www/example1.com/www/public_html">
Options -FollowSymLinks +MultiViews +Indexes
AllowOverride all
Require all granted
ErrorLog "/www/example1.com/www/logs/error.log"
CustomLog "/www/example1.com/www/logs/access.log" combined
NOTE: Change the bold texts according to your requirement.
Finally, the configuration file www.example.com.conf should looks as follows. Press <Ctrl> + x followed by y and <Enter> to save the configuration file.
to just copy the configuration file for bob (www.example1.com.conf) and make what little changes are required.
Copy the configuration file of bob for alice and linda with the following commands:
$ sudo cp -v www.example1.com.conf www.example3.com.conf

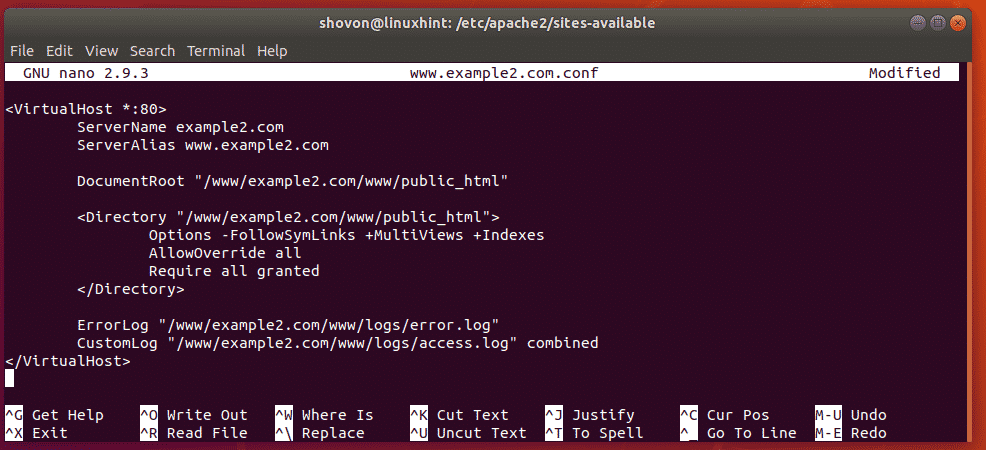
Now, edit the configuration file of alice as follows:

Now, change all occurrences of example1 to example2. Then save the file.
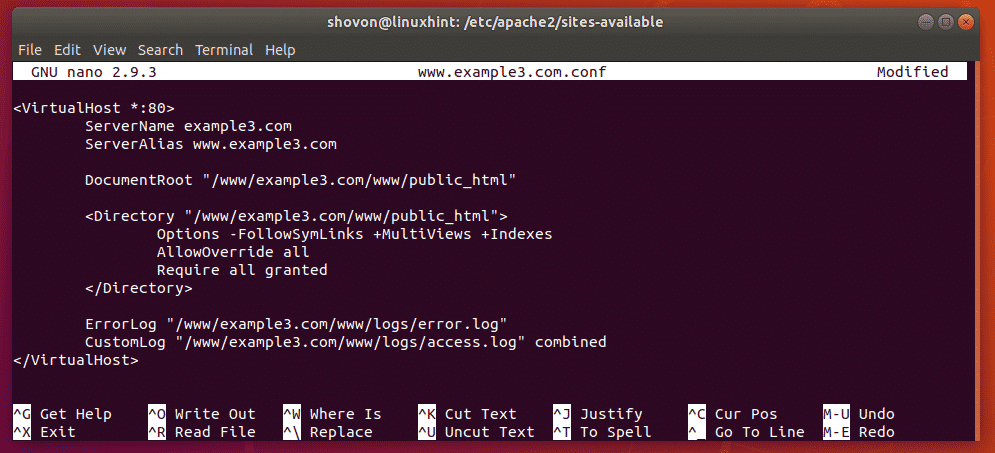
Do the same thing for linda.

Change all occurrences of example1 to example3 and save the file.
Enabling VirtualHost Configurations:
Now, disable the Apache default website configuration as follows:

Now, enable the VirtualHost configurations www.example1.com.conf, www.example2.com.conf, www.example3.com.conf as follows:
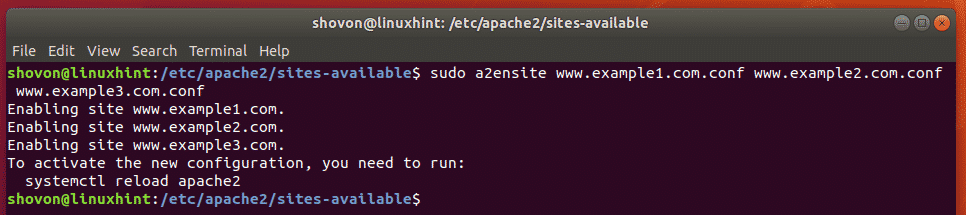
Finally, restart the Apache service as follows:

Testing VirtualHosts:
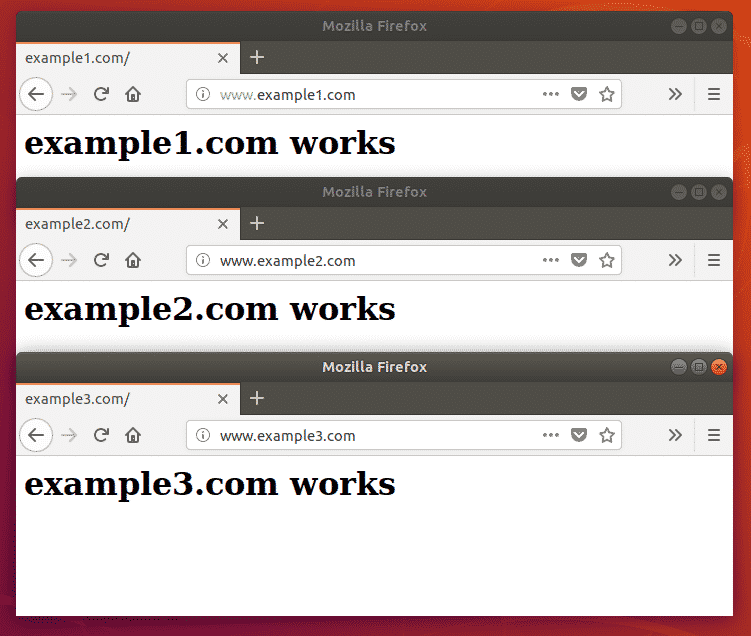
Now, try to access the websites www.example1.com, www.example2.com, www.example3.com
As you can see, all of these websites works as expected.
NOTE: I changed the default page index.html for each sites so that it’s a little bit different for each website for testing purpose. Otherwise, you won’t be able to tell whether VirtualHost configuration works or not.
So, that’s how you configure name based Apache VirtualHost on Ubuntu 18.04 LTS. Thanks for reading this article.