In this post, we will see how we can install one of the most popular asynchronous messaging tools, RabbitMQ. According to their official website: “RabbitMQ is the most widely deployed open source message broker”, but what is messaging and being a message broker? Let’s find out.
Messaging
A message is a way of exchanging information between application, servers and processes. When two applications share data among themselves, they can decide when to react to it when they receive the data. To exchange data effectively, one application should be independent of another application. This independence part is where a message broker comes in.
Message Broker
A message broker is an application which stores messages for an application. Whenever an application wants to send data to another application, the app publishes the message onto the message broker. The message broker then finds out which queue this message belongs to, finds out the apps which are connected to that queue and so, those apps can now consume that message.
The message broker app, like RabbitMQ, is responsible for saving that message until there is a consumer for that message. Queues are just virtually infinite buffers which store message packets.
What is RabbitMQ
RabbitMQ is one of the most widely deployed open source message brokers. It is an implementation of the Advanced Message Queuing Protocol which is an open standard. Let’s get started by installing RabbitMQ on our Ubuntu-based machine.
Installing RabbitMQ
We will begin by updating the Ubuntu’s application toolset:
sudo apt-get -y upgrade
Once this is done, we can enable the RabbitMQ application repository:
This command won’t produce any output:

Now, we can add the verification key of The RabbitMQ package:
This cmmand can take upto a few minutes to complete depending upo on the Internet speed:

We can again run the update command now:
We can now finally move on to downloading and installing RabbitMQ server:
Let’s see the output for this command:

If you’re willing to manage maximum number of connection from the launch itself, edit the following RabbitMQ config file:
Enabling RabbitMQ Management Console
RabbitMQ Management Console is a very useful web application through which we can achieve many tasks very easily, like:
- Manage users and their permissions and roles
- Create new queues
- Manage queues, monitor their consumption rate etc.
- Purge data which is currently on queues
- Send and receive messages
- Memory usage against each queue and by the overall process
Run the following command to enable the RabbitMQ Management Console:
Once this is done, we can visit the following IP to access the RabbitMQ Management Console:
Once this is done, we can see that management plugin is enabled and consuole is up on above mentioned URL:
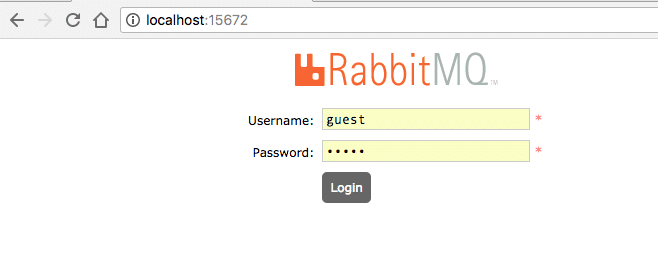
Default credentials for this is guest/guest. You can login and see what all operations we can perform:

Use following commands to manage the RabbitMQ server further:
service rabbitmq-server start
# To stop the service:
service rabbitmq-server stop
# To restart the service:
service rabbitmq-server restart
# To check the status:
service rabbitmq-server status
Conclusion
In general, no manual configuration will be needed with RabbitMQ as it already comes packaged with production-grade configuration. In this lesson, we learned how we can install RabbitMQ and it’s management console.