In this article, I will show you some of the common usages of the dd command in Linux. I will be using Debian 9 Stretch for the demonstration. But it should work on any other Linux distribution. Let’s get started.
Making a Bootable USB Drive with dd:
Making a bootable USB drive of your favorite operating system with the dd command is very easy. All you need is a USB drive and an ISO or IMG image of the operating system that you want to make a bootable USB of.
Let’s assume, you have downloaded an ISO image of Alpine Linux and the file is saved to the ~/Downloads directory as alpine-standard-3.8.0-x86_64.iso
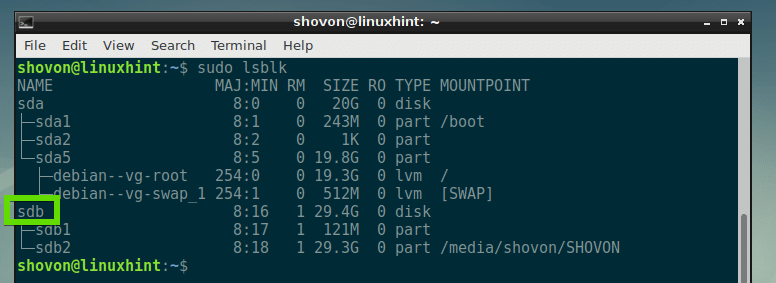
Now, you can list all the connected storage or block devices with the following command:
As you can see, all the connected storage or block devices are listed. Here, /dev/sdb is my USB drive. It has two partitions, /dev/sdb1 and /dev/sdb2. But when you make USB bootable drives, you have to use the /dev/sdb, the whole block device, not any partitions.

Now make bootable USB drive of Alpine Linux with the following command:

Here, if=~/Downloads/alpine-standard-3.8.0-x86_64.iso option is used to tell dd that the input file is in the path ~/Downloads/alpine-standard-3.8.0-x86_64.iso and of=/dev/sdb option is used to tell dd that the output file is in the path /dev/sdb. The bs=1M tells dd to read from ~/Downloads/alpine-standard-3.8.0-x86_64.iso and write to /dev/sdb 1 Megabytes of data at a time.
As you can see, the ISO file is copied to the block device /dev/sdb. Now you can use it to install Alpine Linux.

This command is very destructive. The dd command wipes the partition table and other metadata, flags from the block device. So you must be careful.
Displaying Progress Bar:
By default, the dd command does not show any progress bar. But you can tell dd to show it with the status=progress option.
For example, to copy data from /dev/sda to /dev/sdb 1 Megabytes at a time and also show the progress bar, run the following command:

As you can see, the progress bar is displayed. You can see how much of the data is copied and the rate at which it is being copied.

Measuring Read and Write Performance of a Storage Device with dd:
You can measure the read and write speed of a storage device with dd very easily. Of course, there are many graphical softwares that do provide this information, but the command line lovers would find this very interesting.
First, you have to mount the partition or the storage device on your filesystem. If you don’t have a partition on your storage device, you can always create it with the fdisk command and format it to your desired filesystem (such as FAT32, EXT4, NTFS, XFS etc). Here, I assume that you do have a partition /dev/sdb1 and it is formatted as EXT4.
Let’s say, you want to mount /dev/sdb1 partition to /mnt directory, then run the following command:

As you can see, the partition /dev/sdb1 is mounted on /mnt directory.

Now let’s create a 1 GB file testrw in the /mnt directory with dd:
Here, count=1 means, read bs=1G which is 1 Gigabyte from /dev/zero, and write it to /mnt/testrw file.
The oflag=direct option is used to disable disk caching. If disk caching is enabled, you will not get very accurate results.

NOTE: Remember, for this operation, you must have at least 1 GB of free memory or RAM on your computer. If you can’t afford that much free RAM, then reduce the bs size. For example, set bs=128M or even less, bs=64M.
As you can see, the write speed of my USB drive is about is about 6.1 MB per second.

You can also test the read speed of your storage device with the following command:

As you can see, I can read at 4.3 MB per second.

Testing Storage Device Latency with dd:
The latency of a storage device is the time it takes to access the device. It is an important parameter that we can determine with the help of the dd command.
To test for latency, we can write or read small chunks of data (about 512 bytes at a time) X times and see how long it takes. Then we can calculate how long it takes to read or write a single chunk of data very easily. This is called the latency of the storage device.
For example, let’s say you want to calculate the write latency. Now run the following command to write 512 bytes chunk about 1000 times:

As you can see, it takes about 16.4541 seconds to write 1000 chunks of 512 bytes data. Now, to write a single chunk of data, it takes about (16.4541s / 1000 = 0.0164 s) 0.0164 seconds. So the write latency is about 0.0164 seconds for this storage device.

You can calculate the read latency the same way.
So that’s how you use dd and test performance of an I/O device with it. Thanks for reading this article.


