In this quick tutorial, we will see how we can use chmod command in an Ubuntu machine to find, modify and remove user permissions from specific files which exist on the user’s file system. Let’s play through various conditions so that we can master basic chmod commands which can make our everyday life easier with Ubuntu.
Linux Permissions
Linux Permissions are a great set of rules which are simple to understand if we grasp the basics rights. The three main points which we need to understand to know how Linux Permissions work are:
- The element for which the permissions was defined
- What actions can be performed with a permission
- Who can perform what actions
There are two basic elements in Linux Filesystem:
- Directories
- Files
There are three actions which can be performed:
- Read
- Write
- Execute. Apart from executing scripts, same actions is needed to create files and other folders inside it
User who can perform these actions are:
- Owner of the file
- Group of the owner of the file
- User which are not associated with owner group or owner itself
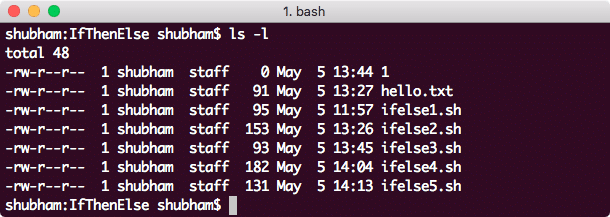
To see permissions related to a file, run the following command:
Here is what we get back with this command:
In the output, the first 10 characters presents the permission for the file:
- First character, which is ‘-‘ in this case signifies that this is a file. For a directory, this would’ve been a ‘d’.
- Next nine characters represent permissions for the owner, the group of the owner, and others, respectively.
Changing Permissions
Syntax for modifying permission of a file looks like:
Octal representation for Permissions
We can present permissions as an octal number. For example, for setting read, write & execute permissions for the owner, read & write permissions for its group, and no permission for others, to a hello.txt file, we will execute the following command:
Once we execute the above command and try to read a file with a non-owner account using the following command:
We will get the following error:
But where does this number come from? Each digit of that number represents a set of permissions. Let us see how were they derived:
- 0: Signifies no permission
- 1: Signifies the execute permission
- 2: Signifies the write permission
- 4: Signifies the read permission
For assigning read, write & execute permissions for the owner, we assigned him the number 7(= 4 + 2 + 1). Let us better understand this in a table of digits:
| Number | Binary | Read | Write | Execute |
| 0 | 000 | NO | NO | NO |
| 1 | 001 | NO | NO | YES |
| 2 | 010 | NO | YES | NO |
| 3 | 011 | NO | YES | YES |
| 4 | 100 | YES | NO | NO |
| 5 | 101 | YES | NO | YES |
| 6 | 110 | YES | YES | NO |
| 7 | 111 | YES | YES | YES |
Above table is much clear in what each represents in terms of file permissions.
Character representation for Permissions
We can present permissions as an octal number. For example, for setting read, write & execute permissions for the owner, read & write permissions for its group, and no permission for others, to a hello.txt file, we will execute the following command:
To add permissions to an existing user, we can also do:
Here, the write permission was being assigned to the user group of the owner of the file.
Recursive Permission Changes
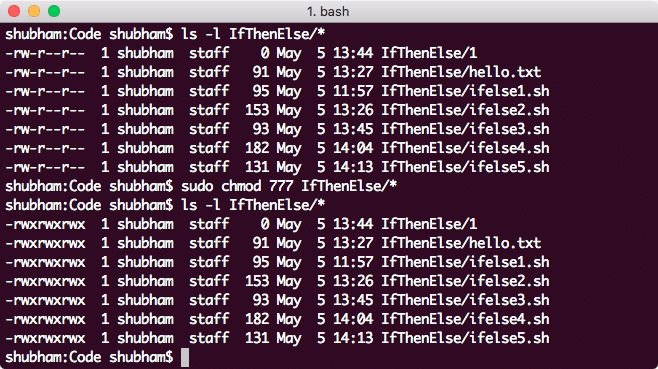
We can also change permissions for file contained in a specific directory with a single command. To modify the permissions of each and every file and folder in a provided directory at once, use sudo chmod with -R:
We can see the following output which clearly reflects the change in file permissions:
Conclusion
In this lesson, we looked at how we can modify a file permssions and if need be, do it recursively. We understood basic concepts behind how Linux permissions which can help us in our everyday work a lot.


