Python, PostgreSQL and Psycopg2 Tutorial
To develop an application beyond a simple script, it is necessary to persist data outside of memory into a database. There are many possible choices for a database, but PostgreSQL is a robust open source platform that can easily scale to production.
Python and PostgreSQL can be interfaced to develop powerful applications quickly. Psycopg is a PostgreSQL adapter that can be used to harness PostgreSQL through the Python based library. This tutorial will walk through the install of Psycopg2 and some Python code to demonstrate its use.
You can install Psycopg2 through the below terminal pip command.
When installing you should see the terminal output below.
Downloading psycopg2-2.7.3.2-cp27-cp27m-
macosx_10_6_intel.macosx_10_9_intel.macosx_10_9_x86_64.macosx_10_10_intel.macosx_10
_10_x86_64.whl (1.7MB)
100% |████████████████████████████████| 1.7MB 397kB/s
Installing collected packages: psycopg2
Successfully installed psycopg2-2.7.3.2
Bradleys-Mini:~ BradleyPatton$
To import the Psycopg2 package into your Python application you use the below line of code.
In order to get some data to load into our database, I have borrowed some code from a previous tutorial on pandas. The below code will create a pandas DataFrame with historical data. This will then be leveraged to create a table in PostgreSQL table.
panel = data.DataReader(symbols, ‘yahoo’, start_date, end_date)
df = panel[‘Close’]
df.columns = map(str.lower, df.columns)
hd = list(df)
print df.head()
print hd
return df
I will now set up some housekeeping code used to run the tutorial. These two methods will be used to call the Psycopg2 methods that we create.
symbols = [‘SPY’, ‘AAPL’,‘GOOG’]
df = get_data(symbols, ‘2006-01-03’, ‘2017-12-31’)
if __name__ == "__main__":
tutorial_run()
In order to connect to the PostgreSQL database, we will need to add the below method. The TryExcept provides some error handling in the event that the local database is not running, or incorrect connection parameters are passed to the database. The connect method in the Psycopg2 library connects to the database with the parameters passed in the connection string. Your parameters for dbname, user, and password may differ. If the connection fails for some reason, the error message will be written to the console. This method returns the connection object back to our call method where it can be used for further database operations.
cons = "dbname=’tutorial’ user=’postgres’ host=’localhost’ password=’password’"
try:
conn = psycopg2.connect(cons)
print "Connected"
except:
print "I am unable to connect to the database"
return conn
Once we have established the connection to the PostgreSQL database, we can load our data from the get_data() method into our database. Psycopg2 and pandas make this a very simple process.
The first line defines the method that pandas should use to connect to the database in order to copy the DataFrame. You will provide the same parameters as your connection method. The second line of code persists the DataFrame to the PostgreSQL database with the to_sql() method.
engine = create_engine(‘postgresql+psycopg2://postgres:password@localhost:5432/tutorial’)
df.to_sql(table, engine, if_exists=‘replace’)
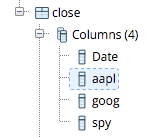
A quick look in our PostgreSQL pgAdmin terminal shows that the code successfully loaded the DataFrame into the table “close”. Now that we have some data loaded into our database. We can use psycopg to run some queries on the data. The below method is constructed to take the connection established in our first method and run a query on our PostgreSQL database. In order to create the 4 SQL objects we need to add another import statement.
In order to create dynamic SQL commands, psycopg uses string formatting to populate variables into the string using the %s and {} operators.
PostrgreSQL is case sensitive. In the get_data() method we forced our column headers to lowercase. The index was not included in this instruction. In order to pass the capital “Data” column header in the query, we need to pass it to PostgreSQL in double quotes. To do this in a string in Python, you need to send the escape character “” before the double quotes.
We can replace the “%s” in the string using the python string formatting syntax below. This replaces the %s with our date parameter dt.
To execute the SQL query that was created. You then need to pass it to the cursor’s .execute() method. By calling the .fetchall() method, you return the results of the query. When printed to the console you can display the results.
cr = conn.cursor()
query = sql.SQL("SELECT aapl from close WHERE "Date" = ‘%s’" % dt)
cr.execute(query)
print cr.fetchall()
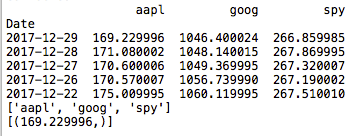
To run this function we add the below line of code to the tutorial_run() method. You should get similar results to the below.
In the next method, we will utilize the string format methods to pass in multiple parameters into our query. This query will take a date and three columns. In additional to using the %s operator, we will utilize the {} operator to join string variables into a string and inject them into our query string. Our query string now uses the join below with a “,” separator to pass multiple column names into our query.
cr = conn.cursor()
query = sql.SQL("SELECT {} from close WHERE "Date" = ‘%s’" % dt).format(
sql.SQL(‘, ‘).join([sql.Identifier(col1), sql.Identifier(col2), sql.Identifier(col3)]))
cr.execute(query)
print cr.fetchall()
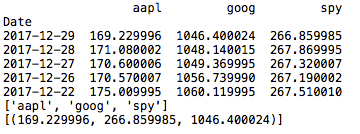
In order to use our new method I will add the below line to our tutorial_run() method. You should see the results below.
The next method that we write will use two {} string replacements to pull all of the data in our table with the exception of our index. This method builds on our previous method by adding a second replace bracket notation “{1}”. This time the brackets are numbered so that they are replaced in the order format notion code. Our new method joins the three column parameters with comma separator. In addition, the second parameter in the format method is the table variable. The query string is then constructed by replacing the brackets with the parameters in the format method in order. That is {0} = columns and {1} = table name.
cr = conn.cursor()
query = sql.SQL("SELECT {0} from {1} ").format(
sql.SQL(‘, ‘).join([sql.Identifier(col1), sql.Identifier(col2),
sql.Identifier(col3)]), sql.Identifier(table))
cr.execute(query)
print cr.fetchall()
In order to use our new method I will add the below line to our tutorial_run() method. You should see the results below.
There are many more methods to explore in the psycopg library. This should get you started with a good understanding of psycopg functions. I have provided some more resources below in documentation pages that will allow you to more extensively explore the library.
Full Code
from psycopg2 import sql
import pandas_datareader as data
def get_data(symbols, start_date, end_date):
panel = data.DataReader(symbols, ‘yahoo’, start_date, end_date)
df = panel[‘Close’]
df.columns = map(str.lower, df.columns)
hd = list(df)
print df.head()
print hd
return df
def connect():
cons = "dbname=’tutorial’ user=’postgres’ host=’localhost’ password=’password’"
try:
conn = psycopg2.connect(cons)
print "Connected"
except:
print "I am unable to connect to the database"
return conn
def create_table(table, df):
engine = create_engine(‘postgresql+psycopg2://postgres:password@localhost:5432/tutorial’)
df.to_sql(table, engine, if_exists=’replace’)
def get_row(dt, conn):
cr = conn.cursor()
query = sql.SQL("SELECT aapl from close WHERE "Date" = ‘%s’" % dt)
cr.execute(query)
print cr.fetchall()
def get_cols(dt, col1, col2, col3, conn):
cr = conn.cursor()
query = sql.SQL("SELECT {} from close WHERE "Date" = ‘%s’" % dt).format(
sql.SQL(‘, ‘).join([sql.Identifier(col1),
sql.Identifier(col2), sql.Identifier(col3)]))
cr.execute(query)
print cr.fetchall()
def get_tab(table,col1, col2, col3, conn):
cr = conn.cursor()
query = sql.SQL("SELECT {0} from {1} ").format(
sql.SQL(‘, ‘).join([sql.Identifier(col1), sql.Identifier(col2),
sql.Identifier(col3)]), sql.Identifier(table))
cr.execute(query)
print cr.fetchall()
def tutorial_run():
conn = connect()
symbols = [‘SPY’, ‘AAPL’,’GOOG’]
df = get_data(symbols, ‘2006-01-03’, ‘2017-12-31’)
create_table("close", df)
get_row("2017-12-29",conn)
get_cols("2017-12-29","aapl","spy", "goog", conn)
get_tab("close", "aapl", "spy", "goog", conn)
if __name__ == "__main__":
tutorial_run()
References
initd.org/psycopg
initd.org/psycopg/docs/install.html
http://initd.org/psycopg/docs/sql.html
wiki.postgresql.org/wiki/Psycopg2_Tutorial


