The following guide demonstrates how to use argparse in Ubuntu, with Python3, and thus make sure both are readily available before proceeding ahead. If Python3 is not available, it can be installed with the following two command lines:
sudo apt-get install python3.6
Essential Syntax
The purpose of this guide is to outline core features of argparse, and how to use some of its options. Argparse requires Python, and a notepad to type its commands. Ubuntu has its own notepad known as “Text editor”, which can be accessed via Ubuntu dash. The commands are executed via terminal.
- Launch the Text Editor via Ubuntu Dash.

- Type the following two lines as the essential codes. First line imports the argparse module to the code snippet, whereas the second one creates an argument parser object, which contains all the information required to parse commands to Python data types.
import argparse
parser = argparse.ArgumentParser() - Use the following command to convert argument strings to objects. Usually, the object is instantiated, and is assigned to a variable, but it’s not necessary.
parser.parse_args()
- The program can be executed in Linux terminal via python3 with the following command.
python3 pscript.py <arguments>
Displaying the App Description
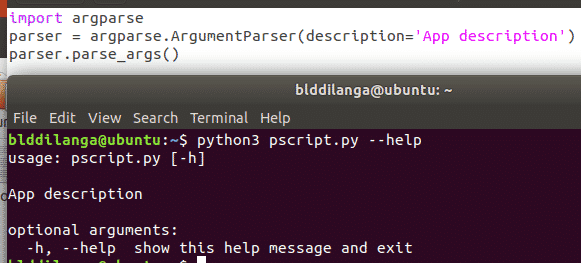
The app description parameter is to state what the application is for. When the help command is used with the python script, the app description appears along with the available flags to be used in the program. The following line needs to be used for stating the app description.
Displaying the Description at the End (Epilogue)
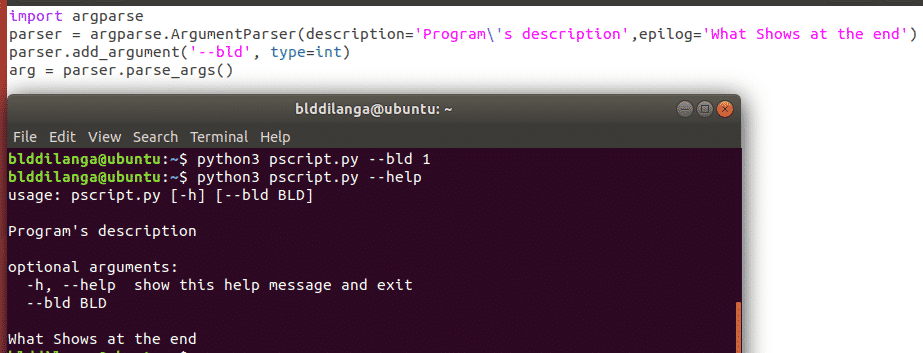
As the description, the epilogue can be displayed at the end with epilog parameter. Like the description, it also has to be specified within argumentParser function.
How to Use Arguments
Arguments are defined with add_argument() function. It specifies which positional arguments/arguments to be used with the python script. By default, the program accepts –help flag as the positional argument, but more can be added with using the aforesaid function. There are many ways to add arguments to the application.
Single Positional Argument
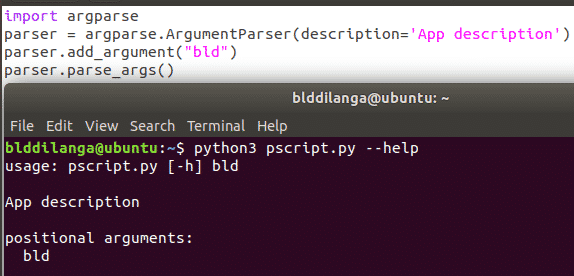
The single positional argument makes sure the program only accepts one argument. In the following example, it state bld as the argument; hence only bld can be used as a positional argument when executing the program. If the argument is missing, the program will throw an error with a “too few arguments” warning message. The special thing of positional argument is, it doesn’t have to be stated in the terminal when giving arguments to the program.
Positional Argument in A Particular Type
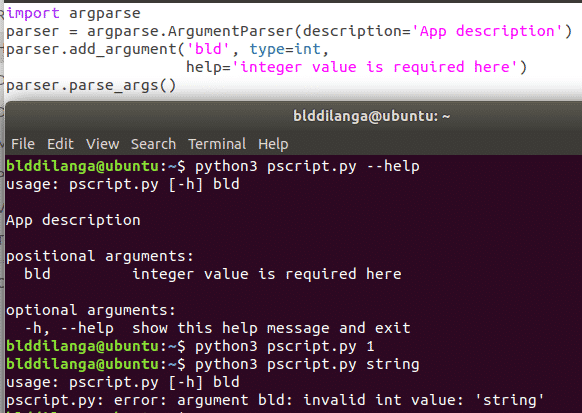
add_argument() not only takes one argument, but also multiple arguments as seen in the following example. If multiple arguments are provided, they have to be formatted as following. The first argument defines the positional argument’s name, second one is its type, meaning the type of the value accepts as the argument for the program, the last one is for the description which only appears when using the help flag.
In the following screenshot, it depicts how program refuses to accept any non-integral value as the positional argument. Only an integer value can be submitted here now.
help=’an integer value is required’)
Optional Positional Argument in A Particular Type
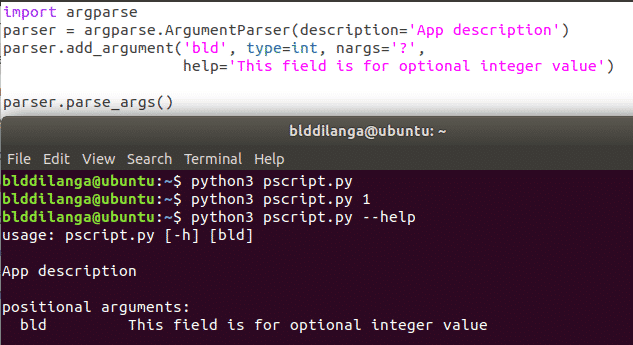
The following command line is same as the above one, except it makes the positional argument optional with nargs parameter; hence the user can omit it when executing the program. However, if the argument was provided, it has to be in the correct data type or else it will not continue parsing as usual.
help=‘This field is for optional integer value’)
Optional Argument in A Particular Type
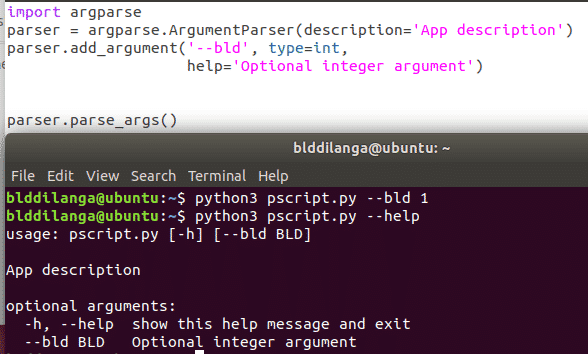
The difference between argument, and the positional argument is positional argument doesn’t have to be mentioned, whereas the argument has to be mentioned as a flag along with its value when executing the program. The following command line contains the exact same texts, except the leading double lines (hyphens). They signify the argument is an argument/flag which has to be mentioned along with a value in the given type when executing the program. To make the using of argument compulsory required=True parameter can be used in add_argument() function as one of another arguments. As said above, not complying to the format will throw an error.
Usage of Short Arguments
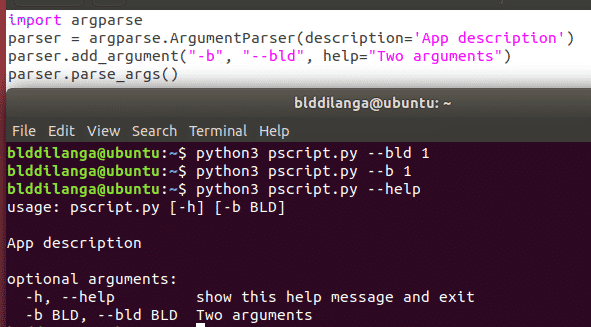
Short arguments act in the same way as its longer counterparts. The only difference is it helps to save the space when using a large amount of command lines or when the developer wants to keep the commands tidy, and organized as much as possible. In the following example it depicts how program responds to the both arguments in the same way. When using the short arguments, make sure to use only a single hyphen as it’s the standard in the industry.
Conditional Arguments
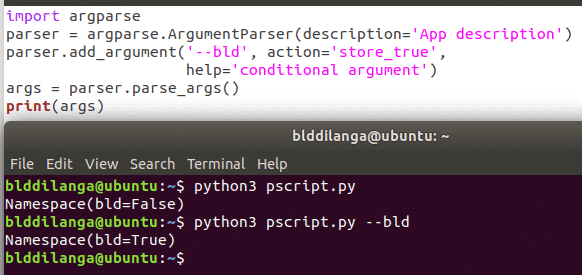
Conditional arguments are very simple to use as arguments in previous examples. The only difference in this segment is to specify the action parameter. It accepts two values, store_true, and store_false. If action parameter is specified as store_true, whenever the flag argument is used in the program, it’s assigned by true Boolean value; hence it can be used as a conditional argument. The applications of conditional arguments are to make a logical flow of the execution based on the user inputs. So, user decides which path they want to take, and how the program flows. The parsed commands are inside of the namespace object, that’s why it returns the namespace() keyword after the program was executed.
help=‘conditional argument’)
Specifying the Program’s Name
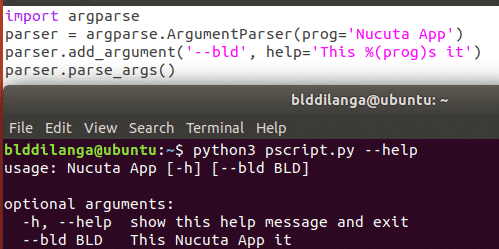
Above all examples doesn’t specify the program’s name. Instead it just states the script file’s name along with the list of accepted arguments. The advantage of using the program name is it makes the program more user friendly, and independent from the script’s name. This is quite useful if multiple script files are involved with the execution. So, it won’t confuse the user with ambiguous names.
The following two command lines have to be used to make it happens. In the first line it specifies the program’s name with prog parameter, whereas this particular parameter can be used as a variable in where program name is used, then when the program is being executed, the prog parameter is replaced with the value stated in argumentParser() function along with prog parameter, meaning “Nucuta App” in this example. Furthermore, it’s important to use the command as %(prog)s or else the parsing won’t be successful.
parser.add_argument(‘–bld’, help=‘This %(prog)s it’)
How to Check Conditions and Make the Execution Flow
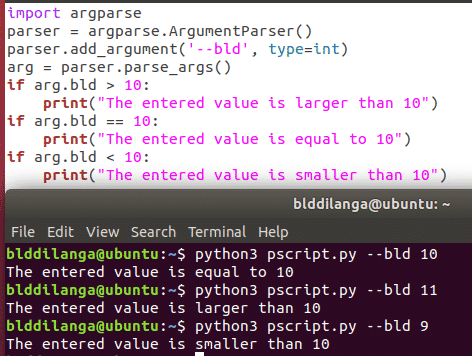
The execution flow is defined with IF ELSE clauses. These clauses guide the execution flow depending on the condition, and its nature. In the following example the typed integer value is assigned to a variable, bld, which is in arg object. Then it’s checked against a predefined value to check its condition. In this example, if the entered value is larger than 10, the first statement is executed, if the entered value is equal to 10, the second statement is executed, if the entered value is less than 10, the last statement is executed. Likewise, the execution flow can be guided with ease. As the example depicts, the arguments can be accessed via object returned by parse_args() function – args.
CONLCUSION
With this guide, you are ready to start parsing all the commands line in python. Good luck


