Python for Hacking: Build a Port scanner in 13 Lines With Python
Becoming a penetration tester is not just merely being able to exploit certain target instantly. Using other people’s pentest tools will not make someone a great hacker. Actually, those who have the dependency to rely on tools are usually stamped as script kiddies. Each field of expertise must have levels, it is also called a process, not the least of which is the field of hacking. As the following popular quote goes, “No legends were born, legends are made”. It is not about one’s talent, but the skill set.
In the following article, we will learn about the implementation of a programming language in the field of hacking. Who does not know about Python programming language? Yes, of course you already know. Python is created for general purposes, such desktop applications development with its GUI, web development, and including hacking or penetration testing. Python has an active community (whom some of them are insane, a.k.a fanatic) and python also has rich library modules.
Python has also become my favorite programming language since I knew the field of penetration testing. I do not just love it for granted. However, for some reason, in essence, python is a less complex and more efficient programming language. What I mean by that is, it is almost near to human language, is not it? From a novice point of view like mine, Python readability rate is insane.
Ok, enough to overstate python. Now I will explain the point of this article. Here we will learn to create a simple port scanner with verbosity with only 13 lines. (i like 13). Here we are not going to beat the “port scanner king” NMap, instead, the aim of this is to understand how a tool works in such a way as to produce what we want, in this case to see if the ports on a target are open or not. On the other hand there are other advantages, i.e. when at some point we are faced with a condition where when we want to do port scanning of the router that can not connect to the Internet and we do not have any tools. This will be easier of course if we can make the port scanner ourself. Quote from the above quotation. I added, “Hackers doe not use tools, they create tools”
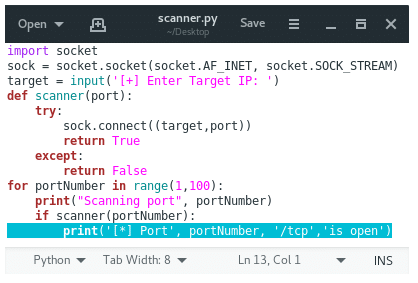
Lets do it with practice, open your favorite text editor. Do not waste your time using a high featured IDE to do simple scripting. Just be efficient. I prefer Gedit, rather than the prebuilt Kali Linux text editor, Leafpad. Because of one reason, Gedit supports color highlighting for various programming languages. Type the following text in your text editor.
sock = socket.socket(socket.AF_INET, socket.SOCK_STREAM)
In the line 1 we need to import module socket in order to use socket() function. In line 2 we create a socket object with the syntax:
Socket_family could be: AF_INET, AF_INET6, AF_UNIX, AF_NETLINK, AF_TIPC, AF_BLUETOOTH and AF_ALG.
Socket_kind options are SOCK_STREAM, SOCK_DGRAM, SOCK_RAW, SOCK_RDM, etc. We use SOCK_STREAM because we will communicating through TCP protocol.
To find out more about socket module please visit the official documentation of socket at https://docs.python.org/3/library/socket.html
Let’s continue the program with the following lines:
https://analytics.google.com/analytics/web/#realtime/rt-content/a2559550w156331077p157923904/
We ask the user to input a target IP, since we are using AF_INET to create socket.
try:
sock.connect((target, port))
return True
except:
return False
In the next lines above, we define scanner() function. In scanner() we use try syntax to ensure we don’t throw any error if some trouble happened. We try to make a connection to target IP and its port. Port variable is passed into the function as shown below.
print("Scanning port", portNumber)
if scanner(portNumber):
print(‘[*] Port’, portNumber, ‘/tcp’,‘is open’)
This for loop above, is to iterate through a series of ports we are going to scan. The syntax of range() function is, range(start from x, stop before x). So in line 10 we will scan 100 ports, which is port 1 to 99. We use a print method call to tell what port is now actually being scanned. Then we return Boolean type, True or False. It calls our scanner() function which tries to make a connection to the supplied port; if it is returns False (the attempt to connect failed). If it returns True (connection success) then go to next line. Which displays a message indicating this certain port is Open. This loop will stop once we scanned port 99.
So to wrap up, our 13 lines port scanner of code should look like this:
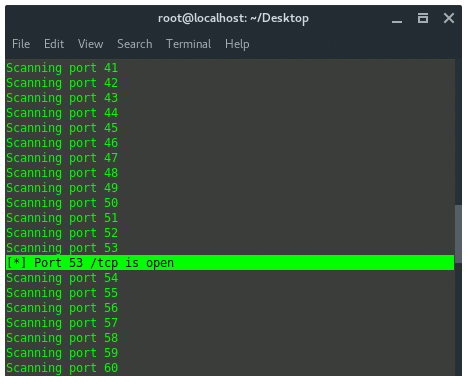
Alright now time to test it, lets see how it works. Save it as scanner.py. In case we are going to scan for our own router opened ports in range between 1 and 99. Trust me this will not be fancy comparing to NMap, just focus on our aim I mentioned above.
Target IP : 192.168.1.1
The syntax to call out scanner.py is:
Because we did not set our script environment in the first line, thus we need to call the Python interpreter, i used python3 rather than its lower version.

And the non-fancy output should look like this:
IN CONCLUSION
Yes, we succeed to build a simple port scanner from the scratch using python just in 13 lines. We succeed to reach our goal, and now we know how things work, right?. Even i did not tell you if there is a guy who made NMap-python module, you would not be surprised. This module is basically able to run NMap command using python programming language.
Oh yeah, if you are wondering where is the hacking part with just doing port scanning? Hmm… Well, what does a hacker target then if they have no clue about the target itself. Do you remember Penetration Testing Phases or Cycles? If not, you might need to read the article here: