In this lesson, I will share the script I use to send emails to the users of the apps I make and more.
What we will be doing?
We will create a simple Python program which will do the following:
- Use the template file we create for the email design. This will just be a text-based file with placeholder values.
- Get the name and email of the person from another text file we make.
These points make this program much closer to a real-life usage of sending emails in your apps. Let’s get started.
File for emails
The file which contains the emails for the users will look like this:
This is just a simple text file which contains user’s name and email separated by space. Multiple emails have been put with each user’s data in a new line. We named this file users.txt.
Using the Template
Let us quickly define the template as well which we will be using in our script for replacing values:
We sent this email using Python smtplib module. Cool, right?
Have a bright day ahead!
Cheers
We have used a template string ${PERSON_NAME} which will be replaced with the name of the person we get from the users.txt file while sending the email.
Getting user data from file
The first step to send email to a user is to identify that where we want to send the emails to. Let’s write a Python function which will accept a file name and returns us users name and email IDs where the emails need to be sent:
user_name = []
user_email = []
with open(file_name, mode=‘r’, encoding=‘utf-8’) as user_file:
for user_info in user_file:
user_name.append(user_info.split()[0])
user_email.append(user_info.split()[1])
return user_name, user_email
With this function, we just return the user’s names and emails which we get form the file.
Getting the Template Object
Now, we can parse our template and get a template object from the text file we made:
with open(file_name, ‘r’, encoding=‘utf-8’) as msg_template:
msg_template_content = msg_template.read()
return Template(msg_template_content)
With this, we will get back a Template object which we can use to parse the content of the file and make necessary replacements for the template strings like a user’s name.
How email sending is done?
Now that we’re ready with the template design and the user’s data, we need to understand how an email is actually sent to the user:
- Create SMTP connection with login credentials for the sender’s account
- Construct a multi-part header with information with From, To and Subject fields
- Construct the message body which needs to be sent
- Send the email with SMTP connection object
Setting up SMTP connection
Let us finally define the function which will send the email to the designated users. Here is the function:
user_name, user_email = get_users_data(‘users.txt’) # read user details
message_template = read_template(‘message.txt’)
# set up the SMTP server
smtplib_server = smtplib.SMTP(host=‘smtp.gmail.com’, port=587)
smtplib_server.starttls()
smtplib_server.login(SEND_FROM, EMAIL_PWD)
# Get each user detail and send the email:
for name, email in zip(user_name, user_email):
multipart_message = MIMEMultipart() # create a message
# add in the actual person name to the message template
msg = message_template.substitute(PERSON_NAME=name.title())
# Prints out the message body for our sake
print(msg)
# setup the parameters of the message
multipart_message[‘From’]=SEND_FROM
multipart_message[‘To’]=email
multipart_message[‘Subject’]="LinuxHint Email"
# add in the message body
multipart_message.attach(MIMEText(msg, ‘plain’))
# send the message via the server set up earlier.
smtplib_server.send_message(multipart_message)
del multipart_message
# Terminate the SMTP session and close the connection
smtplib_server.quit()
In the above function, we followed each step we stated in the previous section. We constructed the SMTP connection and used it to send the email.
Complete program
In the final section, let us take a look at the complete program which can be used to send the email to designated user:
from string import Template
from email.mime.multipart import MIMEMultipart
from email.mime.text import MIMEText
SEND_FROM = ‘my-email-here’
EMAIL_PWD = ‘my-password-here’
def get_users_data(file_name):
user_name = []
user_email = []
with open(file_name, mode=‘r’, encoding=‘utf-8’) as user_file:
for user_info in user_file:
user_name.append(user_info.split()[0])
user_email.append(user_info.split()[1])
return user_name, user_email
def read_template(file_name):
with open(file_name, ‘r’, encoding=‘utf-8’) as msg_template:
msg_template_content = msg_template.read()
return Template(msg_template_content)
def main():
user_name, user_email = get_users_data(‘users.txt’) # read user details
message_template = read_template(‘message.txt’)
# set up the SMTP server
smtplib_server = smtplib.SMTP(host=‘smtp.gmail.com’, port=587)
smtplib_server.starttls()
smtplib_server.login(SEND_FROM, EMAIL_PWD)
# Get each user detail and send the email:
for name, email in zip(user_name, user_email):
multipart_message = MIMEMultipart() # create a message
# add in the actual person name to the message template
msg = message_template.substitute(PERSON_NAME=name.title())
# Prints out the message body for our sake
print(msg)
# setup the parameters of the message
multipart_message[‘From’]=SEND_FROM
multipart_message[‘To’]=email
multipart_message[‘Subject’]="LinuxHint Email"
# add in the message body
multipart_message.attach(MIMEText(msg, ‘plain’))
# send the message via the server set up earlier.
smtplib_server.send_message(multipart_message)
del multipart_message
# Terminate the SMTP session and close the connection
smtplib_server.quit()
if __name__ == ‘__main__’:
main()
When we run this program with a Gmail ID, you might face an issue like this:
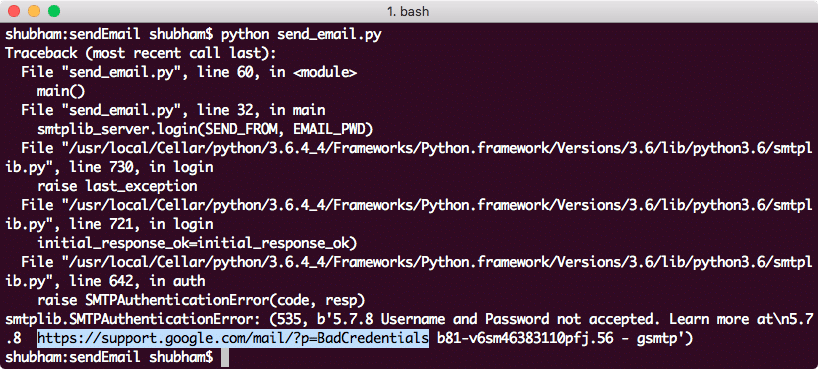
Gmail SMTP Error
This is because Gmail doesn’t allow plain scripts to use Gmail API. For this, you might have to disable security login in your Gmail account. Read about how to do this for Gmail here.
Conclusion
In this lesson, we looked at how we can send emails using Python’s smtplib module.