Kubernetes is one of the few technologies that people struggle with not because it is complicated and hard to understand, but because it is designed to run on server grade hardware and can’t easily be simulated on a typical home computer that easily. Thankfully, there are a variety of cloud hosted platforms which provide affordable infrastructure to experiment with and understand technologies like Kubernetes.As a prerequisite, I encourage you to go through our posts on the architecture of Kubernetes and about nodes and pods, the building blocks of a Kubernetes cluster.While there are a lot of hosted solutions for Kubernetes, we will be deploying everything from scratch on DigitalOcean which is a cloud-hosting solution targeted towards developers in particular.
A VPS instance on this platform is known as a droplet. For running Kubernetes you need at least 2 GB of RAM and we will be using the $20/month option droplets for this demo. They charge per hour as well, so if you experiment for a couple of hours and then destroy all the droplets then you will end up paying no more than a couple of dollars.
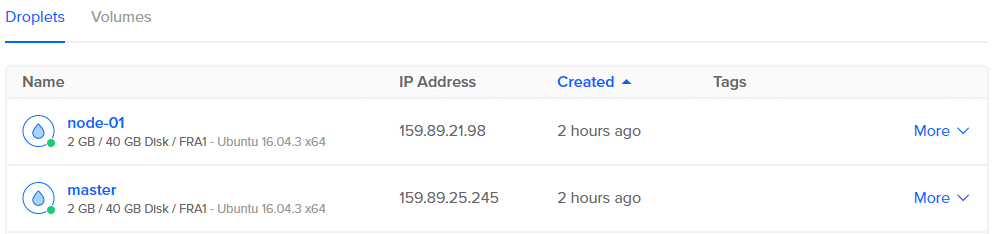
Now we have two machines, one labeled master and another is going to be the worker node. So let’s configure the master first.
Configuring the master node
To configure the master node, SSH into it using the public IP or use the console provided by DigitalOcean to access the terminal as root user.
First commands are the basic house-keeping ones:
Then we fetch the required gpg keys and add them to our list of trusted remote repositories.
$ cat < /etc/apt/sources.list.d/kubernetes.list
deb http://apt.kubernetes.io/ kubernetes-xenial main
EOF
$ apt update
Running apt update for the second time will bring the system up to speed with official Kubernetes repo. Now, we install the requisite packages.
#Docker is required for containerization of apps.
$ apt install kubelet kubeadm kubectl kubernetes-cni
The last command installs a few packages each of which is important for different reasons:
- Kubeadm: Bootstraps and initializes Kubernetes on a node. It can be used to assign a droplet the role of master node, or worker node.
- Kubelet: It is a background process which talks to the master node and performs actions that are requested by it.
- Kubectl: It is the command line tool that allows developers and operations personnel to interact with, and control, the Kubernetes cluster.
- Kubernetes-cni: It is the Container Networking Interface required for internal communications among pods and external communication as well.
Now that we have all the requisite packages installed, it’s time for us to initialize the master node. Run the following:
apiserver-advertise-address $DROPLET_IP_ADDRESS
Make sure to substitute the last variable $DROPLET_IP_ADDRESS with the public IP of your master node. If everything worked fine, this would be your output:
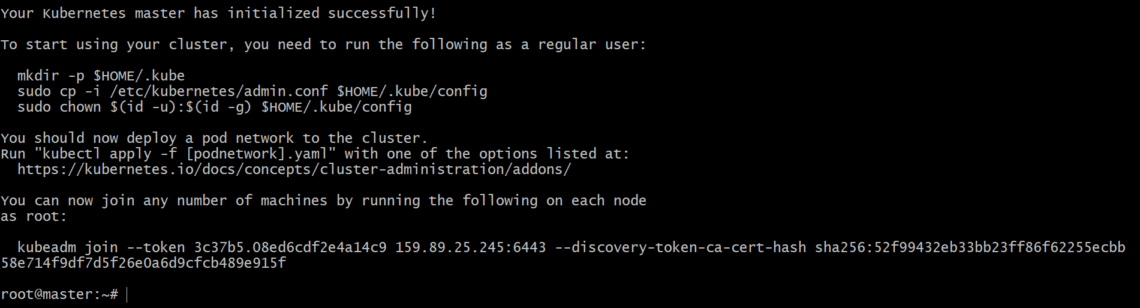
Make sure you copy the last line “kubeadm join –token …” as that contains necessary security credentials which a worker node would need to join the cluster.
Every master node has an API server running on it, which the above command will expose to the pod network and also to the command line interface, kubectl, as well as to an optional Web UI.
| Note: You can use your droplet’s public IP address for the kubeadm init command but if you want to isolate your master node from the rest of the world, you may want to use DigitalOcean’s private IP feature which will be used by different pods across different nodes to talk to each other. You can later expose only the front-end services, when your project comes to fruition. |
Okay, one last step before we get to see the health report on our master node. You may want to run:
$ cp /etc/kubernetes/admin.conf $HOME/.kube
$ chown $(id -u):$(id -g) $HOME/admin.conf
$ kubectl create –f
https://raw.githubusercontent.com/coreos/flannel/master/Documentation/kube-flannel.yml –namespace=kube-system
Flannel is installed in the last command which provides layer 3 networking functionality needed for containers.
Now we can run,
$ kubectl get pods –all-namespaces
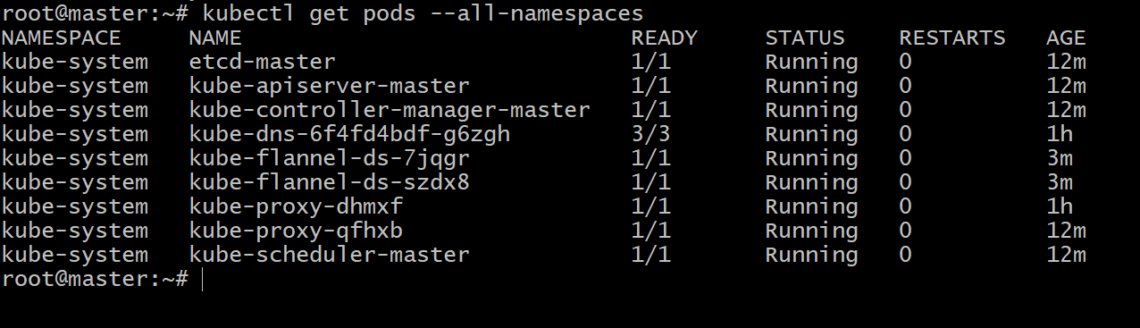
Which would show us the state all the nodes and all pods in this cluster, which is currently only one. So it is time for us to configure the second droplet and convert it into a Kubernetes worker node.
Configuring the minions or worker nodes
A lot of minion configuration is going to be a repetition of what we have done above, it is from kubeadm command that the road will start to diverge.
So to configure your worker node by repeating all the commands up to and including the installation of packages,
Then to initialize the droplet as a kubernetes node, run the command which was generated at the master node, upon the completion ofkubeadm init.
159.89.25.245:6443 –discovery-token-ca-cert-hash
sha256:52f99432eb33bb23ff86f62255ecbb
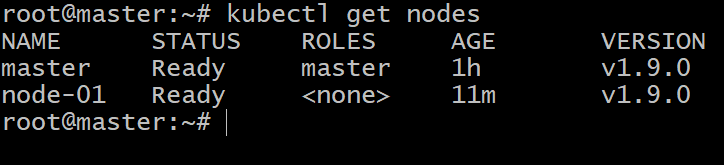
Please note that the content following your token flag, the IP address, and the sha256 checksum are all going to be very different in your case. That’s it! You have a new node as a member of the Kubernetes cluster. You can confirm this by listing the nodes and the pods that are running on this cluster.
Conclusion
Now it is time for you to deploy your dockerized application in this cluster and feel free to spin up more droplets and use the kubeadm join to add new members to your Kubernetes cluster.