Your Java web application hosted on Tomcat server uses HTTP protocol by default. The communication between the client and the web server is not encrypted when HTTP protocol is used. So, it’s not secure.
These days, almost all the browsers will warn you when you try to visit HTTP links. It will even show you a red lock in the URL bar. If you want that green lock to appear in the URL bar when someone visits your Java web application hosted on Tomcat web server, you have to enable HTTPS on Tomcat. HTTPS is just the secured version of the HTTP protocol. When HTTPS is enabled, the communication between the client and the web server is encrypted.
An SSL (Secure Socket Layer) certificate is used to verify the ownership of the web server the client is connecting to using the HTTPS protocol. You normally buy an SSL certificate from a Certificate Authority or CA such as Verisign, DigiCert etc and install it on your web server (in this case the Tomcat web server). You can also generate an SSL certificate yourself and install it on your Tomcat web server. Such certificates are called Self-Signed certificates.
In this article, I will show you how to generate your own SSL certificate or Self-Signed certificate and how to install it on Tomcat web server. Let’s get started.
Generating a Self-Signed SSL Certificate:
Before you can install a SSL certificate on your Tomcat web server, you have to generate a Java KeyStore file or JKS file. When you install Apache Tomcat web server, all the required tools to generate a JKS keystore file is also installed. You can use the keytool utility to generate a JKS file on Linux.
I like keeping all the key files I generate in a single directory. So I am going to create a new directory (let’s call it keys) in the /etc directory.
To do that, run the following command:

Now, navigate to the /etc/keys directory with the following command:

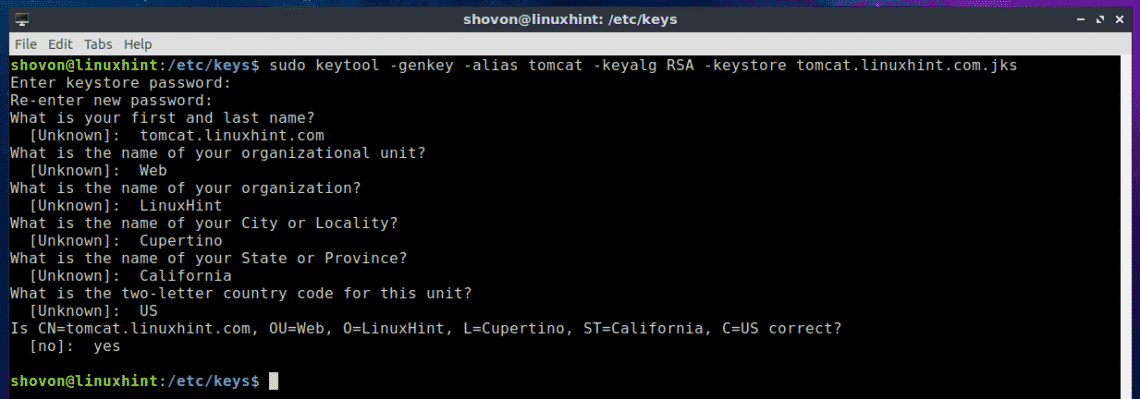
Now, generate a JKS certificate file (with the same name as your domain name) with the following command:
tomcat.linuxhint.com.jks
NOTE: Here, tomcat is the alias of the Java KeyStore file. You can change it to anything you want. Also, tomcat.linuxhint.com.jks is the name of the output JKS certificate file.

Now type in a password for your Java KeyStore file and press <Enter>.

Re-type the same password and press <Enter>.

Now, type in the Fully Qualified Domain Name (FQDN) of your Tomcat server and press <Enter>. I am just going to put tomcat.linuxhint.com here.
NOTE: If you want to use wildcard domain names, you may do so here. For example, you can type in *.yourdomain.com; In that case, this certificate will be valid for site1.yourdomain.com, site2.yourdomain.com and so on.

Now, type in your Organizational Unit (OU) and press <Enter>.

Now, type in the name of your Company or Organization here and press <Enter>.

Now, type in the name of the City of your Company or Organization and press <Enter>.

Now, type in the name of the State the of City you typed in earlier and press <Enter>.

Now type in the two letter country code of your country and press <Enter>.

Finally, type in yes to confirm that all the information is correct and press <Enter>.

Your JKS certificate file should be generated.

As you can see, the JKS key file (in my case tomcat.linuxhint.com.jks) is generated in the /etc/keys directory.

In the next section of this article, I will show you how to install the JKS self-signed certificate on your Tomcat web server.
Installing Self-Signed SSL Certificate on Tomcat Web Server:
Now that you have a self-signed SSL certificate, you can install it on your Apache Tomcat web server and enable HTTPS protocol very easily. To do that, you have to modify the server.xml file of Apache Tomcat web server. On Ubuntu 18.04 LTS, the server.xml file is in the path /etc/tomcat8/server.xml
Now, edit the server.xml file with the following command:

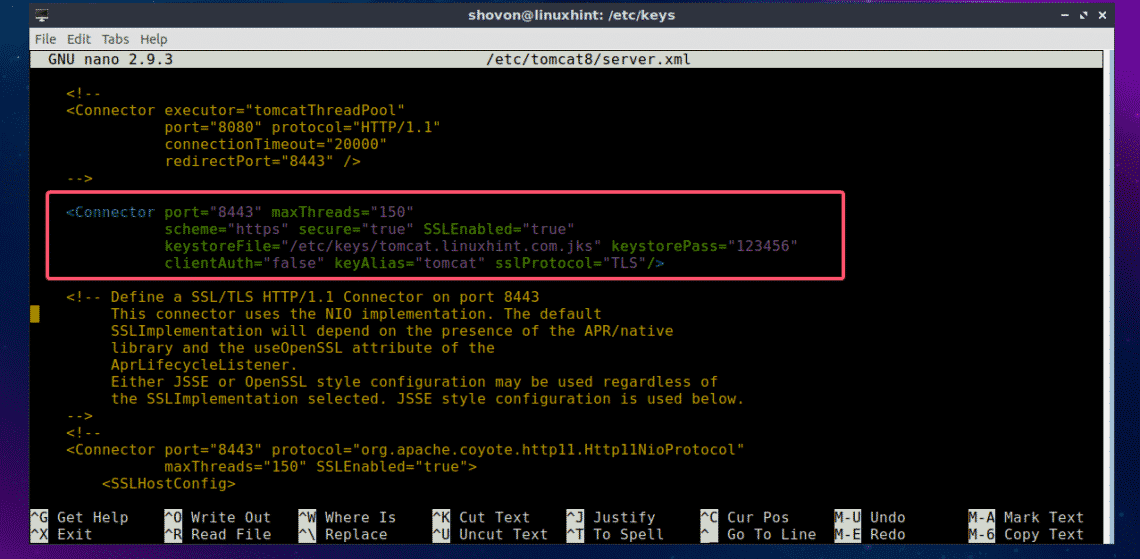
Now, find the line as marked in the screenshot below.

Inside the <Service name=”Catalina”> container, add the following lines.
scheme="https" secure="true" SSLEnabled="true"
keystoreFile="PATH_TO_YOUR_JKS_FILE" keystorePass="YOUR_KEYSTORE_PASSWORD"
clientAuth="false" keyAlias="YOUR_KEY_ALIAS" sslProtocol="TLS"/>
NOTE: Make sure you change HTTPS_PORT, PATH_TO_YOUR_JKS_FILE and YOUR_KEYSTORE_PASSWORD, YOUR_KEY_ALIAS according to your need.
Finally, the server.xml file should look something like this as marked in the screenshot below. Save the file by pressing <Ctrl> + x and then press y followed by <Enter>.

Now, restart Tomcat service with the following command:

Now check whether the Tomcat service is running with the following command:

As you can see, the Tomcat service is running. It means, the configuration was successful.

Now open up a web browser and try to access your website hosted on the Tomcat web server. You should see the following warning. Click on Advanced.

It just means, your SSL certificate is self-signed. If you buy your SSL certificate from a Certificate Authority (CA), then you won’t see this. Now, click on Add Exception…

Now, click on Confirm Security Exception.

As you can see, it works. The green lock icon appears as well.

So, that’s how you install SSL certificate on your Tomcat web server. Thanks for reading this article.


