Linux from scratch
LFS (Linux From Scratch) is the most popular tool to create customized Linux distributions from source. Creating your own Linux distribution may include some advantages (and disadvantages too). Among advantages you will learn a lot on Linux by creating your own Linux distribution. You will know how Linux modules interact and how to customize the system.
The operating size is also an advantage depending on your hardware resources or the use you want to give the system. On their website LFS developers say the created a web server to work with Apache on 5 mb size. Together with Gentoo Linux, Linux From Scratch is the most flexible way to setup a Linux system. Building it is pretty simple and the process is described step by step, below I will only show the initial steps to portray an idea of the difficulty and a link to the official documentation showing from the building stage.
To get started with Linux From Scratch you need to create first a partition (minimum 3 GB due compilation process), it is also recommendable to create a swap partition or to share your existing one (for instructions on partitioning check Partitioning hard disks under Debian/Ubuntu and resizing partitions).
Once you created the partition create the $LFS variable by running:
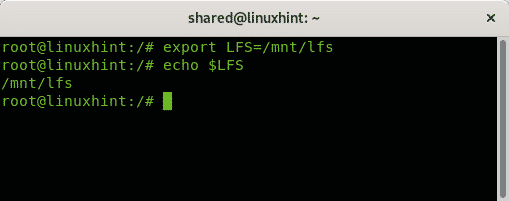
You can check it by running:
Then mount the partition:
# mount -v -t ext3 /dev/<sdX> $LFS
Note: replace <sdX> for your partition.
Then run for the swap partition:
You’ll need to download packages to a specific directory called LFS/sources, to create the directory run:

Make it writable and sticky:

Download and save within the directory all packages from http://www.linuxfromscratch.org/lfs/view/6.6/chapter03/packages.html
and
http://www.linuxfromscratch.org/lfs/view/6.6/chapter03/patches.html
You can use the wget-list http://www.linuxfromscratch.org/lfs/view/6.6/wget-list
Create the tools directory and symbolic link by running:
# ln -sv $LFS/tools /
Run the following commands to create the lfs user giving it rights on the tools and sources directories:
# useradd -s /bin/bash -g lfs -m -k /dev/null lfs
# passwd lfs
# chown -v lfs $LFS/tools
# chown -v lfs $LFS/sources
# su – lfs
Log in as the lfs user and run:
Then type:
And run:
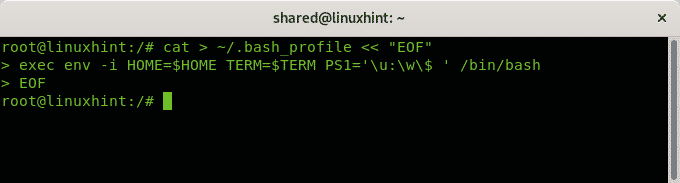
Create a new .bashrc by running:
And add:
# umask 022
# LFS=/mnt/lfs
# LC_ALL=POSIX
# LFS_TGT=$(uname -m)-lfs-linux-gnu
# PATH=/tools/bin:/bin:/usr/bin
# export LFS LC_ALL LFS_TGT PATH
# EOF
Then run:
# set MAKEFLAGS=’-j 2′
Then you can save the tools to start building your linux distribution following the steps at http://www.linuxfromscratch.org/lfs/view/6.6/chapter05/introduction.html
After finishing change the tools directory ownership by running:
The official documentation to build your distribution, prepare the kernel and base software can be found here. It is a sequence of steps you need to create a customized distribution. The steps are to prepare Virtual Kernel File Systems, Package Management, Entering the Chroot Environment, Creating Directories, Creating Essential Files and Symlinks, installing additional software listed here Stripping Again and Cleaning Up.
To start customizing the system visit the chapters:
- LFS-Bootscripts-20100124
- How Do These Bootscripts Work?
- Configuring the setclock Script
- Configuring the Linux Console
- Configuring the sysklogd Script
- Creating the /etc/inputrc File
- The Bash Shell Startup Files
- Device and Module Handling on an LFS System
- Creating Custom Symlinks to Devices
- Configuring the localnet Script
- Customizing the /etc/hosts File
- Configuring the network Script
Creating the /etc/fstab File - Linux-2.6.32.8
Finally install GRUB Using GRUB to Set Up the Boot Process and follow the steps before rebooting for first time
Ubuntu Live
Creating a customized Linux based on Ubuntu is pretty easy, it can be done very fast, it is extremely simple when compared with Linux From Scratch but it is not flexible at all, you’ll be able to add software, customize background and some details but basic customizations like the applications menu edition are not supported.
And add:
–variant=minbase
bionic
$HOME/live-ubuntu-from-scratch/chroot
http://us.archive.ubuntu.com/ubuntu/
Set mount points:
# sudo mount –bind /run $HOME/live-ubuntu-from-scratch/chroot/run
# sudo chroot $HOME/live-ubuntu-from-scratch/chroot
# mount none -t proc /proc
# mount none -t sysfs /sys
# mount none -t devpts /dev/pts
# export HOME=/root
# export LC_ALL=C
# echo "ubuntu-fs-live" > /etc/hostname
Then you’ll need to update the repositories and run apt update and the following command:
# dbus-uuidgen > /etc/machine-id
# ln -fs /etc/machine-id /var/lib/dbus/machine-id
# dpkg-divert –local –rename –add /sbin/initctl
# ln -s /bin/true /sbin/initctl
# apt-get install -y ubuntu-standard casper lupin-casper discover laptop-detect os-prober network-manager resolvconf net-tools wireless-tools wpagui locales linux-generic
When prompting configuration screens like GRUB’s press ENTER to default choices to continue. Then run:
Install any X window manager you want:
Add any additional software you want in your distribution and then run:
# apt-get install -y code
Select your locales and reconfigure the resolv.conf and network manager:
# dpkg-reconfigure resolv.conf
# dpkg-reconfigure network-manager
Then run:
# rm /sbin/initctl
# apt-get clean
# rm -rf /tmp/* ~/.bash_history
Unmount all filesystems:
# umount /sys
# umount /dev/pts
# export HISTSIZE=0exit
# sudo umount $HOME/live-ubuntu-from-scratch/chroot/dev
# sudo umount $HOME/live-ubuntu-from-scratch/chroot/run
Create directories and copy the kernel and binaries:
# mkdir -p image/{casper,isolinux,install}
# sudo cp chroot/boot/vmlinuz-**-**-generic image/casper/vmlinuz
# sudo cp chroot/boot/initrd.img-**-**-generic image/casper/initrd
# sudo cp chroot/boot/memtest86+.bin image/install/memtest86+
# wget –progress=dot https://www.memtest86.com/downloads/memtest86-usb.zip -O image/install/memtest86-usb.zipunzip -p image/install/memtest86-usb.zip memtest86-usb.img > image/install/memtest86rm image/install/memtest86-usb.zip
Setup GRUB
Run all following commands:
# sudo mksquashfs chroot image/casper/filesystem.squashfs
# printf $(sudo du -sx –block-size=1 chroot | cut -f1) > image/casper/filesystem.size
# cd $HOME/live-ubuntu-from-scratch
# cd $HOME/live-ubuntu-from-scratch/image
# grub-mkstandalone –format=x86_64-efi –output=isolinux/bootx64.efi –locales="" –fonts="" "boot/grub/grub.cfg=isolinux/grub.cfg"
# grub-mkstandalone –format=i386-pc –output=isolinux/core.img –install-modules="linux16 linux normal iso9660 biosdisk memdisk search tar ls" –modules="linux16 linux normal iso9660 biosdisk search" –locales="" –fonts="" "boot/grub/grub.cfg=isolinux/grub.cfg"
# cat /usr/lib/grub/i386-pc/cdboot.img isolinux/core.img > isolinux/bios.img
# sudo /bin/bash -c "(find . -type f -print0 | xargs -0 md5sum | grep -v "./md5sum.txt" > md5sum.txt)"
# sudo xorriso -as mkisofs -iso-level 3 -full-iso9660-filenames -volid "<YourDistroName>" -eltorito-boot boot/grub/bios.img -no-emul-boot -boot-load-size 4 -boot-info-table –eltorito-catalog boot/grub/boot.cat
–grub2-boot-info –grub2-mbr /usr/lib/grub/i386-pc/boot_hybrid.img -eltorito-alt-boot -e EFI/efiboot.img -no-emul-boot -append_partition 2 0xef isolinux/efiboot.img -output "../<yourdistronam>.iso" -graft-points "." /boot/grub/bios.img=isolinux/bios.img /EFI/efiboot.img=isolinux/efiboot.img
As you can see the process with Ubuntu Live is a lot faster and easier, but it is not more than an Ubuntu distribution with light customizations in contrast to Linux From Scratch which is fully customizable. I hope you found this tutorial useful, keep following LinuxHint for additional tips and updates on Linux and networking.