The Clear Linux Project for Intel Architecture is building a Linux OS distribution targeted for various cloud use cases. The goal of the Clear Linux OS is to showcase the best of Intel Architecture technology, from low-level kernel features to more complex use cases that span the entire operating system stack. Emphasis is been put on Power and Performance optimizations throughout the operating system as a whole.
Clear Linux Key Features
- With Clear Linux OS stateless feature, it can effectively perform a “factory reset” on the system and you can immediately set it up again
- With Clear Containers, ways are been worked on to improve security of containers by using Intel Virtualization Technology
- Cloud Integrated Advanced Orchestrator (ciao) is a new workload scheduler designed to address limitations in current cloud OS projects
- Clear Linux for Intel Architecture includes a telemetry solution that rapidly detects and responds to quality issues in the field
- Clear Linux OS for Intel Architecture is the first Linux distribution that supports auto proxy
- Mixing is a term we use to describe composing an OS for very specific use cases
- AutoFDO uses a sampling-based profile to drive feedback-directed optimizations
- Function Multiversioning (FMV) is a compiler feature that is capable of optimizing the same code for multiple architectures, automatically selecting the correct architecture-specific version of the code at runtime
How to Install Clear Linux on a Virtual Machine using VirtualBox
Create a virtual machine in VirtualBox
- Download the latest live version (clear-XXXX-live.img.xz)
[su_button url=”https://download.clearlinux.org/image/” target=”blank” icon=”icon: download”]DOWNLOAD THE LIVE IMAGE[/su_button]
- Decompress the downloaded image.
- On Linux Machine
xz -d clear-XXXX-live.img.xz
-
-
On a Windows Machine, use 7zip.
-
- Convert the raw image to VDI format by running either of the following commands (Note: open the command prompt as an Administrator > Change to directory Virtualbox was installed on, in my case “E:program FilesOracleVirtualBox”. Then note to point to directory you extracted the image file to)
VBoxManage convertfromraw e:Ubuntuclear-linuxclear-12540-live.img e:Ubuntuclear-linuxclear-12540-live.vdi --format VDI
or:
vbox-img convert --srcfilename e:Ubuntuclear-linuxclear-12540-live.img --dstfilename e:Ubuntuclear-linuxclear-12540-live.vdi --srcformat raw --dstformat vdi
![]()
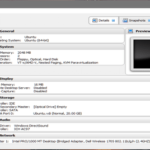
- Now create a new virtual machine using the following settings
- Type: Linux
- Version: Linux 2.6 / 3.x / 4.x (64-bit)
- On Hard disk, select “Use an existing virtual hard disk file”
![]()
- Next go to settings to enable EFI support
- System -> Enable EFI (special OSes only)
![]()
Start and Configure Clear Linux OS
- When you start the VM for the first time, Clear Linux will ask for a login user, type root and then enter new password
![]()
Now time to get the OS up and running
- Install the bundle that supports VirtualBox modules
swupd bundle-add kernel-lts
- Set a timeout in the bootmanager to shows a menu at boot time
clr-boot-manager set-timeout 10
- Update the bootloader entries
clr-boot-manager update
- Reboot the machine
reboot
![]()
- On restart, choose LTS kernel version
![]()
(Optional) Unset timeout to boot directly to LTS version
clr-boot-manager set-timeout 0
- Update bootmanger to use always LTS version
clr-boot-manager update
Next Install Guest Additions
- Install the sysadmin-basic bundle
swupd bundle-add sysadmin-basic
- Insert Guest Additions CD image using Devices menu and Install
install-vbox-lga 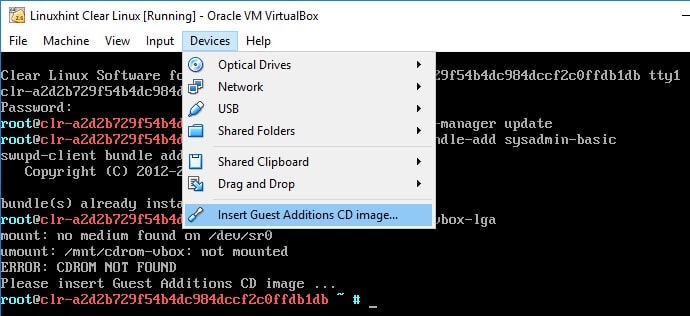
- Reboot your system
reboot
- Setup the Clear Linux graphical user interface ans start it up
swupd bundle-add os-utils-gui startxfce4
![]()
ONET IDC thành lập vào năm 2012, là công ty chuyên nghiệp tại Việt Nam trong lĩnh vực cung cấp dịch vụ Hosting, VPS, máy chủ vật lý, dịch vụ Firewall Anti DDoS, SSL… Với 10 năm xây dựng và phát triển, ứng dụng nhiều công nghệ hiện đại, ONET IDC đã giúp hàng ngàn khách hàng tin tưởng lựa chọn, mang lại sự ổn định tuyệt đối cho website của khách hàng để thúc đẩy việc kinh doanh đạt được hiệu quả và thành công.