Web scraping tutorials have been covered in the past, therefore this tutorial only covers the aspect of gaining access into websites by logging in with code instead of doing it manually by using the browser.
To understand this tutorial and be able to write scripts for logging into websites, you would need some understanding of HTML. Maybe not enough to build awesome websites, but enough to understand the structure of a basic web page.
Installation
This would be done with the Requests and BeautifulSoup Python libraries. Asides those Python libraries, you would need a good browser such as Google Chrome or Mozilla Firefox as they would be important for initial analysis before writing code.
The Requests and BeautifulSoup libraries can be installed with the pip command from the terminal as seen below:
pip install BeautifulSoup4
To confirm the success of the installation, activate Python’s interactive shell which is done by typing python into the terminal.
Then import both libraries:
from bs4 import BeautifulSoup
The import is successful if there are no errors.
The process
Logging into a website with scripts requires knowledge of HTML and an idea of how the web works. Let’s briefly look into how the web works.
Websites are made of two main parts, the client-side and the server-side. The client-side is the part of a website that the user interacts with, while the server-side is the part of the website where business logic and other server operations such as accessing the database are executed.
When you try opening a website through its link, you are making a request to the server-side to fetch you the HTML files and other static files such as CSS and JavaScript. This request is known as the GET request. However when you are filling a form, uploading a media file or a document, creating a post and clicking let’s say a submit button, you are sending information to the server side. This request is known as the POST request.
An understanding those two concepts would be important when writing our script.
Inspecting the website
To practice the concepts of this article, we would be using the Quotes To Scrape website.
Logging into websites requires information such as the username and a password.
However since this website is just used as a proof of concept, anything goes. Therefore we would be using admin as the username and 12345 as the password.
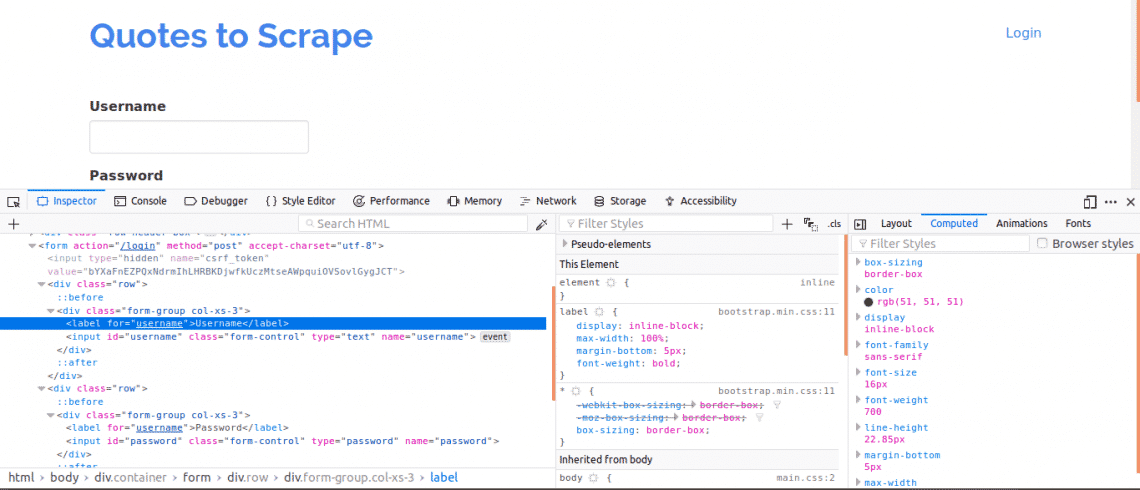
Firstly, it is important to view the page source as this would give an overview of the structure of the web page. This can be done by right clicking on the web page and clicking on “View page source”. Next, you inspect the login form. You do this by right clicking on one of the login boxes and clicking inspect element. On inspecting element, you should see input tags and then a parent form tag somewhere above it. This shows that logins are basically forms being POSTed to the server-side of the website.
Now, note the name attribute of the input tags for the username and password boxes, they would be needed when writing the code. For this website, the name attribute for the username and the password are username and password respectively.
Next, we have to know if there are other parameters which would be important for login. Let’s quickly explain this. To increase the security of websites, tokens are usually generated to prevent Cross Site Forgery attacks.
Therefore, if those tokens are not added to the POST request then the login would fail. So how do we know about such parameters?
We would need to use the Network tab. To get this tab on Google Chrome or Mozilla Firefox, open up the Developer Tools and click on the Network tab.
Once you are in the network tab, try refreshing the current page and you would notice requests coming in. You should try to watch out for POST requests being sent in when we try logging in.
Here’s what we would do next, while having the Network tab open. Put in the login details and try logging in, the first request you would see should be the POST request.
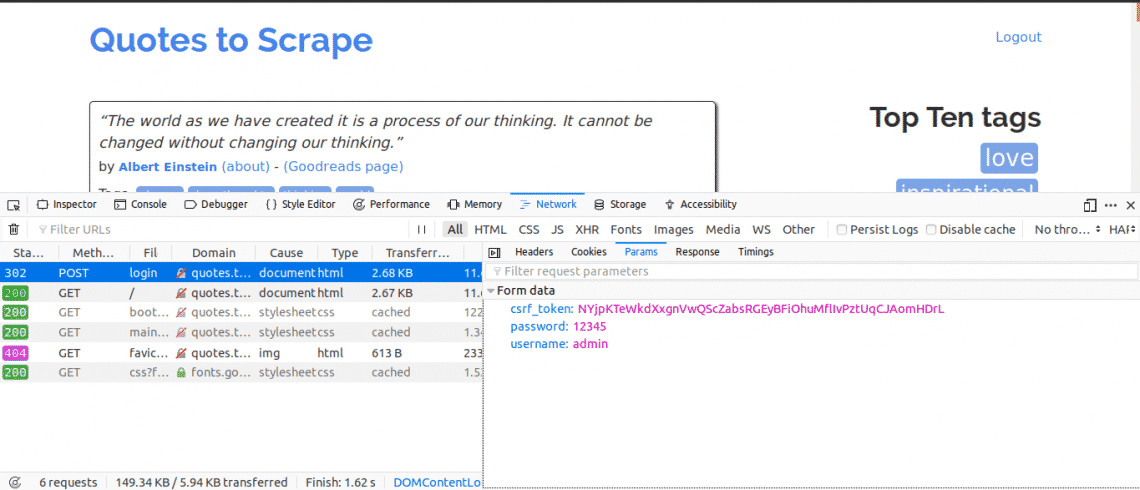
Click on the POST request and view the form parameters. You would notice the website has a csrf_token parameter with a value. That value is a dynamic value, therefore we would need to capture such values using the GET request first before using the POST request.
For other websites you would be working on, you probably may not see the csrf_token but there may be other tokens that are dynamically generated. Over time, you would get better at knowing the parameters that truly matter in making a login attempt.
The Code
Firstly, we need to use Requests and BeautifulSoup to get access to the page content of the login page.
from bs4 import BeautifulSoup as bs
with Session() as s:
site = s.get("http://quotes.toscrape.com/login")
print(site.content)
This would print out the content of the login page before we log in and if you search for the “Login” keyword. The keyword would be found in the page content showing that we are yet to log in.
Next, we would search for the csrf_token keyword which was found as one of the parameters when using the network tab earlier. If the keyword shows a match with an input tag, then the value can be extracted every time you run the script using BeautifulSoup.
from bs4 import BeautifulSoup as bs
with Session() as s:
site = s.get("http://quotes.toscrape.com/login")
bs_content = bs(site.content, "html.parser")
token = bs_content.find("input", {"name":"csrf_token"})["value"]
login_data = {"username":"admin","password":"12345", "csrf_token":token}
s.post("http://quotes.toscrape.com/login",login_data)
home_page = s.get("http://quotes.toscrape.com")
print(home_page.content)
This would print the page’s content after logging in, and if you search for the “Logout” keyword. The keyword would be found in the page content showing that we were able to successfully log in.
Let’s take a look at each line of code.
from bs4 import BeautifulSoup as bs
The lines of code above are used to import the Session object from the requests library and the BeautifulSoup object from the bs4 library using an alias of bs.
Requests session is used when you intend keeping the context of a request, so the cookies and all information of that request session can be stored.
token = bs_content.find("input", {"name":"csrf_token"})["value"]
This code here utilizes the BeautifulSoup library so the csrf_token can be extracted from the web page and then assigned to the token variable. You can learn about extracting data from nodes using BeautifulSoup.
s.post("http://quotes.toscrape.com/login", login_data)
The code here creates a dictionary of the parameters to be used for log in. The keys of the dictionaries are the name attributes of the input tags and the values are the value attributes of the input tags.
The post method is used to send a post request with the parameters and log us in.
print(home_page.content)
After a login, these lines of code above simply extract the information from the page to show that the login was successful.
Conclusion
The process of logging into websites using Python is quite easy, however the setup of websites are not the same therefore some sites would prove more difficult to log into than others. There is more that can be done to overcome whatever login challenges you have.
The most important thing in all of this is the knowledge of HTML, Requests, BeautifulSoup and the ability to understand the information gotten from the Network tab of your web browser’s Developer tools.