CentOS Add Users to Sudoers

29/12/2020
In the case of any Linux system, there’s a very powerful user – the “root”. It upholds the ULTIMATE power over the entire system, even modifying data at the hardware level! That’s why it’s so delicate and dangerous at the same time. Without the “root” access, hackers are forced to follow a trickier and more difficult path for taking over the system.The “root” privilege is responsible for performing all the actions that modifies the system files and packages. That’s why in the enterprise/professional workspace, not all users are allowed to run commands as they wish.

CentOS also comes up with a similar policy. It only allows a certain users to perform actions with the “root” privilege. For example, whenever you run any command with the “sudo” command, you’ll get the following error –

For fixing the issue, the user account must be in the “sudoers” file. In this tutorial, we’ll check out on adding a user into the “sudoers” file.

Adding users to the “sudoers”

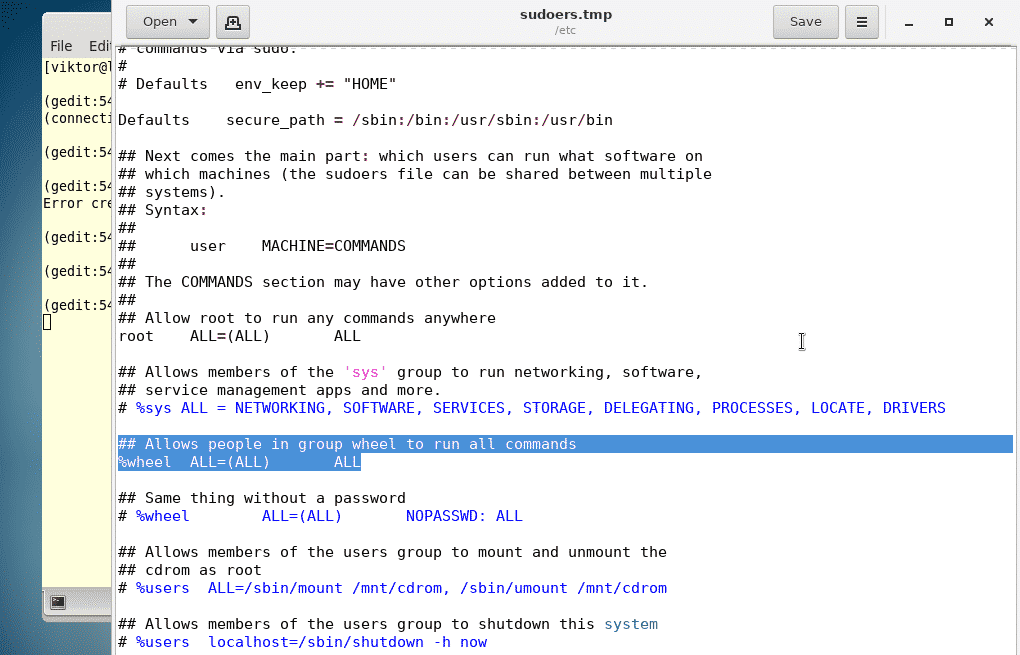
The trick here is NOT directly editing the “/etc/sudoers” file. Instead, we’ll be adding the specific user into the “wheel” group. In the case of CentOS, all the users in the group have the ability of running “sudo” commands and that’s the easier and safer way.

This is also proven within the “/etc/sudoers” file –

Optional – creating a new user

I’m going to create a new user for the “sudo” purpose only. Don’t worry; you can easily add the existing user.

Enter the “root” mode –

su

Now, create a new user –

adduser <username>

Time to add a password for the newly created username –

passwd <username>

It’s finally time to add the user “Yasuo” on the “wheel” group. At first, make sure that you’re logged as the “root” –

su

Now, perform the final action –

usermod -aG wheel <username>

Everything is set!

Testing the outcome

Well, it’s always worth testing the outcome, no matter how obvious it may seem. Let’s try out running a “sudo” command as “Yasuo” –

su – Yasuo

sudo yum update

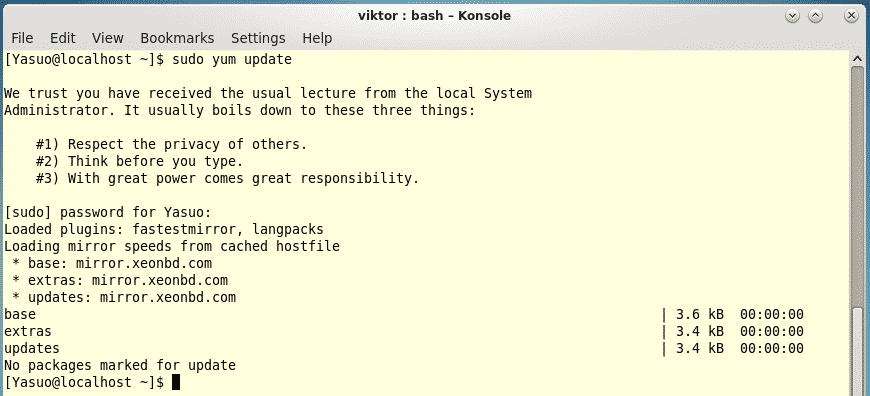
Voila! “Yasuo” is now a privileged user account capable of “sudo”!

ONET IDC thành lập vào năm 2012, là công ty chuyên nghiệp tại Việt Nam trong lĩnh vực cung cấp dịch vụ Hosting, VPS, máy chủ vật lý, dịch vụ Firewall Anti DDoS, SSL… Với 10 năm xây dựng và phát triển, ứng dụng nhiều công nghệ hiện đại, ONET IDC đã giúp hàng ngàn khách hàng tin tưởng lựa chọn, mang lại sự ổn định tuyệt đối cho website của khách hàng để thúc đẩy việc kinh doanh đạt được hiệu quả và thành công.
Bài viết liên quan

[Netbox] [Phần 5] Hướng dẫn khai báo IPAM trên Netbox

IPAM là viết tắt của IP Address Management, được sử dụng để quản lý các vlan và địa chỉ IP....
30/12/2020

[CI/CD] Phần 2: Hướng dẫn cài đặt Jenkins trên CentOS 7

Jenkins là phần mềm tự động hóa, mã nguồn mở và viết bằng Java. Với Jenkins, các nhà phát triển...
30/12/2020

Nextcloud [Part 2] – Cài đặt Nextcloud trên Ubuntu 18

Mục lục Chuẩn bị môi trường Cài đặt dịch vụ Web Cài đặt MariaDB Cài đặt PHP 7.2 Cài...
30/12/2020
Bài Viết

Bài Viết Mới Cập Nhật

Hướng dẫn fake ip bằng phần mềm SStap
10/06/2025

VPS treo game là gì? Thuê VPS treo game giá rẻ, không lo giật lag
02/06/2025

 BitBrowser – Best Anti-Detect Browser!
26/05/2025

Dịch Vụ Xây Dựng Hệ Thống Peering Với Internet Exchange (IXP)
04/04/2025

Dịch Vụ Triển Khai VPN Site-to-Site & Remote Access
04/04/2025