Basic Set up Diagram:
Here is the basic set up diagram to run this program.
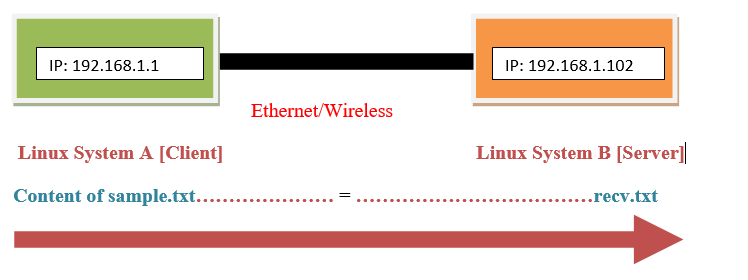
For simplicity we will call System A as A_client and System B as B_server throughout the article.
File requirements:
We need server.py and this file should be present at server system. In our case server.py should be at B_server system.
Another two files client.py and sample.txt should be present at client system. In our case those two files should be present at A_client system.
Assumptions:
Here are the assumptions:
- We should have two Linux systems with terminal access.
- Preferable Linux flavor is Ubuntu.
- Python3 should be installed.
- Both Linux systems should able to ping each other. Use ping <Other system IP> command to check ping.
- One system should act as Server and other system should act as client at one particular time.
Limitations:
Before we proceed further we should know that there are some limitations of this program.
- Python3+ should be installed to run this program. You may observe error or different behavior if run on python older versions.
- Only text file can be transferred through this program as of now. Any other format file which does not contain text may fail.
- Basic programming exceptions have been handled in the program.
- Program may or may not run on other OS than Ubuntu.
- Text file should be short at client side as buffer size of 1024 bytes has been used.
Set up requirements:
- We need at least one Linux system to try out this program. But recommendation is to use two different Linux systems which are connected through network.
- Two systems should be connected through Ethernet or Wi-Fi or any other connections.
Server Source Code:
https://github.com/linuxhintcode/websamples/blob/master/python_send_file/server.py
Client Source Code:
https://github.com/linuxhintcode/websamples/blob/master/python_send_file/client.py
How to run programs and expected output:
Here are the steps to execute the program.
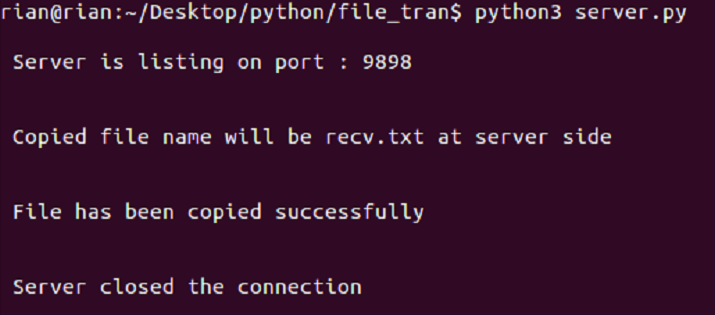
Step1: Go to B_server system and open a terminal. Short cut to open a terminal is Alt+Ctrl+t.
Step2: Now go the path where server.py is present.
Step3: Now run server.py like below
There should not be any errors and you should see below prints
Copied file name will be recv.txt at server side
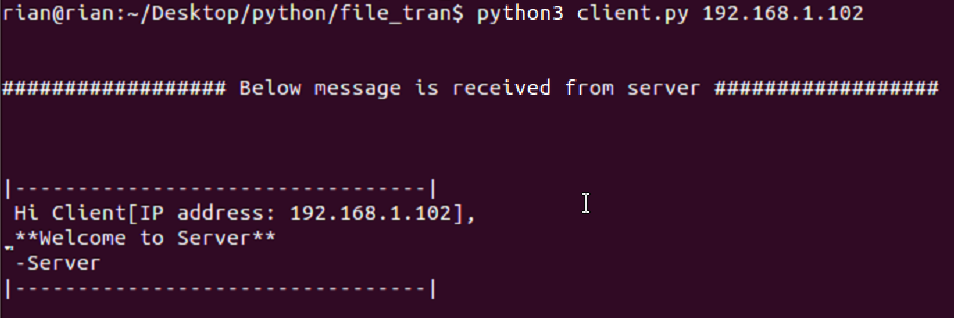
Step4: Now open terminal at A_client system.
Step5: Go to the path where client.py and sample.txt are present.
Step6: Now run client.py like below
We have observed that we need to know the IP address of server. We can execute below command to know the IP address of B_server system.
ifconfig
Now output of A_client system should be like this
|———————————|
Hi Client[IP address: 192.168.1.102],
**Welcome to Server**
-Server
|———————————|
Step7: Now go to B_server and look for below output
Server closed the connection
Step8: There should be one file name recv.txt at server folder. The content of this recv.txt should be same sample.txt.
So we have successfully copied a file from client to server over network through python program.
Code explanations:
There are two python files server.py and client.py.
Note that we will explain once if any code is same inside server.py and client.py.
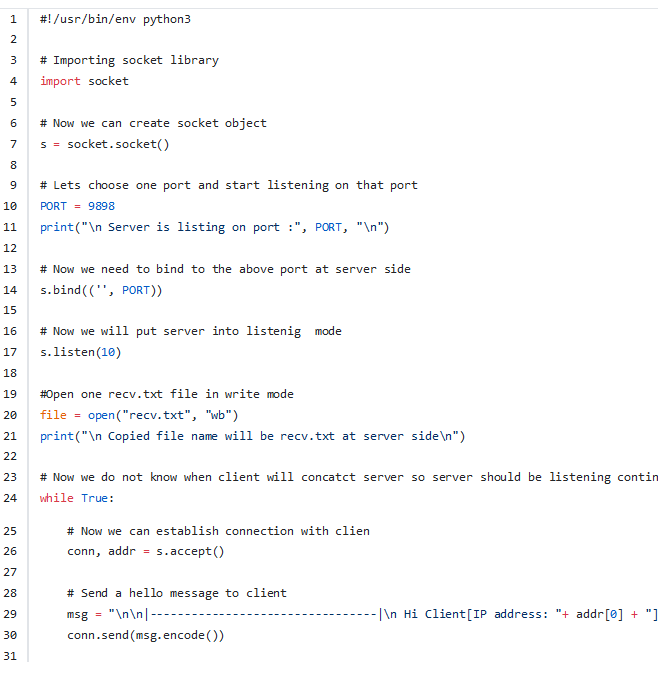
- server.py:
This is shebang line which means by default this server.py should use python3. Let’s see one advantage of this line.
We have executed the server.py or client.py like python3 <.py file name>. Now without using python3 we can execute the python file. Follow below commands
Go to super user mode:
Give all permission to .py file:
Run server.py:
Importing socket library into python program as we are going
to use socket for connection.
s = socket.socket()
We are creating a object “s” to access all methods of socket. This is a OOPs concept.
Now we choose one port where server will be listening. We can use non reserved port instead of this.
We use bind method to bind server ip address to that port [9898]. One observation is we could have used exact IP address of server in place of first argument of bind method but we choose to left blank as this work fine.
file = open("recv.txt", "wb")
We have opened one file name “recv.txt” in server for write mode and got file pointer. This is required as we have to copy one text file from client.
Let’s start one infinite while loop as server’s job is to wait until a client communicates with server on that 9898 port. So this while loop is required.
This code is to accept any incoming connection request from client. Conn will use “conn” to communicate with client and “addr” is the IP address of client who has sent commotion request to this server on port 9898.
"+ addr[0] + "], n **Welcome to Server** n -Servern
|———————————|n nn"
This code is to create a message to send to client. This message should be printed on client terminal. This confirms that client is able to communicate with server.
Now we have the message ready, and then send it to client using that “conn”. This code actually send message to client.
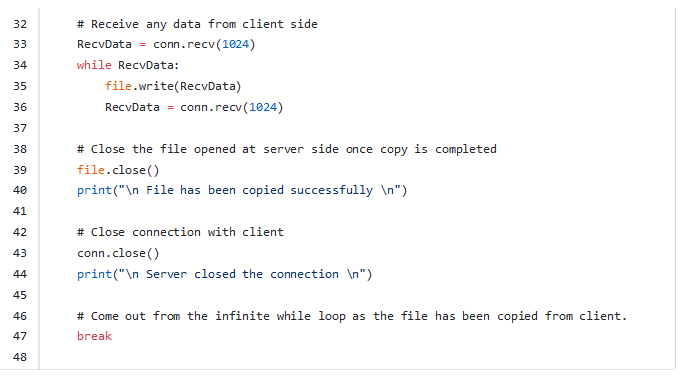
This code is receiving any data that is sent from client side. In our case we are expecting the content of sample.txt in “RecvData”.
One more while loop with condition RecvData is not empty. In our case it’s not empty.
Once we have content inside “RecvData” then we are writing to that file “recv.txt” using file pointer “file”.
Again trying to receive if there is any data from client. Once “RecvData” has no data the code will break the while loop.
This will just close the file pointer as we are done with file write.
This will close the connection with client.
This is to come out from infinite while loop at B_server.
- client.py:
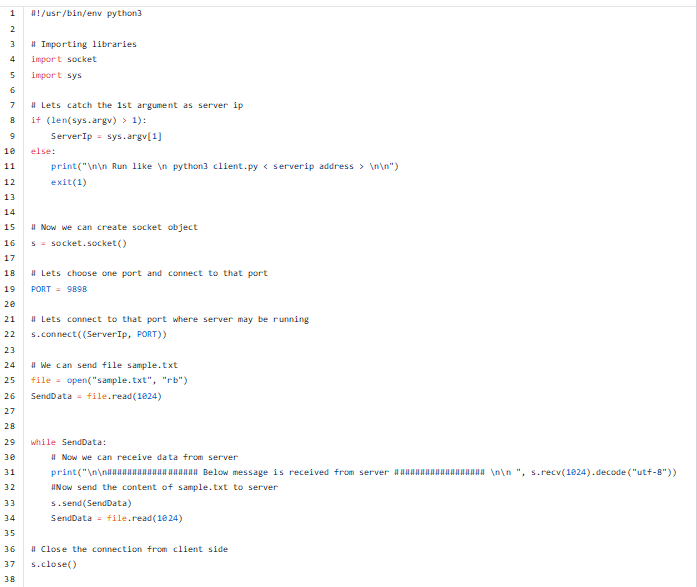
Importing sys library as we want use argument facility in python.
ServerIp = sys.argv[1]
else:
print("nn Run like n python3 client.py < serverip address > nn")
exit(1)
As we pass IP address of B_server after file name client.py while running, we need to catch that server IP address inside client.
…..if (len(sys.argv) > 1): => To make sure user passes at least one argument as IP address and catch that IP address insdie “ServerIP”.
If user does not pass at least one argument code shows help and come out from code.
This has to be same port as mentioned at B_server side.
This code will do TCP connection to server IP with that port. Anything wrong at this ponint results into failures in connection.
We are opening “sample.txt” in read mode to read only content.
Reading the content of file and putting inside “SendData” variable.
We are starting one while loop if “SendData” has data. In our case if “sample.txt” is not empty it should have data.
Now we can send content of “sample.txt” to server using socket object “s”.
Again reading if there is anything left. So there will be nothing to read from file “SendData” will be empty and it will come out from while loop.
This is not close the connection from client side.
Ubuntu Screenshots Server side
Ubuntu Screenshots Client side
Tested combinations:
- Linux as server and Linux as client: PASS
- Linux as client and Linux as server: PASS
- Linux as server and Windows10 as client: PASS
- Linux as client and Windows10 as server: PASS
The recommendation is to use two Linux systems for server and client.
Expected Errors:
- You can see below error if server is not running on 9898 port
Traceback (most recent call last):
s.connect((ServerIp, PORT))
ConnectionRefusedError: [Errno 111] Connection refused
- Below error is seen if IP address is not passed at client side
Run like
- Below error is seen if 1st argument at client side is not an IP address
Traceback (most recent call last):
s.connect((ServerIp, PORT))
socket.gaierror: [Errno –2] Name or service not known
- Below error is seen if port is use like 98980
Traceback (most recent call last):
s.connect((ServerIp, PORT))
OverflowError: getsockaddrarg: port must be 0–65535.
- Below error is seen if “sample.txt” is not present at client side.
Traceback (most recent call last):
file = open("sample.txt", "rb")
FileNotFoundError: [Errno 2] No such file or directory: ‘sample.txt’
Conclusion:
Using this program we can send a simple text file from one system to another system through network using python program. This gives us basic learning of python and socket programming also for sending data over network.