How to Setup a Static IP Address on Debian 9
In this guide, I’ll show you how to set a static IP in your Debian desktop or server installation. By default, the Debian installer will try to fetch an IP via DHCP. In most cases this is desirable because it’s simple and it works with no configuration, especially in a home setting.
However, if you intend for your computer to be a server or want to predictably address it via a fixed IP address, assigning it a static IP is your best choice. However, before we get started, you’ll need to make sure that the IP you want to give your machine is unique and not being used on your network.
Determining What IP to Use
If you are setting up a Debian server in a data center environment, your data center will give you the information to use. If you’re allocating them yourself, check your router and other computers to see what network configuration values they are using.
For example, if your router is addressable via the IP address 192.168.1.254, then valid IPs would likely be 192.168.1.1 to 192.168.1.253. That said, you’ll want to check other IP addresses allocated to ensure the one you want to use is free.
The quickest and easiest way to obtain netmask and gateway settings would be to look at other machines on the network. If they are working correctly, you can generally trust those settings, especially if they use DHCP to automatically connect to the network. On Windows machines, the ipconfig command on the command line will show you the details of that machine’s network settings. For macOS and Linux machines, the ifconfig or ip addr show command will do the same.
Console Method After Install
This is the desired (and probably only) method to use for a Debian machine intended to be used a server, especially if it is in a data center.
Via SSH or a local terminal, we need to become root. Either login as root or become root with the su command. You may used to be using sudo to run root commands, but sudo isn’t configured by default on a fresh Debian install, so for this tutorial we’ll use su.
Once you are root, run:
ip link show
This will show a list of all of your network devices. Once you know the name of your network card, run:
nano /etc/network/interfaces
If you prefer to use vim, emacs, or another editor, substitute nano for the editor name of your choice.
Once you’re in the file, you can add the following configuration lines to add your dedicated IP. Please note that you must change eth0 to the name of your network device that we discovered earlier, and the IP address, netmask, and gateway to values we previously discovered.
auto eth0 iface eth0 inet static address 192.168.1.200 netmask 255.255.255.0 gateway 192.168.1.254
Save the file (in nano this is done with CTRL+X, then hit Y when asked to save), then you can either run (as root):
systemctl restart networking.service
Or simply reboot your machine to activate the new IP.
If you want to add multiple IP addresses to the same interface, or perhaps add an IP alias to the same interface, use eth0:0, eth0:1, etc. (replacing eth0 with your device name), incrementing the value after the colon, for each additional IP address you want to add.
Graphical Method After Install
If your system is already installed and you don’t have a graphical desktop configured, you can use the console method as previously described. However, if you have a graphical desktop enabled, you can use the NetworkManager configuration screens. The screenshots and instructions are for the MATE desktop, but with all desktop environments the instructions will be very similar.
In MATE, click System -> Preferences -> Internet and Network -> Network Connections:

Then select the appropriate connection (most likely Wired Connection 1) and click Edit:

On the next screen, click IPv4 Settings then click Add, then enter the IP, netmask, and default gateway. In the example below I have added our example values as previously used, so be sure to change the values to match your requirements.
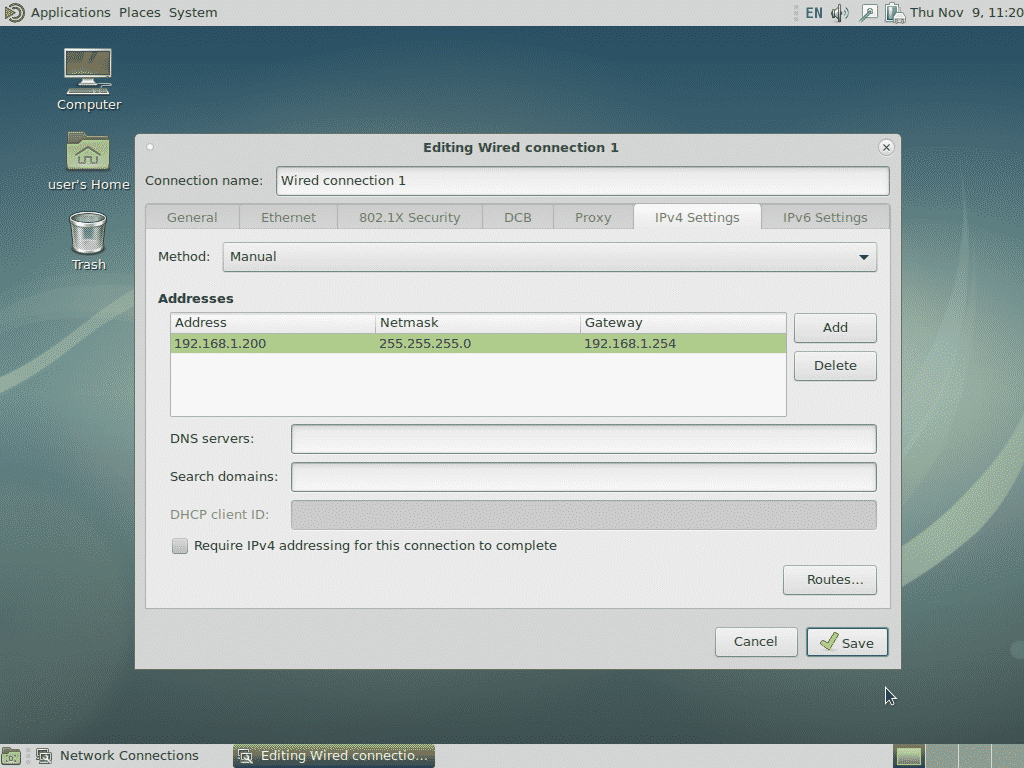
When you’re done, click Save, and the static IP will be added.
You may also use this method to add multiple IP addresses to the same interface, or to define IPv6 or any other required settings.
Graphical Method During Install
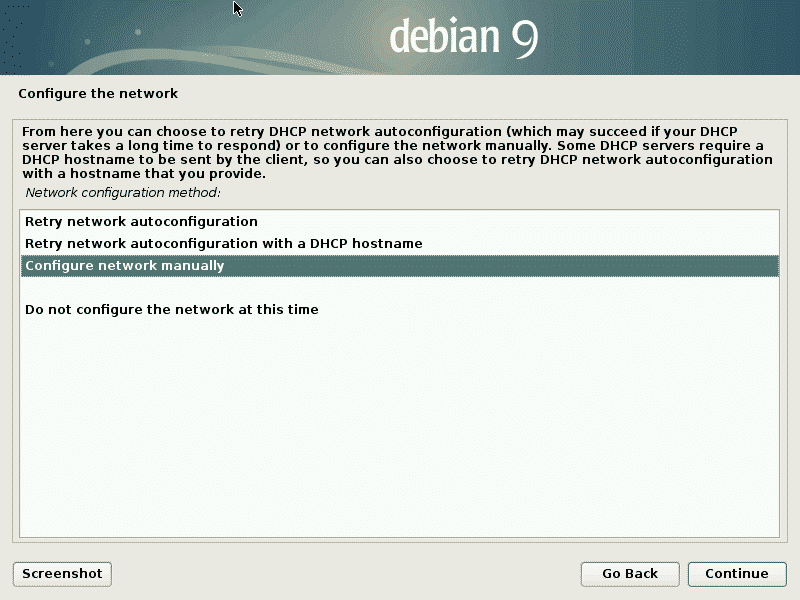
This method is best for home or small office installations where the Debian desktop interface is used. During the network detection phase of the installer, you can click cancel, which will take you to a screen like this:

Clicking continue will lead to the next screen where you’ll have an opportunity to configure the network manually. Select that option then click Continue again.
After this you’ll be prompted for network information (i.e. IP address, netmask, etc.).
If you miss the opportunity to click cancel during network detection, you can click “Go Back” and select “Configure the network” to achieve the same result.
Text Method During Install
The text method during install is identical to the graphical method shown above except the screen will have text-driven menus. The prompts and steps are otherwise the same.