You can use Docker volumes to save changes of a certain directory of your Docker containers. In simple words, you can persist data of your Docker containers using Docker volumes.
You can tell Docker which directory of your Docker container to persist changes in your Dockerfile when you create custom Docker images using Dockerfile.
In this article, I will show you how to use Docker volumes in Dockerfile and how to manage these volumes. Let’s get started.
Using Volumes in Dockerfile:
In this section, I will create a custom Docker image of Apache 2 server from the Docker image httpd:2.4 and use Docker volumes to persist the Apache WEBROOT data.
First, create a new directory (let’s say www3) for your custom Docker image (let’s say www:v1) and navigate to it:

Now create a Dockerfile with the following command:

Now edit the Dockerfile file with nano or vim text editor.
Nano:
Vim:
Now add the following lines to it and save the file:

Here, FROM httpd:2.4 means, the base image of this custom Docker image is httpd:2.4
WORKDIR /usr/local/apache2/htdocs means, when you Iog into the shell (command line interface) of containers made from this custom image, you will be in the /usr/local/apache2/htdocs directory of the container by default.
VOLUME /usr/local/apache2/htdocs means, create a new volume for each of the containers created from this custom image and persist all the files in the /usr/local/apache2/htdocs directory of that container to this new volume.
Now that you’ve got your Dockerfile ready, it’s time to build our custom Docker image (I will call it www:v1).
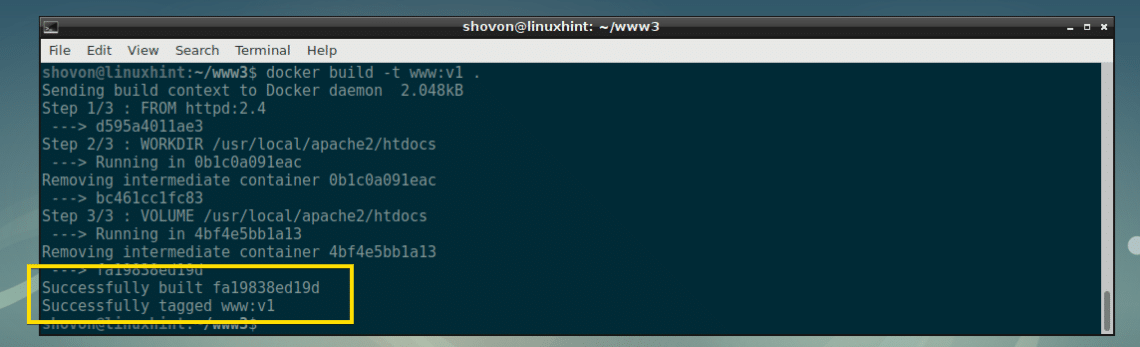
To build your custom Docker image www:v1 using the Dockerfile, run the following command:

The custom Docker image www:v1 is created successfully.
Listing Locally Available Docker Images:
You can list all the locally available Docker images with the following command:
As you can see, the www:v1 image is about 178MB in size and it was created about a minute ago.

Working with Docker Volumes and Containers:
We’ve created a volume enabled Docker image www:v1 in the earlier section of this article above.
To create a Docker container (let’s say app1) from the custom Docker image www:v1, run the following command:
The Docker container app1 should be created.

Now run the following command to bring up the shell of the app1 container:

As you can see, I am in the /usr/local/apache2/htdocs directory by default.

Let’s create a index.html file here with the following command:

Now exit out of the app1 container.

Now run the following command to find the IP address of the app1 container:
As you can see, the IP address is 172.17.0.2

Now from any web browser, if you visit the page at 172.17.0.2, you should see the index.html page that you just created.

Now let’s test whether persistence works or not.
First stop the app1 container with the following command:

Then start the container again with the following command:

Now find the IP address of the container again:

As you can see, the index.html page is unchanged when I access it from my web browser. It means Docker volume is persisting data from the app1 container.

Managing Docker Volumes:
You can list all the Docker volumes on computer with the following command:
As you can see, I have 2 Docker volumes on my computer. The long hexadecimal string as marked in the screenshot below, is the auto generated volume for the app1 container.

When you create a container from a Docker image that uses volumes, a new volume like this will be generated for each container you create.
For example, I created another container app2 from the www:v1 image that I built from the Dockerfile that uses volume.
As you can see, a new volume is generated.

Both of these volumes hold different data. The data persists for only one container for which it was generated. For example, the volume generated for the app1 container persists data only for the app1 container. The same goes for the app2 container. The volume generated for the app1 container won’t store data from the app2 container.
You can remove volumes if you don’t need it anymore. For that to work, you have to stop and remove the container the volume is attached to. If you try to remove a volume that is attached to a container, you will get the following error message.

Let’s say you want to delete the volume for app2 container, first run the following commands to stop and remove the container:
$ docker container rm app2<

Now remove the volume that was attached to app2 container with the following command:

The volume should be removed.

Adding Files to Volumes Using Dockerfile:
You can use the COPY command in your Dockerfile to copy files from your host computer to your Docker volumes. That way, any container you create from your custom built Docker image will have these files by default. You can check more about COPY in the Dockerfile documentation.
So that’s basically how you work with Docker Volumes using Dockerfile. Thanks for reading this article.