MySQL client can be any remote application like phpMyAdmin or your custom web app or MySQL’s own command line client which is also named just mysql.
Setting up MySQL server is often tedious, you have to set up user account, open ports, set passwords, create databases and tables, etc. In this post, I will try and minimize some of your miseries by making a simple MySQL deployment using Docker-Compose. If this is your first time dealing with compose, here’s a quick tutorial on it and while you are at it, you will want to know about more about Docker volumes too. These are used to store persistent data for applications like MySQL.
Disclaimer: In no way is this compose file “production ready”. If you want to run a MySQL database in production, you will have to tighten up the security quite a bit more. This will include locking down the root account, setting up TLS, and setting stricter permissions on various databases for various database users, etc.
A Simple Example
First ensure that Docker is installed on your workstation or server. To run a simple MySQL service, first create a new folder on your Docker host. Name it MySQLCompose:
Create a file docker-compose.yml in it using your favorite text editor, and write the following:
services:
db:
image: mysql
command: –default-authentication-plugin=mysql_native_password
restart: always
environment:
MYSQL_ROOT_PASSWORD: UseADifferentPassword
adminer:
image: adminer
restart: always
ports:
– 8080:8080
Then run the following command from inside the same directory:
This with the above compose file two new containers will be created, first will be the database service, and the second will be an adminier container which will act as a frontend for database management.
Although the communication between the adminier container and the MySQL service is over TCP using port 3306, we don’t have to open any ports on our database. This is because docker containers on a bridge network can talk to one another on any port (except on the default bridge network of a docker host). You can list the docker network by using the command docker network ls and it will show you that a new network has indeed been created.
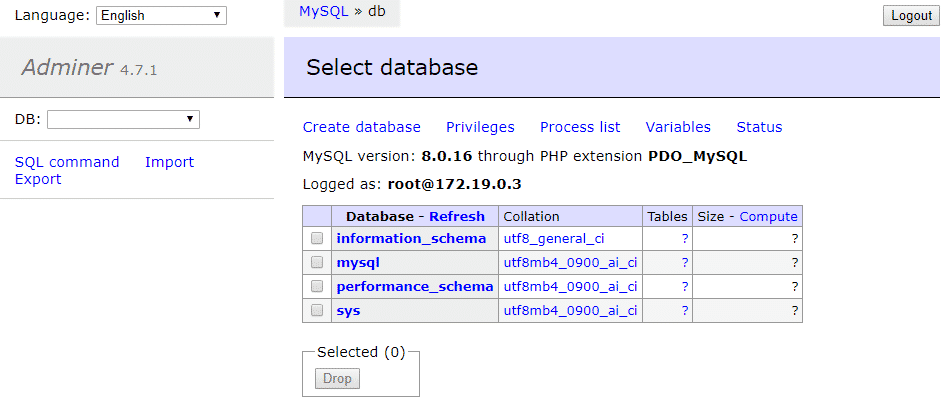
Visit http://localhost:8080 and log in as root using the password UseADifferentPassword and you will get a very simple UI to interact with your MySQL. MySQL can be configured to be authenticated in a variety of ways, however, we have opted to use just the mysql_native_password as an authentication method. You can pass the MySQL root password using via an environment variable, as shown in the yml file itself.
NOTE: For the sake of clarity, I mentioned important credentials like the MySQL root password and other user passwords in plain text, here. This is obviously a security risk. The proper way to do this would be to use Docker secrets, but that’s a topic for another day.
Deploying WordPress
WordPress is perhaps the classic example for highlighting the strengths and nuances of docker-compose. Like most regular installation of WordPress, the Docker variant also uses MySQL for its backend database. However, the database is run as a different container where as the web server (along with the application WordPress) run on another container.
Here’s a snippet from the official documentation of docker-compose regarding its setup.
services:
db:
image: mysql:5.7
volumes:
– db_data:/var/lib/mysql
restart: always
environment:
MYSQL_ROOT_PASSWORD: somewordpress
MYSQL_DATABASE: wordpress
MYSQL_USER: wordpress
MYSQL_PASSWORD: CreateNewPasswordPleaseDontCopyThis
wordpress:
depends_on:
– db
image: wordpress:latest
ports:
– "8000:80"
restart: always
environment:
WORDPRESS_DB_HOST: db:3306
WORDPRESS_DB_USER: wordpress
WORDPRESS_DB_PASSWORD: CreateNewPasswordPleaseDontCopyThis
WORDPRESS_DB_NAME: wordpress
volumes:
db_data: {}
This will create a WordPress website open at port 8000 of your Docker host. You can see that the services section defines two services under it:
First, the MySQL database with a named volume to store persistent data and some environment variables to setup MySQL user, database and password.
Second, the WordPress container which has a webserver, php and WordPress all installed with it. It needs to talk to the database (available at db:3306 internally), it exposes the port 80 internally to the rest of the world via the Docker host’s port 8000. It also has a few environment variables defining where to find the database (db:3306), along with the database name, username and password that we defined on the MySQL service.
Conclusion
Hopefully, the above few examples illustrate how to configure a MySQL container. The underlying idea is that you pass your database name and other configuration details as environment variables. You can always refer to the description provided at Docker Hub and then you can configure MySQL for your own application.