Eclipse Integrated Development Environment is an incredible open source compilation of tools, projects and co-existing working groups. Eclipse is the most used open source Java Integrated Development Environment because of its advanced text editor with numerous tools and plug-ins. It makes it easy and fast to write Java programs and run them. More updates can be added to Eclipse given its plug-in structure. The Eclipse platform is developed using the Java programming language and can be utilized to develop client applications, integrated development environments, and some other tools.
The major features of Eclipse include:
- Windows builder
- Integration using Maven
- Mylyn
- XML editor
- Git client
- CVS client
- PyDev
Selecting a workspace
After installing Eclipse, the next step is to select a workspace for your projects. This refers to folders on your hard drive that you can store your project’s files and Java classes.
Components of an Eclipse window
The components that can be seen on opening an Eclipse window include the following;
- Views
- Editors
- Menu bar
- Toolbar
Several Eclipse Windows can be opened simultaneously, each showing a different perspective.
The Eclipse Menus include;
- File menu
- Help menu
- Navigate menu
- Run menu
- Edit menu
- Search menu
- Project menu
- Window menu
However, with plug-ins, which can be updated, you can add more menus and menu items.
An Eclipse Perspective
An Eclipse perspective is used to refer to an initial group, an arrangement of views and an editor area. Java is Eclipse’s default perspective. A user has the option of selecting from an open perspective or to open a new perspective.
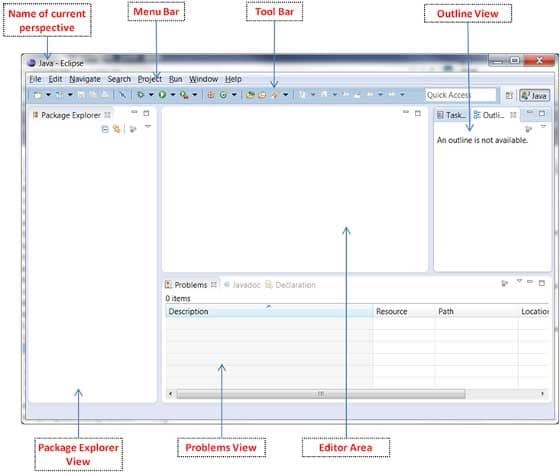
Fig 1. Image of the Java window
The Eclipse Java Perspective
a. Package Explorer view
This gives the user space to browse the structure of their projects and to access files in an editor through double-clicking the file. It can also be used to alter the project’s structure by either renaming or move files and files by dragging and dropping.
b. Outline view
This displays the structure of the selected source file.
c. Problems view
Displays errors and caution messages. You can open it by going to the window, show view then problems. This view also allows the user to initiate a Quick fix by right-clicking on the selected messages.
d. Javadoc view
Displays the documentation of the chosen element in the Java editor.
e. Java editor
Can be used to change the structure of the Java source code. A click on the left side of the editor gives you an option of configuring the properties.

Fig 2. An example of creating a project in Eclipse
Creating a Java Program using Eclipse
To create a project;
- Select file
- Click on New
- Select Java project
- Enter com.username.eclipse.ide. one (as the title of your project – choose a package name you like, this is just an example)
- Click on the Finish button
To create a package
After creating the com.username.eclipse.ide.one package, click on the src folder, right-click it then choose New then select Package. Press Finish button
Editing files
When you want to develop a new file that is a copy of one which is not within your present project, you can import it, using import command,
To edit an existing file
- Go to navigator
- If, for some reason, the files are not visible, click on the arrow near the project name.
- Double-click on the file of your choice
How to import files (import command)
- Go to files, then select import
- Check that the triangle near the General is facing downwards
- Select file system, then Next
- Select Browse to look for your file
- Enter your project title in the folder
- Click finish
Creating Java class
This explains creating a new file which opens in the Java editor.
To create a Java class;
- Right-click on the package
- Click on New
- Select Class to create a Java class
- Enter MyFirstClassName as the class title
- Click the public static void main (string[]args) checkbox
- Press Finish button
Executing your project in Eclipse
To run your code either right-click on your Java class in the Package Explorer or right-click in the Java class and choose Run-as then select Java application. This command makes Eclipse run your Java Program, and the output is displayed in the console view.
How to set the Java Build Path
When compiling a Java project, we can make use of a Java build path so that we can discover dependent cases. It comprises the following items;
- Code in the source folders
- Jars and classes folder associated with the project
- Classes and libraries exported by projects referenced by this project
The Java build path page enables us to see and alter its contents. It can be accessed by right-clicking on the Java project in the package explorer view then clicking the properties menu item. On the left-hand side, select Java build path.
Eclipse Web Tool Platform
This provides useful tools for creating Java web applications that execute in a Java environment. They include HTML, CSS and XML files. With Eclipse Web Tool Platform, the process is made user-friendly as these web artifacts have already been created.
How to build a Java project in Eclipse
A Java project is associated with a Java builder. To view the builders associated with a project;
- Right-click on the particular project in the Package Explorer view
- Select Builders in the left-hand side tree
A java builder separates a java project from others. It must compile the Java source code and generate new classes.
Debugging a Java program
For a fast method of debugging a Java program you should use the Package Explorer view, following these steps;
- Right-click on the Java class that contains the method you want to debug
- Click on Debug As
- Select Java application
Special Issues dealing with Java Eclipse IDE
- Before this check on the availability of Java Development tools (JDT) plugin, from the Window, then select Open perspective before checking to see if Java is listed. If not, you should download JDT.
- Check for use project folder As Root for Sources and Classes before creating a project
- During debug runs, Eclipse will stop before main(), all you need to do is click the select button.
Running a Java program outside of Eclipse
In this case, you have to export it as a JAR file, which the standard distribution format for Java applications.
Creating a JAR file
- Choose your project then right-click for a drop-down options menu
- Select the Export menu entry
- Select JAR file then hit the next button
- Choose your project from the list, enter your export destination and a title for the JAR file
- Hit the Finish button
How to run your Program Outside Eclipse
- Open a command shell or terminal.
- Get back to the JAR file, by entering cd path_to_file
- To execute this program, include the JAR file in your classpath, which refers to the Java classes that you can access in the Java runtime
- Type java –classpath myprogram. Jar com.username.eclipse.ide.one.MyFirstclassName, which is a command, in the directory used to export.
The Breadcrumb
Activation of the breadcrumb mode for the Java editor enables you to navigate the source code directly from the Java editor. It can be done by right-clicking in the editor then select the show in breadcrumb entry. This activation makes it possible to navigate the source code from the editor. You can also conceal it by right-clicking on the feature, breadcrumb, then select hide.
Closing and opening Projects
You may want to focus all your attention on one project; this can be done by closing all other projects. Plus, closing projects saves runtime memory used by Eclipse hence decreasing the build time. Eclipse ignores closed projects such that all later searches ignore files from the closed project and the problem view also shows errors from the opened projects only.
To close a project, right-click on it and choose the close project menu. However, to close multiple unrelated projects right-click on it then select close unrelated projects. You can reopen a closed project by double-clicking on it then selecting open project.
The filter functionality for the Package Explorer view provides the options of hiding the closed projects.
Content Assist and Quick Fix
Content assist is a feature in Eclipse that provides the user with the ability to obtain context-sensitive code completion in an IDE upon user request. You can invoke this by pressing control and space buttons simultaneously.
Quick fix gives you some suggested replacements for an error that has been detected by Eclipse. The error will be underlined, select the particular text then simultaneously press, the buttons CTRL and 1. Quick fix allows you to come up with new local variables and fields not forgetting additional methods and new classes. Moreover, it can assign a statement to a variable and much other important material.
Conclusion
Most of Eclipse is written in the Java programming language making it more suitable as an IDE for developing greater platforms, application software and even IDEs through Java.
Sources
https://www.tutorialspoint.com/eclipse/eclipse_explore_windows.html
https://eclipse.org/home/index.php
https://www.vogella.com/tutorials/Eclipse/article.html#run-java-program-outside-eclipse
https://www.google.com/search?hl=en-GB&source=android-browser-type&q=ide+in+linux&oq=ide+in+linux&aqs=mobile-gws-lite..