In this tutorial, I will walk you through the process of installing Rancher on Ubuntu 18.04 server.
Requirements
- Two servers with Ubuntu 18.04 installed.
- A static IP address 192.168.0.100 is configured on Rancher server and 192.168.0.103 is configured on Rancher client.
- A root password is set up on both servers.
Getting Started
Before starting, you will need to update both servers to the latest stable version. You can update them with the following command:
apt-get upgrade -y
Once both servers are updated, restart them to apply all the changes.
Install Docker CE
Next, you will need to install Docker CE on both servers. By default, the latest version of Docker is not available in the Ubuntu 18.04 server default repository.
So, you will need to add the repository for that.
First, you will need to allow apt to use a repository over HTTPS. You can do it by installing the following packages.
software-properties-common -y
Next, download and add Docker CE GPG key with the following command:
apt-key add gpg
Next, add the Docker CE repository to APT with the following command:
Add the following line:
Save and close the file, when you are finished. Then, update the repository with the following command:
Once the repository is updated, install Docker CE with the following command:
Once the installation has been completed, check the Docker service status with the following command:
You should see the following output:
Loaded: loaded (/lib/systemd/system/docker.service; enabled; vendor preset: enabled)
Active: active (running) since Tue 2019-06-06 21:16:14 IST; 1min 0s ago
Docs: https://docs.docker.com
Main PID: 14498 (dockerd)
CGroup: /system.slice/docker.service
└─14498 /usr/bin/dockerd -H unix://
Jun 06 21:16:14 rancher dockerd[14498]: time="2019-06-06T21:16:14.456058066+05:30"
level=warning msg="Your kernel does not support swap memory
Jun 06 21:16:14 rancher dockerd[14498]: time="2019-06-06T21:16:14.456058066+05:30"
level=warning msg="Your kernel does not support cgroup rt pe
Jun 06 21:16:14 rancher dockerd[14498]: time="2019-06-06T21:16:14.456058066+05:30"
level=warning msg="Your kernel does not support cgroup rt ru
Jun 06 21:16:14 rancher dockerd[14498]: time="2019-06-06T21:16:14.456058066+05:30"
level=info msg="Loading containers: start."
Jun 06 21:16:14 rancher dockerd[14498]: time="2019-06-06T21:16:14.456058066+05:30"
level=info msg="Default bridge (docker0) is assigned with an
Jun 06 21:16:14 rancher dockerd[14498]: time="2019-06-06T21:16:14.456058066+05:30"
level=info msg="Loading containers: done."
Jun 06 21:16:14 rancher dockerd[14498]: time="2019-06-06T21:16:14.456058066+05:30"
level=info msg="Docker daemon" commit=4d60db4 graphdriver(s)
Jun 06 21:16:14 rancher dockerd[14498]: time="2019-06-06T21:16:14.456058066+05:30"
level=info msg="Daemon has completed initialization"
Jun 06 21:16:14 rancher systemd[1]: Started Docker Application Container Engine.
Jun 06 21:16:14 rancher dockerd[14498]: time="2019-06-06T21:16:14.456058066+05:30"
level=info msg="API listen on /var/run/docker.sock"
Docker is now installed and running. You can now proceed to the next step.
Install Rancher Container
Next, you will need to download Rancher image from the Docker hub repository. You can download and start Rancher container with the following command:
You should see the following output:
stable: Pulling from rancher/server
bae382666908: Pull complete
29ede3c02ff2: Pull complete
da4e69f33106: Pull complete
8d43e5f5d27f: Pull complete
b0de1abb17d6: Pull complete
422f47db4517: Pull complete
79d37de643ce: Pull complete
69d13e08a4fe: Pull complete
2ddfd3c6a2b7: Pull complete
bc433fed3823: Pull complete
b82e188df556: Pull complete
dae2802428a4: Pull complete
effdbd93afcb: Pull complete
a4fcc35085ad: Pull complete
e8234323b6c4: Pull complete
d3f751a5d9cc: Pull complete
d4b24e84b43b: Pull complete
da9d7264902d: Pull complete
df2b31306256: Pull complete
c2238fcf71c2: Pull complete
10c7c4a52421: Pull complete
Digest: sha256:290e94536b32665d0ff537c2b947804faeed2768cd8652f0088a0d7e1acced75
Status: Downloaded newer image for rancher/server:stable
d209e25452fecc8c77cb276855bb7875c137c8b5d6ed6ba1c461c44ac877f6c7
Rancher server is now starting and listening on port 8080.
Now, open your web browser and type the URL http://192.168.0.100:8080. You should see the following page:
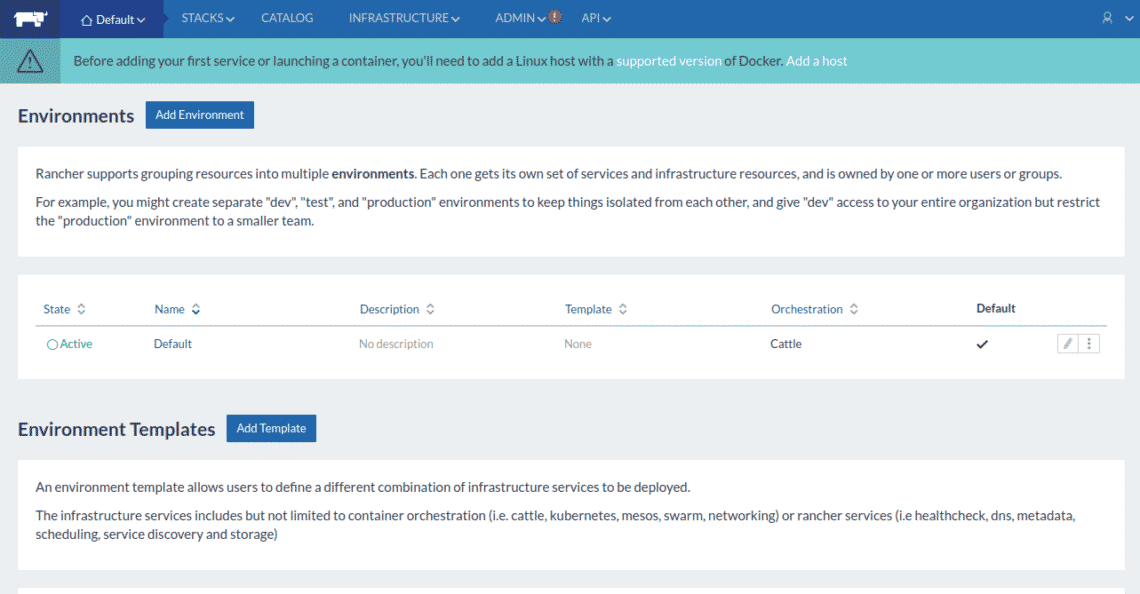
Now, click on the ADMIN menu and click on the Access Control to configure the Rancher Access Control. You should see the following page:
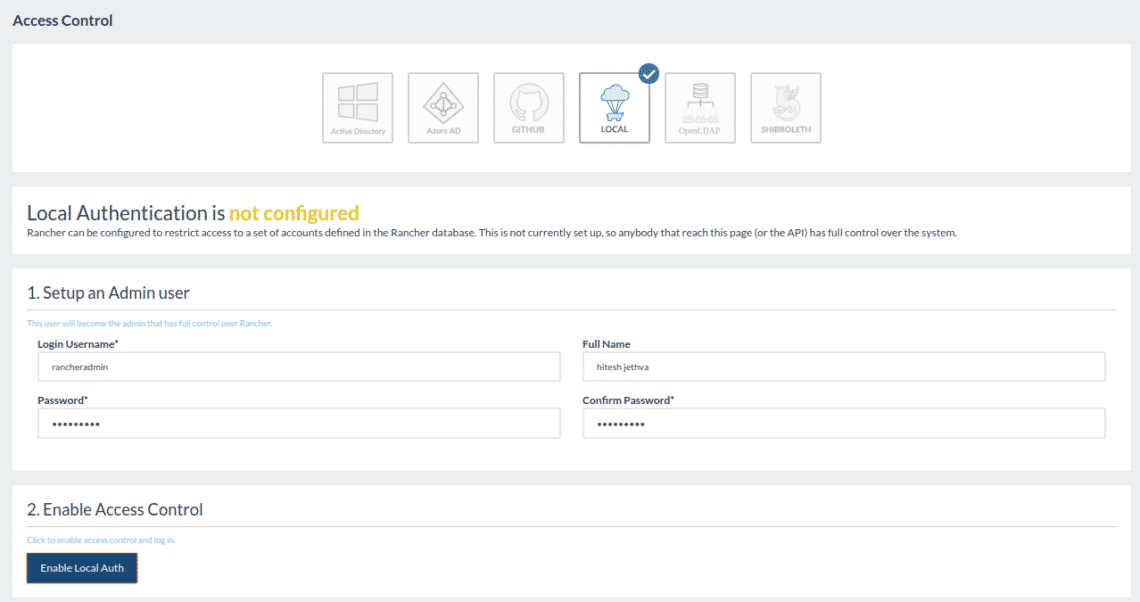
Now, click on the LOCAL Access Control, provide all the required details and click on the Enable Local Auth button. You should see the following output:

Configure Rancher Client for Rancher Server
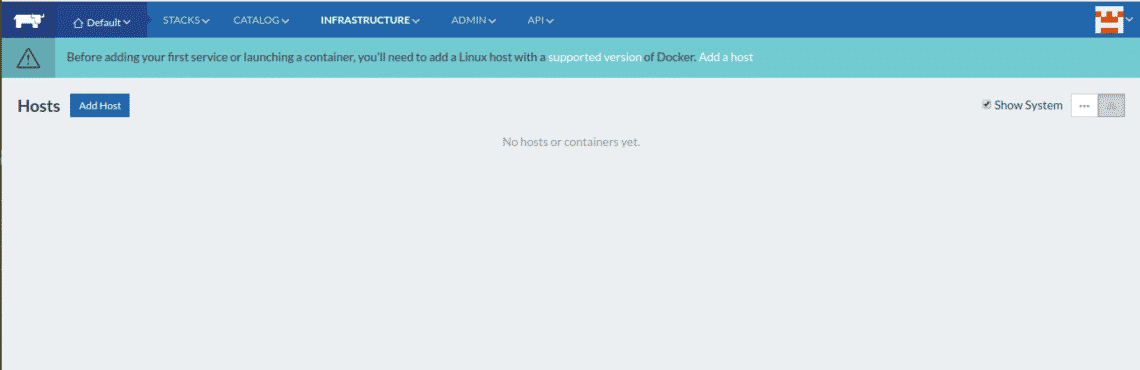
Now, go to the Rancher server Dashboard > INFRASTRUCTURE > Hosts. You should see the following page:
Now, click on the Add Host button. You should see the Host Registration URL in the following page:
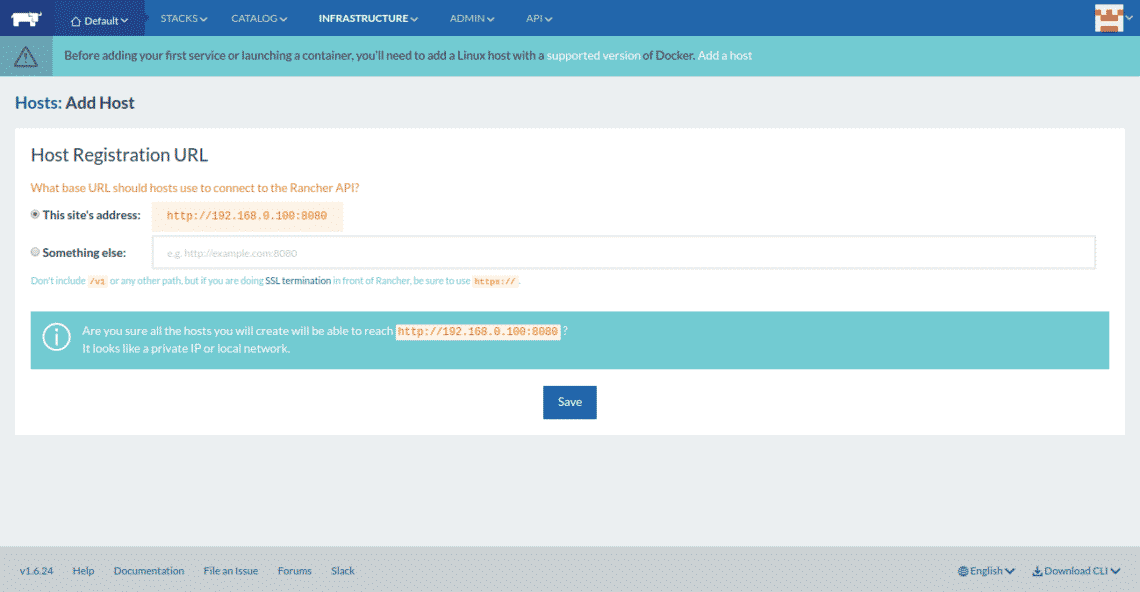
Now, click on the Save button. You should see the following page:
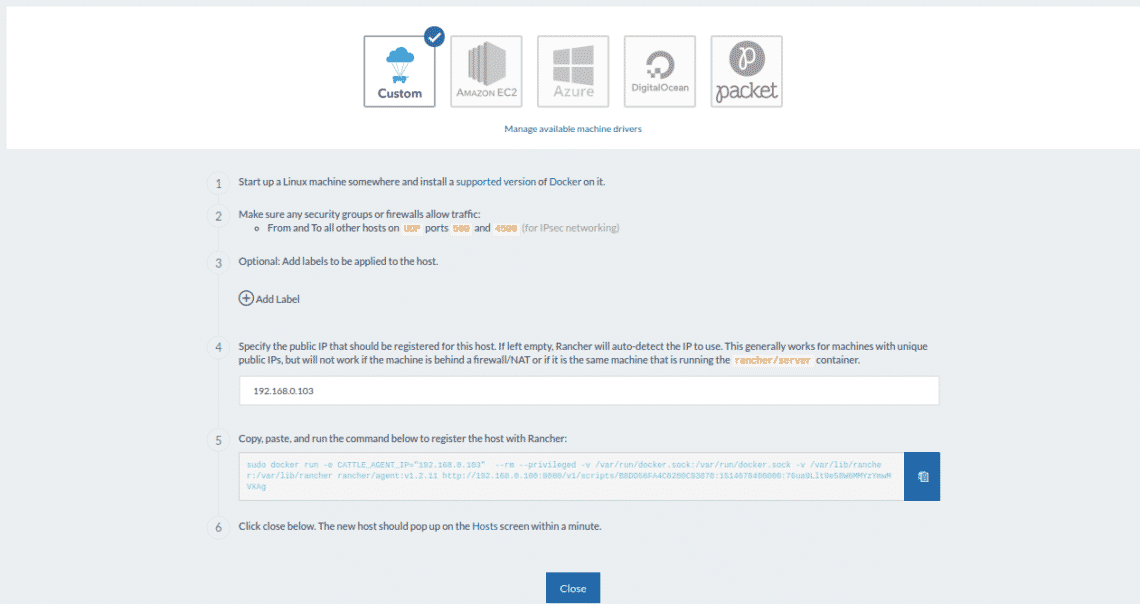
Next, provide Rancher Client IP address and select Custom host type. Then, copy the command from the box.
Next, log in to Rancher client system and paste the command which you have copied earlier:
/var/run/docker.sock:/var/run/docker.sock -v /var/lib/rancher:/var/lib/rancher
rancher/agent:v1.2.11 http://192.168.0.100:8080/v1/scripts/A7694D846BE6239EC650:
1546214400000:XOdj1phkwWhDH556B6Jb1Le2E
Once the command runs successfully. You should see the following output:
v1.2.11: Pulling from rancher/agent
b3e1c725a85f: Pull complete
6a710864a9fc: Pull complete
d0ac3b234321: Pull complete
87f567b5cf58: Pull complete
063e24b217c4: Pull complete
d0a3f58caef0: Pull complete
16914729cfd3: Pull complete
bbad862633b9: Pull complete
3cf9849d7f3c: Pull complete
Digest: sha256:0fba3fb10108f7821596dc5ad4bfa30e93426d034cd3471f6ccd3afb5f87a963
Status: Downloaded newer image for rancher/agent:v1.2.11
INFO: Running Agent Registration Process, CATTLE_URL=http://192.168.0.100:8080/v1
INFO: Attempting to connect to: http://192.168.0.100:8080/v1
INFO: http://192.168.0.100:8080/v1 is accessible
INFO: Configured Host Registration URL info: CATTLE_URL=http://192.168.0.100:8080/v1
ENV_URL=http://192.168.0.100:8080/v1
INFO: Inspecting host capabilities
INFO: Boot2Docker: false
INFO: Host writable: true
INFO: Token: xxxxxxxx
INFO: Running registration
INFO: Printing Environment
INFO: ENV: CATTLE_ACCESS_KEY=C6CB8593B0FDB118728B
INFO: ENV: CATTLE_AGENT_IP=192.168.0.100
INFO: ENV: CATTLE_HOME=/var/lib/cattle
INFO: ENV: CATTLE_REGISTRATION_ACCESS_KEY=registrationToken
INFO: ENV: CATTLE_REGISTRATION_SECRET_KEY=xxxxxxx
INFO: ENV: CATTLE_SECRET_KEY=xxxxxxx
INFO: ENV: CATTLE_URL=http://192.168.0.100:8080/v1
INFO: ENV: DETECTED_CATTLE_AGENT_IP=192.168.0.103
INFO: ENV: RANCHER_AGENT_IMAGE=rancher/agent:v1.2.11
INFO: Launched Rancher Agent: b8816fa492af46e02fb7da53096c829d2b834375fb533f5586c7ebc
6c906ab77
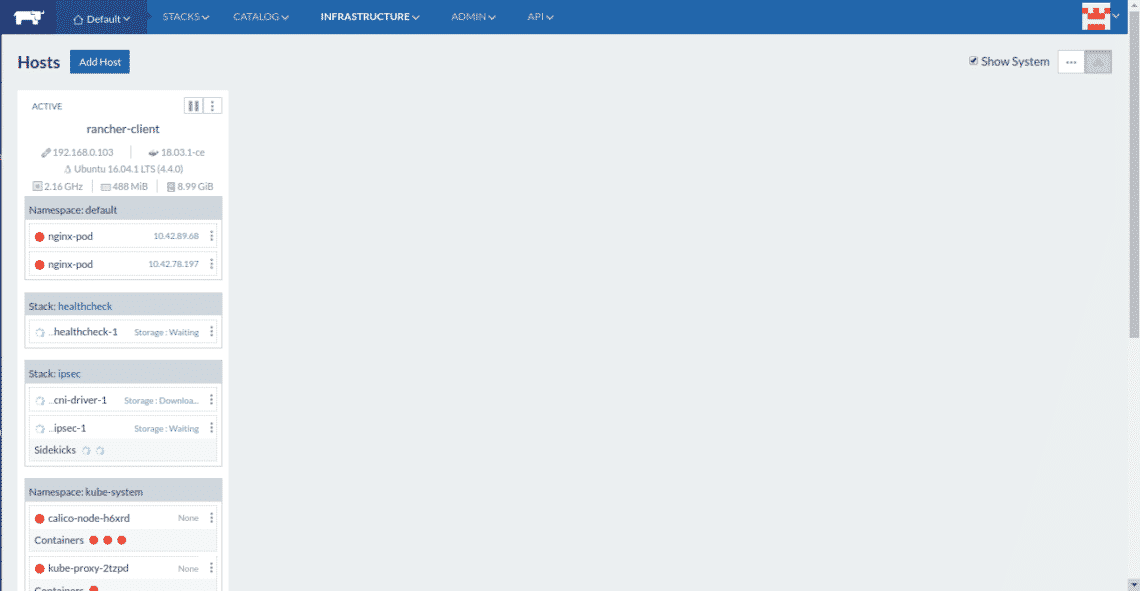
Next, go to the Rancher Server Dashboard and click on the close button. You should see the Rancher client in the following page:
Conclusion
Congratulations! you have successfully installed and configured Rancher Server and Client with Docker on Ubuntu 18.04 server. You can now create new container from Rancher Server dashboard and manage it from a central location.