For example, you want to send a reminder to your customers for their remaining bills and you have all customer related data like their phone numbers, address, age etc in an excel sheet or a database then instead of doing it manually, you can write a simple program in Python to automatically do that for you. In this tutorial, we’ll learn how email protocol works and how you can automate the process to save your precious time.
A word about SMTP
Simple Mail Transfer Protocol (SMTP) is computerized equivalent of your postal service. It is a protocol that works on Application layer of a TCP/IP Network. Its a standard protocol for sending and receiving emails over the internet. Mail Transfer process consists of Email Servers and Clients sending and receiving emails to each other.
For example, you have a GMAIL account and you want to send an email to your friend on his YAHOO account. You write an email and hit send, but the backend process is a little complicated, and to understand this process, you will have to understand SMTP first. Your SMTP email client first sends HELO (or EHLO) to the GMAIL server, you can say this command or header is equivalent of Host header in HTTP protocol and is used to identify the server using domain name. After HELO or EHLO, the client authenticate itself to the server with the given username and password using AUTH command. Then it specifies sender’s and recipient’s email address and then the message body and sends email to the GMAIL Server. GMAIL server will first confirm that whether the recipient’s email address on YAHOO exists or not, then it will send the email to YAHOO Server where recipient can retrieve his emails from.
SMTPLIB
SMTPLIB is a python library that can be used as an SMTP client just like your GMAIL, YAHOO, Thunderbird or any other email client and can be used to send emails. We can perform all tasks using SMTPLIB client that we can do with those having Graphical User Interface.
It comes by default in Python, incase you don’t have it then you can install using the following command.
OR in Python3
Writing your first Email with Python
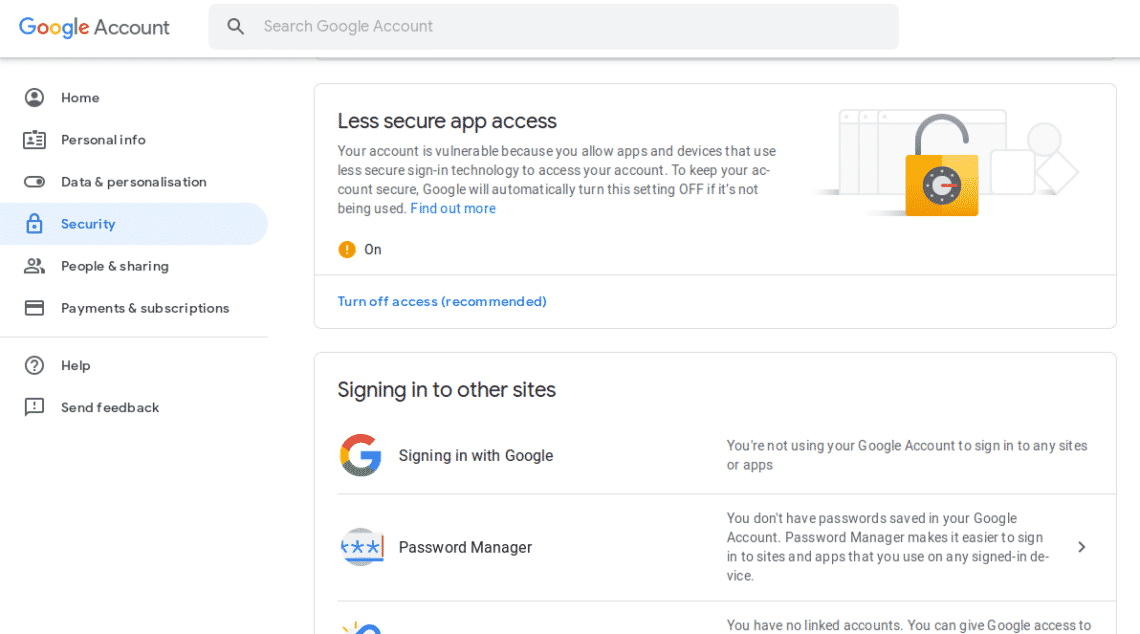
In this tutorial, I’ll use a GMAIL account as sender, also I’ll be making use of Python console, so It’ll be easier for me to explain each line of code step by step. To get started, we need to allow our GMAIL access to less secure apps.
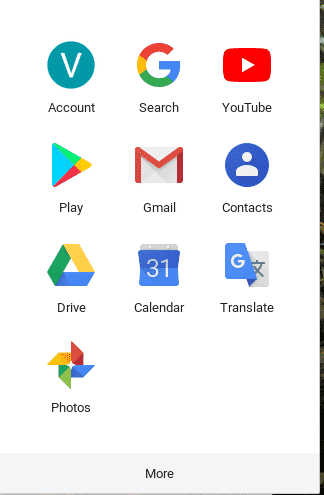
So login to your GMAIL account and then go to account settings.
Now make sure that access for less secure apps is turned on.
Now open your python console and start writing your first email using Python
Python 2.7.16 (default, Oct 7 2019, 17:36:04)
[GCC 8.3.0] on linux2
Type “help”, “copyright”, “credits” or “license” for more information.
>>> import smtplib
//connect to the GMAIL Server with domain name and port number (This setting differs for
each email provider, please take a look at the table given below)
>>> mailobj = smtplib.SMTP(‘smtp.gmail.com’,587)
//say hello to the server
>>> mailobj.ehlo()
(250, ‘smtp.gmail.com at your service, [103.255.4.246]nSIZE35882577n8BITMIMEnSTARTTLS
nENHANCEDSTATUSCODESnPIPELININGnCHUNKINGnSMTPUTF8′)
//Port 587 means that we’re using encrypted TLS connection, so start encrypted TLS
communication using starttls(), so that our credentials and messages don’t get sniffed
>>> mailobj.starttls()
(220, ‘2.0.0 Ready to start TLS’)
//login to your GMAIL account using email and password
>>> mailobj.login(‘[email protected]’,‘s3cr3t_p4ssw0rd’)
(235, ‘2.7.0 Accepted’)
//specify sender and recipient’s email address and email content
>>> mailobj.sendmail(‘[email protected]’,‘[email protected]’,‘Subject:
Hello world! n Hello world! this is my first hello world email in Python’)
{}
// close connection to the GMAIL server
>>> mailobj.quit()
(221, ‘2.0.0 closing connection b6sm4519863lfi.72 – gsmtp’)
In the above sample program, replace the given content with your own. If you’re not a GMAIL user, then you can use email server of your provider. Here is the list of Domain Names and ports of some common mail providers.
| Name | Server Domain Name | Port |
| Gmail | smtp.gmail.com | 587 |
| Outlook / Hotmail | smtp-mail.outlook.com | 587 |
| YAHOO Mail | smtp.mail.yahoo.com | 587 |
| Verizon | smtp.verizon.net | 465 |
| Comcast | smtp.comcast.net | 587 |
Some Words about IMAP
So we just studied that SMTP is used to send emails, but what is IMAP (Internet Access Messaging Protocol) for? SMTP can’t be used to search and get emails from the server, IMAP or POP3 protocol is used for that purpose.
IMAPCLIENT, IMAPLIB and PYZMAIL
There are two major libraries in Python that can be used as an IMAP client to find, retrieve and delete emails from the mail server. Python has default imaplib library but another external library imapclient is more effective and easy to use. In this tutorial we’ll use imapclient to retrieve emails from mail server.
The problem with imapclient is that it retrieves emails from mail server in raw format. So, we’ll need pyzmail library as a parser for user friendly output. To install both libraries, type
ubuntu@ubuntu:~$ sudo pip install pyzmail
Getting your Emails from Mail Server
Now, we’ll learn how to search and download email from the mail server using imapclient. We’ll use imapclient to search and download emails from the server, then we’ll use pyzmail to parse this raw content. Let’s
>>> import imapclient
// Connect to GMAIL’s IMAP server
>>> obj = imapclient.IMAPClient(‘imap.gmail.com’,ssl=True)
// Login to your email account using your credentials
>>> obj.login(‘[email protected]’,‘s3cr4tp4ss’)
‘[email protected] authenticated (Success)’
// Select message folder to read i.e INBOX, DRAFTS, SENT mails
>>> obj.select_folder(‘INBOX’, readonly=True)
{‘EXISTS’: 830, ‘PERMANENTFLAGS’: (), ‘HIGHESTMODSEQ’: 112999, ‘UIDNEXT’: 931,
‘FLAGS’: (‘\Answered’, ‘\Flagged’, ‘\Draft’, ‘\Deleted’, ‘\Seen’,
‘$NotPhishing’, ‘$Phishing’), ‘UIDVALIDITY’: 1, ‘READ-ONLY’: [”], ‘RECENT’: 0}
// Search your messages in your INBOX, or apply a filter, below filter will show
you the mails received after 25-Oct-2019
>>> mail_ids = obj.search([‘SINCE’, ’25-Oct-2019′])
>>> mail_ids
[919, 920, 921, 922, 923, 924, 925, 926, 927, 928, 929, 930]
// The list “mail_ids” contains a list of email ids received since 25-Oct-2019,
you can download an email using imapclient fetch function.
>>> raw_mail = obj.fetch([919],[‘BODY[]’,‘FLAGS’])
// Now, the content in raw_mail variable is in raw format, it can’t be displayed on the
screen directly, So we’d need a parser to parse this content for a user friendly output
>>> import pyzmail
>>> message = pyzmail.PyzMessage.factory(raw_mail[919][‘BODY[]’])
// Now email is parsed and stored in message variable, to get the subject of
the email, use get_subject function
>>> message.get_subject()
u‘Dress up your skills this Halloween with 25% off’
// Similarly, you can see sender details
>>> message.get_addresses(‘from’)
[(u‘Usama Azad’, ‘[email protected]’)]
>>> message.get_addresses(‘to’)
[(u‘[email protected]’, ‘[email protected]’)]
// To get the body of the email, type
>>> message.text_part.get_payload().decode(message.text_part.charset)
u”Hi! Enjoy flat 25% on our premium courses”
If you have an account in some other Email Service provider other than GMAIL, you can login to their IMAP server. Here is the IMAP domain name list of some famous mail providers.
| Provider | Domain Name for IMAP Server |
| YAHOO | imap.mail.yahoo.com |
| Hotmail/Outlook | imap-mail.outlook.com |
| Verizon | incoming.verizon.net |
| Comcast | imap.comcast.net |
| AT&T | imap.mail.att.net |
Deleting your Email from IMAP Server
Similar to searching and retrieving emails from the server, you can also delete emails from your mail server using their uid. Just follow the given steps
emails
>>> obj.select_folder(‘INBOX’, readonly=False)
>>> mail_ids = obj.search([‘SINCE’, ’25-Oct-2019′])
>>> mail_ids
[919, 920, 921, 922, 923, 924, 925, 926, 927, 928, 929, 930]
// Provide an email uid or a list of email uids, after running below command,
your email will get disappeared from INBOX.
>>> obj.delete_messages(919)
{919: (‘\Seen’, ‘\Deleted’)}
// This command will permanently delete your emails from the Mail server
>>> obj.expunge()
(‘Success’, [])
https://techtopz.com/build-a-birthday-reminder-application-in-python-on-mac/
Making up your own birthday reminder
You have birthdays of your friends in coming months and you want to wish them on their birthdays. But you have a lot of work in your office and there is a possibility that you will forget to wish them. So this task can be automatically performed using python. Following is the code to perform this task.
import re
// os module is used to perform operating system tasks i.e accessing direcotories
import os
import datetime
import smtplib
// defining a function which will be sending emails
def send_mail(reciever_mail_address, name):
sender_mail_address = "[email protected]"
passwd = "senderPasswd"
//connecting to gmail server with domain name and port number
obj = smtplib.SMTP(‘smtp.gmail.com’, 587)
obj.ehlo()
obj.starttls()
// logging into your gmail account
obj.login(sender_mail_address, passwd)
// sending mail to ‘reciever_mail_address’.
obj.sendmail(sender_mail_address, reciever_mail_address, "Subject: BirthDay Wishing Mailnn HappyBirthday "+name)
// ending connection
obj.quit()
// Main Body
// going to the directory in which file containing data is present
os.chdir("path_to_birthday_data_file")
while 1:
// getting date and time of present moment
today = datetime.datetime.today()
today = str(today)
// getting current year, month, day, hour, minute and second
current_year = today[0:4]
current_month = today[5:7]
current_day = today[8:10]
current_hour = today[11:13]
current_minute = today[14:16]
current_sec = today[17:19]
// opening birthday file in ‘birthday_file’ object in read mode
birthday_file = open(‘birthday_file’,‘r’)
// saving all the lines of ‘birthday_file’ in lines list
lines = birthday_file.readlines()
// closing ‘birthday_file’ object
birthday_file.close()
// reading each line using for loop
for line in lines:
// making a regular expression to find a date in ‘birthday_file’
dateEx = re.compile(r"d{4}-d{2}-d{2}")
findDate=dateEx.search(line)
date = findDate.group()
// getting birthday_month and birthday_day from file
birthday_month = date[5:7]
birthday_day = date[8:10]
// making a regular expression to find mail address from birthday_file
mailEx = re.compile(r"w*@w*.com")
findMail = mailEx.search(line)
reciever_mail = findMail.group()
//making a regular expression to find the name of the person
nameEx = re.compile(r"w*")
findName = nameEx.search(line)
name = findName.group()
// checking if someone’s birthday is coming or not
if current_month == birthday_month and =current_day == birthday_day:
// sending mail at exact 08:00
if current_hour == ’08’ and current_minute == ’00’ and current_sec == ’00’:
// calling ‘send_mail’ function
send_mail(reciever_mail, name)
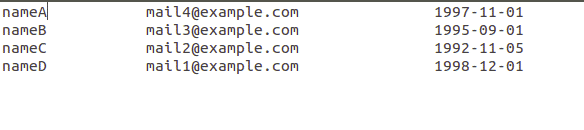
Now we make a ‘birthday_file’, in which we save names, email addresses and their date of birth. This is a simple text file and looks like this.
Explanation
We will read this file using python script and check whose birthday is coming and wish them. First of all we will import some Modules. DATETIME Module has functions which give us current date and time and many more. But we will only use this to find the current date and time. SMTPLIB module is used to send mail and has been explained above. RE module has functions which is used to find regular expression from a string.
In this script, we define ‘send_mail’ function, which sends mail to the ‘reciever_mail_address’, whose name is ‘name’. Both the arguments are passed to the function from main body of msg. In the main body of the script we will see how we find ‘reciever_mail_address’ and ‘name’.
Sending email using smtplib has been explained above, so you can read it and it will not be discussed here.
In the main body, we go to the directory where we have saved ‘birthday_file’ using ‘os.chdir()’. Then we have a ‘while loop’ which is always true so it will check the birthday continuously. Now we get current date and time and save it in ‘today’ variable. It looks like this.
We will extract year, month, day, hour, minutes and seconds using indices of these quantities. After this, we will open birthday_file in an object ‘birthday_file’ in read mode, so we can only read it. Now we will save all the lines of this file in lines list. ‘birthday_file.readlines()’ will save each line in ‘lines’ list. After this we will close birthday_file using ‘birthday_file.close()’ function.
Now we will read each line one by one using for loop. In each line only one person’s data is available in ‘birthday_file’, so we are reading only one person’s data at one time in this loop.
After this, we will extract Date of birth, email address and name of person using RE module. As we have written the date in the following format
So we will make a regular expression ‘dateEx’ which finds this format in the line.
Above command find a string which has ‘4 digits’ followed by ‘-’ then ‘2 digits’ followed by ‘-’ and ‘2 digits’. This will give us the date of birth of the person so we will extract birth_day and birth_month from this expression.
Similarly we will find email address using regular expressions. After this, we will compare the birthday_month and current_month and birthday_day and current_day. If these conditions are satisfied, we will send the birthday email using ‘send_mail’ function at exact ‘08:00’.
Running Script Automatically via Cronjob
Now we will make sure that this python script runs every time. To do this, we will add this task to crontab. Crontab, in linux, is used to perform tasks automatically. What we have to do is just add the task to crontab. To do so, follow the given steps.
- Open crontab to add task in your terminal using following command
- At the end of this file enter following command without #
Above commands will enable your system to run the python script every time you restart your system. In this way, your system will run python script every time when your system is on.