Introduction
Ubuntu is a Linux operating system that is quite popular among server administrators due to advanced features provided with it by default. One such feature is the firewall, which is a security system which monitors both incoming and outgoing network connections to make decisions depending on the pre-defined security rules. To define such rules, the firewall has to be configured prior to its use, and this guide demonstrates how to enable and configure the firewall in Ubuntu with ease along with other useful tips in configuring the firewall.
How to Enable Firewall
By default, Ubuntu comes with a firewall, known as UFW (uncomplicated firewall), which is sufficient, along with some other third party packages to secure the server from external threats. However, since the firewall is not enabled it has to be enabled prior to anything. Use the following command to enable the default UFW in Ubuntu.
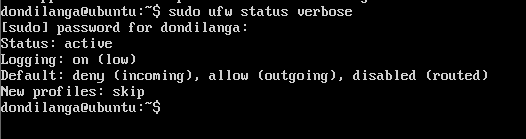
- First of all, check the current status of the firewall to make sure it’s really disabled. To get detailed status, use it along with the verbose command.
sudo ufw status
sudo ufw status verbose
- If it’s disabled, the following command enables it
sudo ufw enable
- Once the firewall is enabled, restart the system for changes to take effect. The r parameter is used to state the command is for restarting, the now parameter is for stating the restart has to be made immediately without any delay.
sudo shutdown –r now
Block All Traffics with Firewall
UFW, by default block/allow all the traffics unless it’s overridden with specific ports. As seen in the above screenshots ufw blocks all incoming traffics, and allows all outgoing traffic. However, with the following commands all the traffic can be disabled without any exceptions. What this does clear all the UFW configurations, and deny access from any connection.
sudo ufw reset
sudo ufw default deny incoming
sudo ufw default deny outgoing
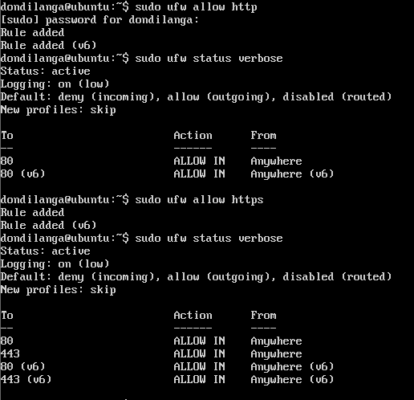
How to Enable Port for HTTP?
HTTP stands for hypertext transfer protocol, which defines how a message is formatted when transmitting across any network, such as the world wide net aka Internet. Since a web browser, by default, connects to the web server over HTTP protocol to interact with the contents, the port that belongs to HTTP has to be enabled. Additionally, if the web server uses SSL/TLS (secured socket layer/transport layer security), then HTTPS has to be allowed as well.
sudo ufw allow http
sudo ufw allow https
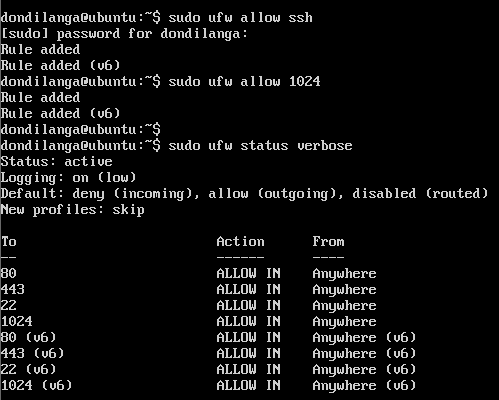
How to Enable Port for SSH?
SSH stands for secure shell, which is used to connect to a system over a network, typically over the Internet; hence, It’s widely used to connect to servers over the Internet from the local machine. Since, by default Ubuntu blocks all incoming connections, including SSH, it has to be enabled in order to access to the server over Internet.
sudo ufw allow ssh
If SSH is configured to use a different port, then the port number has to be explicitly stated instead of the profile name.
sudo ufw allow 1024
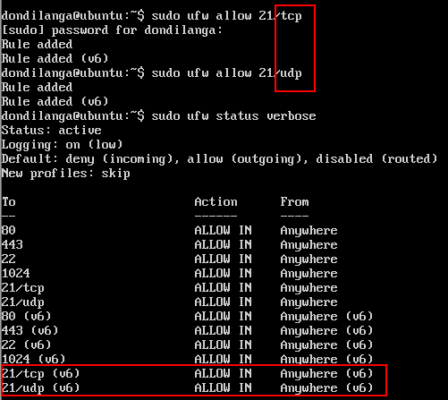
How to Enable Port for TCP/UDP
TCP, aka transmission control protocol defines how to establish and maintain a network conversation in order for the application to exchange data. By, default, a web server uses TCP protocol; hence, it has to be enabled, but fortunately enabling a port also enables the port for both TCP/UDP at once. However, if the particular port is intended to enable for TCP or UDP only, then the protocol has to be specified along with the port number/profile name.
sudo ufw allow|deny portnumber|profilename/tcp/udp
sudo ufw allow 21/tcp
sudo ufw deny 21/udp
How to Disable the Firewall Completely?
Sometimes the default firewall has to be disabled in order to test the network or when a different firewall is intended to install. The following command completely disables the firewall and allows all incoming and outgoing connections unconditionally. This is not advisable unless the aforesaid intentions are the reasons for disabling. Disabling the firewall doesn’t reset or delete its configurations; hence, it can again be enabled with previous settings.
sudo ufw disable
Enable Default Policies
Default policies state how a firewall responds to a connection when no rule matches it, for instance if the firewall allows all incoming connections by default, but if the port number 25 is blocked for incoming connections, the rest of the ports still work for incoming connections except the port number 25, as it overrides the default connection. The following commands deny incoming connections, and allow outgoing connections by default.
sudo ufw default deny incoming
sudo ufw default allow outgoing
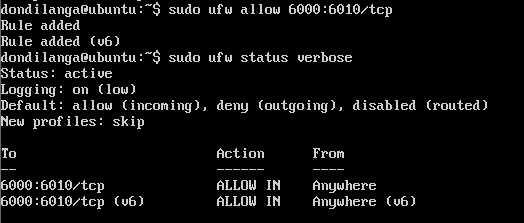
Enable Specific Port Range
Port range specifies to which ports the firewall rule applies. The range is stated in startPort:endPort format, it’s then followed by the connection protocol which is mandated to state in this instance.
sudo ufw allow 6000:6010/tcp
sudo ufw allow 6000:6010/udp
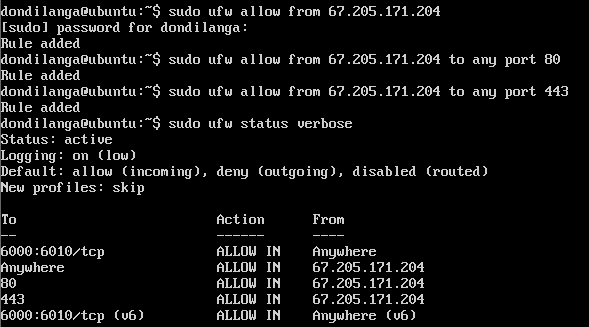
Allow/Deny Specific IP Address/Addresses
Not only a specific port can be allowed or denied for either outgoing or incoming but also a IP address too. When the IP address is specified in the rule, any request from this particular IP is subjected to just specified rule, for instance in the following command it allows all requests from 67.205.171.204 IP address, then it allows all requests from 67.205.171.204 to both port 80 and 443 ports, what this means is any device with this IP can send successful requests to the server without being denied in a case when the default rule blocks all incoming connections. This is quite useful for private servers that are used by a single person or a specific network.
sudo ufw allow from 67.205.171.204
sudo ufw allow from 67.205.171.204 to any port 80
sudo ufw allow from 67.205.171.204 to any port 443
Enable Logging
Logging functionality logs the technical details of each request to and from the server. This is useful for debugging purpose; hence it’s recommended to turn it on.
sudo ufw logging on
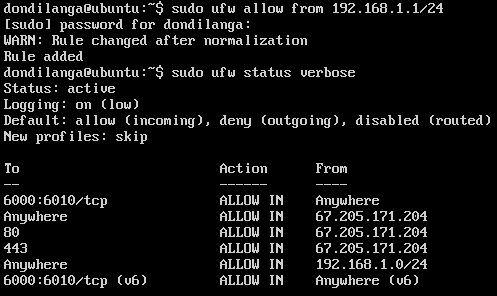
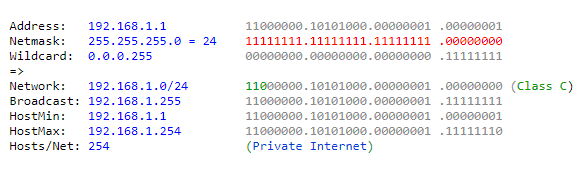
Allow/Deny Specific Subnet
When a range of IP addresses are involved it’s difficult to manually add each IP address record to a firewall rule to either deny or allow, and thus IP address ranges can be specified in CIDR notation, which typically consists of the IP address, and the amount of hosts it contains and IP of each host.
In the following example it uses the following two commands. In the first example it uses /24 netmask, and thus the rule valid from 192.168.1.1 to 192.168.1.254 IP addresses. In the second example the same rule valid for the port number 25 only. So if incoming requests are blocked by default, now the mentioned IP addresses are allowed to send requests to port number 25 of the server.
sudo ufw allow from 192.168.1.1/24
sudo ufw allow from 192.168.1.1/24 to any port 25
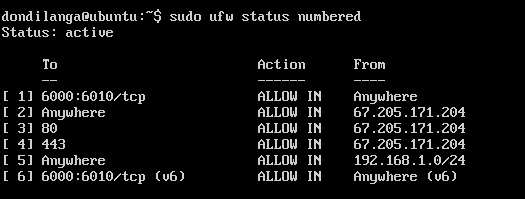
Delete a Rule from Firewall
Rules can be removed from the firewall. The following first command lines up each rule in the firewall with a number, then with the second command the rule can be deleted by specifying the number belonging to the rule.
sudo ufw status numbered
sudo ufw delete 2
Reset Firewall Configuration
Finally, to start over the firewall configuration, use the following command. This is quite useful if firewall starts working oddly or if firewall behaves in unexpected manner.
sudo ufw reset