Ubuntu Remote Desktop
How to Setup an Ubuntu Remote Desktop Accessible From Windows And Android
Setting up a remote computer can be very useful to any type of user. For example, if you have an Ubuntu computer at your office and wish to do some work from your home computer which is running Windows you can access files on your office computer remotely from home. So today we will stepwise setup Ubuntu Remote Desktop to access it from anywhere using either a Windows computer or an Android smartphone.
1. Enable Desktop Sharing On Ubuntu
Follow these simple steps to configure desktop sharing on your Ubuntu system.
Step 01: Search for Desktop Sharing in Unity dashboard and launch it by clicking on the icon.
Step 02: Now the Desktop Sharing interface will appear and you will see it it divided in 3 sections.
2. Sharing
Under this section you will see 2 checkboxes:
- Allow other users to view your desktop
- Allow other users to control your desktop
If you select the first check box then you and any other user will only be able view files or any other thing on your Ubuntu computer but will not be able to make changes to it. If you wish to work from a different location and make changes then you should select both checkboxes.
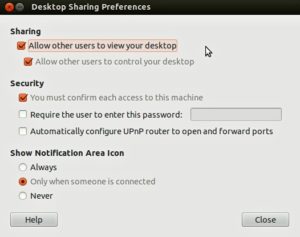
Desktop Sharing Preferences
3. Security
The security section is very important while setting up desktop sharing and you can see there are three options:
- You must confirm each access to this machine: This option is by default checked and you shouldn’t change this because this will allow you or other people to connect to your computer.
- Require the user to enter this password: This is very important whatever the reason you are setting up remote desktop for. You should select this checkbox and set a strong password. Anyone who wants to connect to your computer will need to enter this password.
- Automatically configure UPnP router to open and forward ports: Select this checkbox too because this deals with your router and connection to your remote computer from outside network.
4. Show Notification Area Icon
Whenever desktop sharing is running you will see an icon in the notification area of the Ubuntu desktop and you can configure this using the following 3 options:
- Always: If you select this option then an icon will appear until desktop sharing is enabled.
- Only when someone is connected: The icon will appear only when someone is connected to your computer.
- Never: No icon in notification bar.
- Step03: Finally click on the Close button and you are good to go.
5. Find Out Your IP Address
The IP address of your Ubuntu desktop is the first thing you will need while connecting from another computer. If you are connecting from the same network you will need an internal IP address while connecting from a different network you may need an external IP address.
How to find external IP Address
Finding your external IP address is a very easy task, just go to your web browser and type What is my IP in the search bar and you will see your external IP in the search result.
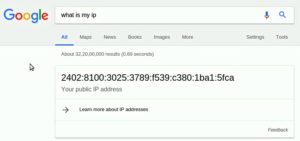
External IP Address
How to find internal IP Address
Open Terminal from Ubuntu dashboard and type the following command and press Enter.
Ifconfig
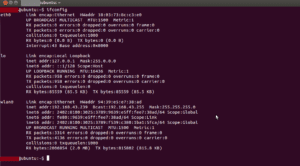
Internal IP Address
Here you can find your connection type and under that you will find an internal IP address.
6. How to Connect to Ubuntu Remote Desktop From a Windows Computer
To connect from a Windows PC to Ubuntu remote desktop you need to download VNC client. There are many VNC clients available on the internet you can download. So, first download a VNC client and install it on your Windows PC. Now open the VNC client and enter your internal IP address in address bar and press Enter.
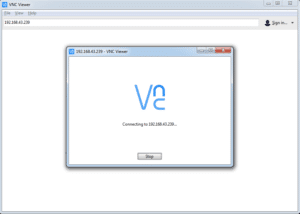
Enter IP Address
Now it will ask for a password you have set in desktop sharing. Just type in that password and click on Ok. Now you can see your Ubuntu desktop in VNC client window from which you can access your Ubuntu system.
7. How to Connect to Ubuntu Remote Desktop From Android Phone
To connect to Ubuntu desktop from your Android phone is very easy you just need to download VNC viewer. Once the VNC viewer is installed in your phone launch the app then click on ‘+’ sign to add new connection and enter the internal IP address of your Ubuntu Desktop.
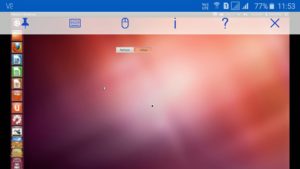
Results
Now you will see your desktop name in connections just click on it and enter the password of Ubuntu desktop sharing and finally click on connect. Now you can see the Home screen of the Ubuntu desktop on your mobile phone. So this is how you can connect to your Ubuntu desktop from any Windows desktop or android phone remotely.