In this article, you’ll be learning about a very crucial part of the whole Docker setup, the Dockerfile. The Dockerfile uses a simple structure. While this simplicity is a good thing, it gives room for individuals to just hack commands together, without fully understanding the impact.
At the end of this article, you’ll have a better understanding of the Dockerfile. So, you’ll be able to write Dockerfiles that you understand.
Inside The Dockerfile
The Dockerfile is basically a text file. But, unlike regular text files, you’ll see that it doesn’t have a .txt file extension. The Dockerfile is a file that you’ll save as Dockerfile, with no file extensions.
In this Dockerfile exists all the commands used to assemble a Docker image. While you can pass these commands into the Docker CLI when building an image, you’ll agree that it is better practice to have a file for it, so things can be better organized.
The commands in the Dockerfile are vital to building a Docker image.
Here’s why:
Every line of command in the Dockerfile creates the layers that make up the Docker image. Provided the Dockerfile remains the same, every time you build an image off it, it’s certain you’d get the same results. However, when you add a new line of command, Docker simply builds that layer and adds it to the existing layers.
Just like the compiler or interpreter does to programming languages, Docker reads the Dockerfile from top to bottom. Hence, the placement of the commands matter a lot.
Unlike most programming languages, the commands in the Dockerfile are not case sensitive. But, you’ll see from sample Dockerfiles that the commands are written in UPPERCASE. This is nothing but a convention, which you should follow too.
Like programming languages, you can write comments in your Dockerfiles. Comments in Dockerfiles are denoted by using the hash or pound symbol # at the beginning of the line. You should note that it only supports one-line comments, hence to write multi-line comments, you’ll use the hash symbol on each line.
Careful though, not all hash symbols you see in a Dockerfile are comments. Hash symbols could also indicate parser directives. Parser directives are commands in the Dockerfile that indicate the way the Dockerfile should be read.
Only two parser directives are available on Docker as at the time of writing this article. They are the escape and syntax parser directives. The syntax directive is only available on Docker when it’s running on a BuildKit backend.
The escape directive does work everywhere. The escape directive allows you decide what symbol Docker uses as an escape character.
You can have in your Dockerfile, a line similar to the one below:
COPY index.html C:\Documents
You shouldn’t bother about what the command does yet, focus on the file location. Using the command above in a Windows based Docker image, is valid. But, you’ll recall that Docker is Linux based, so it uses the backslash as an escape character due to Linux conventions. Therefore, when Docker reads through the Dockerfile, it’ll escape the backslash instead of reading it as a file path.
To change this behaviour, you’ll use the escape parser directive as seen below:
This directive causes Docker to use the backtick as an escape character, instead of the backslash. To use the parser directive, you’ll have to put it at the top of the Dockerfile, else it’ll only count as a comment—you have to place it even above comments, if you have the comments at the top of the file.
Dockerfile Instructions
Docker relies on each line of command in the Dockerfile and executes them, building a layer for each line in the process.
You’ll need an understanding of the commands to write Dockerfiles. A point of caution though: a lot of the Dockerfile commands do similar stuff. You don’t have to worry, you’ll get to understand those commands too.
Here’s a list of the commands you’ll learn about:
- FROM
- LABEL
- ENV
- EXPOSE
- RUN
- COPY
- WORKDIR
- CMD
FROM
Remember that the main aim of Docker is to virtualize things at the Operating System (OS) level, by creating containers. Therefore, whatever image Docker builds from your Dockerfile needs to be based on an existing OS—except you are building a base image.
The FROM command is used to state what OS you intend to use as the base image. If you intend building on a base image, the FROM command must be the first command in the Dockerfile—asides parser directives and comments.
LABEL
The Dockerfile needs metadata, and the LABEL command is what you’d use to create them. After building an image and running a container off it, you can use the docker inspect command to find information on the container.
ENV
Environment variables. Familiar words? Well, the ENV command is used to set environment variables while building the Docker image. You’ll also get to see that those set environment variables are also accessible after launching the container.
Dockerfile has a command similar to ENV, known as ARG. However, whatever environment variable is set using ARG is only available while building the image, but not after launching the container.
EXPOSE
The same way your Docker host—your local machine is the docker host in this case—has ports for communication such as 8080, 5000, etc. is the same way Docker containers have ports.
You’ll use the EXPOSE command to choose what ports should be available to communicate with a container.
When running Docker containers, you can pass in the -p argument known as publish, which is similar to the EXPOSE command.
Here’s the subtle difference: you use the EXPOSE command to open ports to other Docker containers, while the -p argument is used to open ports to the external environment i.e. outside the Docker container.
If you do not make use of EXPOSE or -p at all, then the Docker container won’t be accessible through any ports from outside the container or other Docker containers.
RUN
While building a Docker image, you may need to run commands for reasons such as installing applications and packages to be part of the image.
Using the RUN command, you can do all of that. But remember: commands are run only when you’re building the Docker image.
COPY
There are different reasons to copy files from your Docker host to your Docker image. Some files you may like to copy could be configuration files, or the source code—if you’d be running it in your Docker container.
To copy files from your Docker host to a Docker image, you can use the COPY command.
There is the ADD command that is similar to COPY, and is a bit different. While COPY can only copy files from your Docker host to the Docker image, ADD can copy files from a URL and also extract compressed files to the Docker image.
Why use COPY instead of ADD? Well, you’ll figure out copying files from a URL is a task you can run with Curl using the RUN command. You can also extract files in the Docker image using the RUN command too.
However, there is nothing wrong with using ADD to directly extract compressed files into the Docker image.
WORKDIR
Remember the RUN command? You can use the RUN command to execute commands in your Docker image. However, sometimes you’ll have a reason to run a command in certain directories. As an example, to unzip a file, you have to be in the directory of the zip file or point to it.
That’s where WORKDIR comes in handy. WORKDIR allows you change directory while Docker builds the image, and the new directory remains the current directory for the rest of the build instructions.
CMD
Your Docker container is usually set up to run one process. But how does it know what process to run? It’s through the CMD command. The CMD command is used to execute commands as Docker launches the Docker container from the image.
While you can specify the command to be run when launching from the command-line, the commands stated at the CMD instruction remain the default.
Docker can run only one CMD command. Therefore, if you insert two or more CMD instructions, Docker would only run the last one i.e. the most recent one.
ENTRYPOINT is similar to CMD, however, you can run commands while launching and it wouldn’t override the instructions you’ve defined at ENTRYPOINT.
Example
In this example, you’ll see an implementation of almost all the commands discussed above. You’ll see how a Flask application would be run in a Docker container. If you don’t know what Flask is, Flask is a web framework written in Python for building web applications.
It’s quite simple, so you don’t need to have any knowledge of the language to run the example.
To start with, you’ll need to install Git on your machine. After installing Git, you’ll clone the source code from the GitHub repository here.
First, create a new directory. You’ll have the source code and the Dockerfile in this directory. You can create a directory—you can call it docker-sample—and the Dockerfile using the commands below:
touch Dockerfile
Remember the Dockerfile is just a plain text file? You also remember that it shouldn’t have the .txt extension? You’ll find that discussion at the beginning of the “Inside The Dockerfile” section, if you missed it.
Next, you’ll download the source code from GitHub using the git clone command as seen below:

You can check the contents of the flask-helloworld directory:
You’ll see the following files:
- Markdown.rst: It contains the details of the project, but not important to this example. You shouldn’t be worried about it.
- Procfile: It contains commands to run the projects on a server. You shouldn’t be worried about it either.
- app.py: It contains the code you’ll run in the Docker container.
- Requirements.txt: It contains the dependencies the app.py file needs to run successfully.
Writing The Dockerfile
This Dockerfile has all of the Docker instructions discussed above. It also has comments in it, to help you understand what each line does.
# This example uses Alpine.
# Alpine is a minimal Docker image very small in size
FROM alpine:3.3
# The first label is maintainer with the value Linux Hint.
# The second label is appname with the value Flask Hello. World
# You can have as many key-to-value pairs as you want.
# You can also choose any name for the keys.
# The choice of maintainer and appname in this example
# is a personal choice.
LABEL "maintainer"="Linux Hint" "appname"="Flask Hello World"
# The /usr/src directory holds downloaded programs,
# be it source or binary before installing them.
ENV applocation /usr/src
# from the Docker host to the Docker image.
# You’ll copy the source code to the Docker image.
# The command below uses the set environment variable.
COPY flask-helloworld $applocation/flask-helloworld
ENV flaskapp $applocation/flask-helloworld
# The command below changes directory to /usr/src/flask-helloworld.
# The target directory uses the environment variable.
WORKDIR $flaskapp/
# just like you do on the terminal,
# but in the Docker image.
# The command below installs Python, pip and the app dependencies.
# The dependencies are in the requirements.txt file.
RUN apk add –update python py-pip
RUN pip install –upgrade pip
RUN pip install -r requirements.txt
# Flask app uses the port 5000, so you’ll expose port 5000.
EXPOSE 5000
# but the commands run when the Docker container launches.
# Only one CMD instruction can be used.
CMD ["python", "app.py"]
Building the Docker image
After writing the Dockerfile, you can build the Docker image with the command below:
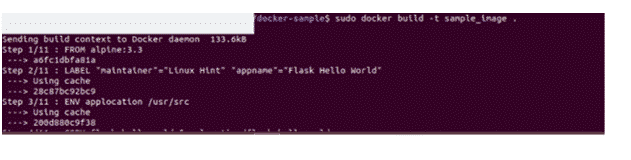
Here, sample_image is the name of the Docker image. You can give it another name. The dot (.) at the end of the command indicates that the files you’re working with are in the current directory.
Running the Docker container
To run the Docker container, you can use the docker run command below:

The -i parameter ensures the Docker container runs in interactive mode and the -p parameter binds the Docker host’s port to the Docker container’s port. Think of it as: docker-host:docker-container.
After launching the Docker container, you can visit localhost:5000 in your browser to see the results of the Flask application.
Conclusion
The Dockerfile is the blueprint for a Docker image. Understanding how Dockerfiles work, and being able to write them comfortably would make your Docker experience an enjoyable one.
Working towards this through this article, you’ve seen how Dockerfiles work. Hopefully, you also understand what the major Docker instructions mean and can be able to use them in building your own Docker images.
Any question you have relating to Dockerfiles would be welcome. Thanks for reading.