In this article, I will show you a how to expose ports using Dockerfile with a real world example. Let’s get started.
Creating a Project Directory:
First, we have to create a project directory. In this directory, you should keep all the project files and a Dockerfile.
Run the following command to create a project directory myapp/ in your users HOME directory and navigate to it:

Getting the Web App Ready:
Now create a directory src/ inside the ~/myapp/ directory with the following command:

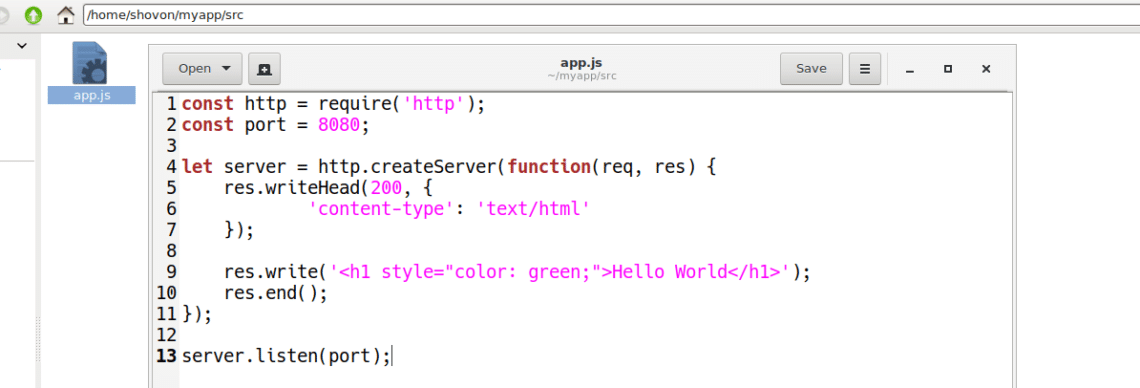
In the src/ directory, all the source code of my NodeJS application will be kept.
I will just create a simple app.js file in the src/ directory and run a simple web server on port 8080 just for demonstration.
The src/app.js file contains the following lines of codes:
Writing Dockerfile and Exposing Ports:
Now create a Dockerfile in the ~/myapp directory with the following command:

Now type in the following lines to the Dockerfile and save it. I will discuss what these lines mean later.

Here, FROM alpine:3.8 means, use the alpine:3.8 Docker image as the base for the new image that we will be building from this Dockerfile.
RUN apk update means, run the apk update command in the base Docker image alpine:3.8.
RUN apk add –no-cache nodejs means, run the apk add command to install the NodeJS programming language in the alpine:3.8 Docker base image.
COPY ./src /app means, copy all the files from the ~/myapp/src directory to the /app directory of the new Docker image that we will build using the Dockerfile.
CMD [“/usr/bin/node”, “/app/app.js”] means, run the /app/app.js file from the new container using node binary located in /usr/bin/node.
Finally, to EXPOSE 8080/tcp means, expose or open the TCP port 8080 to the host computer.
Creating Custom Docker Image Using Dockerfile:
Now let’s make a custom Docker image alpine-node:v1 using the Dockerfile that we just created.
First make sure you’re in the ~/myapp/ directory and then run the following command to create your custom Docker image alpine-node:v1:

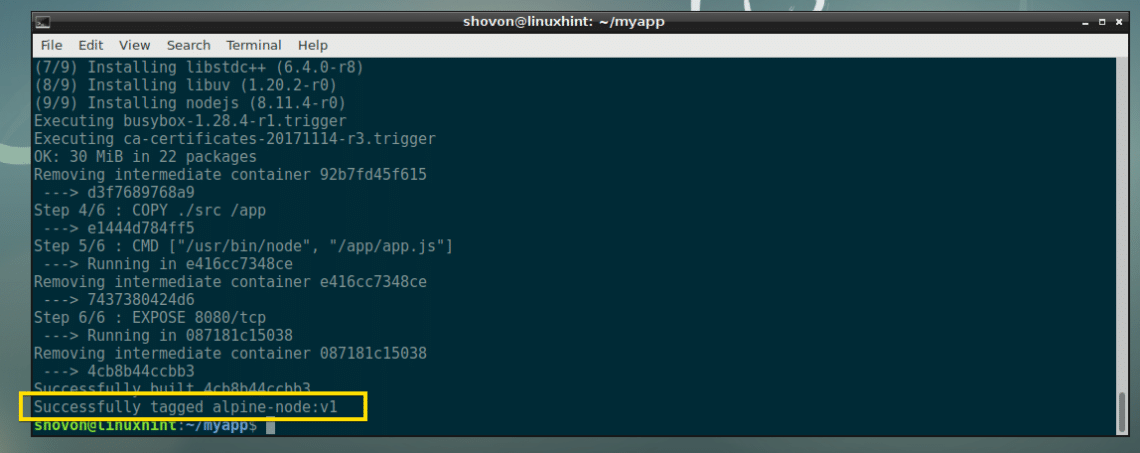
As you can see, the custom Docker image alpine-node:v1 is being created. The required base Docker image and packages are being pulled from the internet.

As you can see, the custom Docker image alpine-node:v1 is created successfully.
Testing the Custom Docker Image:
Now we can test the custom Docker image alpine-node:v1 very easily. All we have to do is to create a container out of alpine-node:v1 image.
Run the following command to create a Docker container www from the alpine-node:v1 Docker image:

The container www is created.

Now let’s find out the IP address of the www Docker container with the following command:
As you can see, in my case, the IP address is 172.17.0.3. So the NodeJS application that I wrote should be accessible from the web browser at port 8080 of this IP address.

Voila! I can access the port 8080 of my www Docker container.

That’s basically how you expose certain ports in your custom Docker images you will be building using Dockerfile.
Exposing TCP and UDP Ports Using Dockerfile:
In the earlier section of this article, I showed you how to expose a TCP port using a Dockerfile.
You can easily expose a TCP port (let’s say TCP port 53) in your Dockerfile with the following line:
You can also expose an UDP port (Let’s say UDP port 53) with the following line in your Dockerfile:
You can expose TCP and UDP port at the same time with the following lines in your Dockerfile:
EXPOSE 53/udp
If you don’t specify what protocol (TCP or UDP) to use, TCP is used by default. For example, if you write the following line in your Dockerfile:
Then Docker will assume that you want to use the TCP port 53.
Exposing Multiple Ports Using Dockerfile:
Let’s say you want to create a custom MEAN stack Docker image. In this case, you will be running a HTTP server on some port (let’s say TCP port 80 or 8080), a FTP server which runs on TCP port 21, a SQL database server (let’s say MySQL) which runs on TCP port 3306, or NoSQL database server (let’s say MongoDB) which runs on TCP port 27017 or 27018, a SSH server which runs on TCP port 22. That’s a lot of ports!
The good news is; you can expose as many ports as need on your custom Docker image created using Dockerfile.
The ports in the example above can be exposed with the following lines in your Dockerfile:
EXPOSE 8080/tcp
EXPOSE 21/tcp
EXPOSE 22/tcp
EXPOSE 3306/tcp
EXPOSE 27017/tcp
EXPOSE 27018/tcp
If you want, you can leave the protocol specification as Docker uses TCP by default and do the same thing with the following lines in your Dockerfile:
EXPOSE 8080
EXPOSE 21
EXPOSE 22
EXPOSE 3306
EXPOSE 27017
EXPOSE 27018
If you need to, you can mix TCP and UDP ports in your Dockerfile. For example, if you run DNS server (which runs on UDP port 53), along with the above example, you would add the following lines to your Dockerfile.
EXPOSE 8080
EXPOSE 21
EXPOSE 22
EXPOSE 53/udp
EXPOSE 3306
EXPOSE 27017
EXPOSE 27018
So that’s how you expose ports using Dockerfile. To learn more about Dockerfile and exposing ports using Dockerfile, read the Dockerfile reference guide at https://docs.docker.com/engine/reference/builder/#expose
Thanks for reading this article.