However, there are other drivers available as well, such as macvlan and Overlay driver, which is the topic of this post. Let’s have a closer look at what Overlay driver helps us accomplish and how we can create one for ourselves and attach containers to it.
What is Overlay driver?
Overlay driver is designed to facilitate communication between docker containers that are hidden from each other in entirely different networks. These networks could be private ones, or even public infrastructure on Cloud. The essential point is, if there are two hosts, each running Docker, then the Overlay network helps create a subnet which is overlaid on top of these two hosts and each Docker container connected to this overlay network can communicate with every other container using their own block of IP address, subnet and default gateway. As though they are part of the same network.
As illustrated below:
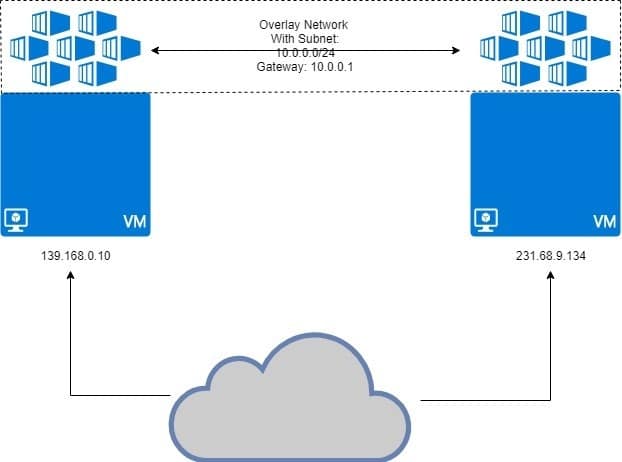
The two VMs are running docker, with containers attached to overlay network. The overlay network is “overlaid” on top of the VM and containers will get IP address like 10.0.0.2, 10.0.0.3, etc on this network. Regardless of the VMs running them or the VM’s own network configuration.
Prerequisites
Two Linux hosts with Docker installed and running on each of them. You can have two different VMs running locally, or use a couple VPS with static IPs.
Setting up Docker Swarm
The kind of setup described above is not meant for Docker running on a single host. We need a Docker Swarm where Overlay networks are truly meant to work. We won’t go into much details about Docker Swarm here, because it is Overlay that we want to discuss the most.
I have two VPS running on DigitalOcean with public IP addresses and one of them is going to be Docker Swarm Manager. Another node is going to be a worker node. This is the basic model for distributed systems like Docker Swarm.

On the Manager node, let’s initialize Docker Swarm:
You may have to specify which IP address to use, in case multiple IP addresses are assigned to a single network interface. If the previous command gives an error indicating that multiple IPs are being used, use the following:
It is important to note that the IP_ADDRESS above is the IP of your Swarm Manager host. In my case, it’s value is going to be 165.227.170.190.

This would generate an authentication token and you can copy and paste that command in your worker node’s terminal to make it a member of your Docker Swarm:
tm5fovjh50cmk–2rmfrdqup4vaujxnrpj4mmtn9 165.227.170.190:2377
Your token would differ wildly from this one, as it should. So copy the command generate after your docker swarm init command, NOT the one shown above.
Run the following command on your Docker manager to verify that the worker has actually been added:
The output would be something similar to this:

Creating Overlay Network adding Containers
Now we can use Docker’s built-in overlay driver to create a network. Let’s call this network my-overlay. You can call it whatever seems fit to you.
While you can attach containers directly to this network it isn’t something that is allowed by default, since services (which is another Docker Swarm entity) and not containers interface with this network, typically. Containers are what make up services, but that’s a story for another day.
Check the list of docker networks by running command docker network ls and you should see an entry for my-overlay in there, with scope set to swarm.
To attach containers, as part of a service, let’s run the command:
—replicas 2 alpine sleep 1d
This will create 2 replicas of the Alpine Linux container, which is a very lightweight linux container. Let’s see how these containers are distributed amongst the two nodes that we have.
root@manager:~# docker service ps my–service
The output would show where each of the containers in this service are running:
mlnm3xbv1m3x my–service.1 alpine:latest manager
ms9utjyqmqa7 my–service.2 alpine:latest workernode
You will notice that half the containers are running on manager and the rest are running on worker node. This is the idea behind distributed system. Even if one node dies, the additional load is transferred to the other one.
Verifying the network IPs
We can run the following command on both manager and workernode:
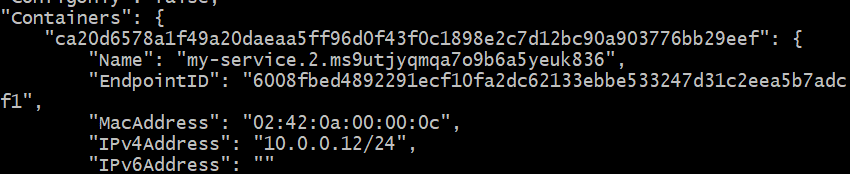
root@workernode:~# docker inspect my–overlay
You will get a long JSON response in either case. Look for the container section in each case. This was the output on the Manager node, in my specific case:
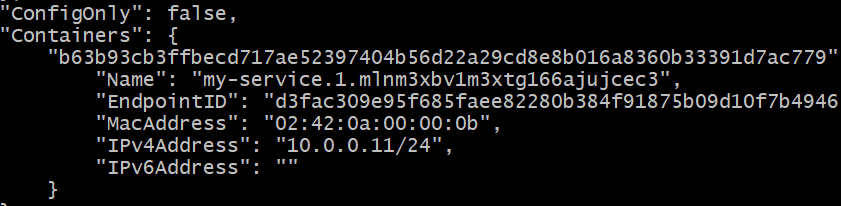
The IP address is 10.0.0.11 for the one container running on Manager node.
The IP address is 10.0.0.12 for the second replica running on Workernode.
Let’s see if we can ping the first container (10.0.0.11) from the second on (10.0.0.12). Get the container ID of the second one, running on workernode:
Copy this ID. Let’s call it CONTAINER2 for now.
Drop into the shell of this second container, by running:
Just replace “CONTAINER2” with proper ID, obtained in the previous step. You will also notice that the prompt has changed from “root@…” to plain “#”
In this shell, ping the other container, which you know is running on different host, in a different physical network.
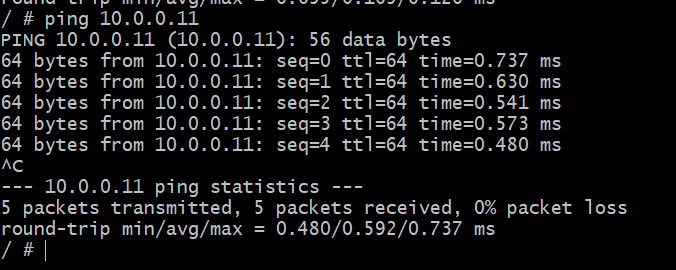
Success! We can now create an abstract network just for our Docker containers which could potentially span the entire globe. That’s Docker Overlay for you.