In this article I will demonstrate how to install PostgreSQL on Debian. We will use the latest stable versions of both Postgres and Debian at the time of this article, and I expect the process to not vary widely for several years making this tutorial still accurate. We will use the native repo of Debian and not any custom process to have a fully Debian experience. The current Debian version is 9.6 and the current PostgreSQL version is 9.6, released in 2016. Yes that is old, but we are going with the stable versions natively provided by Debian. Also its just a complete coincidence that both Debian and PostgreSQL have the same version number at this time, please don’t read anything into that other than pure coincidence. This will ensure the most stability which is recommended for mission critical usage. I will start with a fresh install of Debian on Digital Ocean in order to ensure the system is clean and the process is reproducible.
Prepare the System
Firstly, lets do a quick apt-get update and apt-get upgrade to ensure that the system has all packages already installed up to date.
$ apt-get upgrade
Install PostgreSQL
There are numerous PostgreSQL packages you can see by running apt-cache search. The package we want to install is called just postgresql. We will install it with apt-get install.
$ apt-get install postgresql
Run dkpg to verify the install was completed and PostgreSQL related packages are installed:

$ dpkg -l | grep postgre
On Debian platform, there is a convenience service to manage PostgreSQL. So we will not be running initdb or starting and stopping the database using native commands like pg_ctl. Check the help message for the PostgreSQL service by running the command:
Starting and Stopping PostgreSQL

$ service postgresql
Before we begin trying to start and stop the processes, lets verify the configuration files. On Debian the configuration files are installed via the postgresql-common package under the location /etc/postgresql.
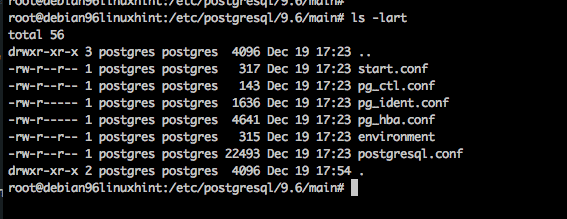
PostgreSQL Configuration Files
The postgresql.conf is the main database configuration file, where you can set custom settings for your installation. The pg_hba.conf is the access configuration file. These are started with sane and secure defaults for a Debian server. Notice the pg_hba.conf is configured for local access only, so you will need to update this file according to the documentation when you want to grant access to users or applications to connect to the database remotely.
Ok, lets practice stopping and starting the database with the provided service. With the service postgresql command you can provide the arguments stop, start, and status in order to control the server.
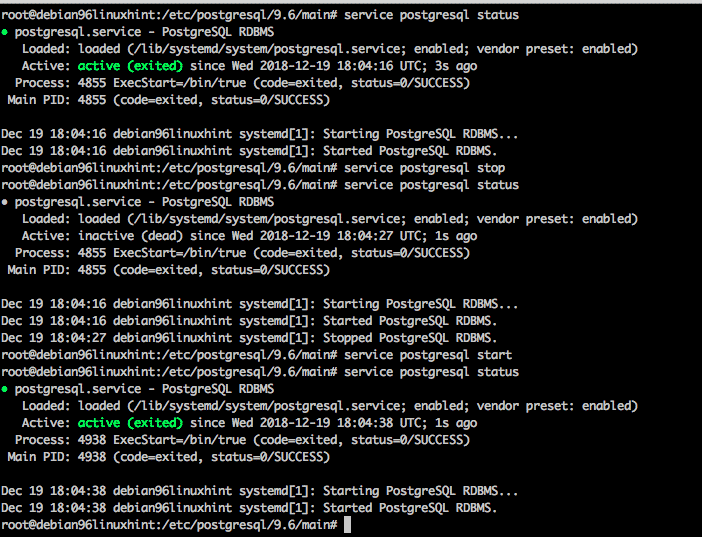
service postgresql start
service postgresql stop
service postgresql status
Connecting to the Database
By default PostgreSQL is installed in a fairly secure fashion. A linux user named postgres is created by default and this user has local access to connect to the database without any extra configuration steps. Even root can not login to the database by default. Let’s try to connect to the database as root user.
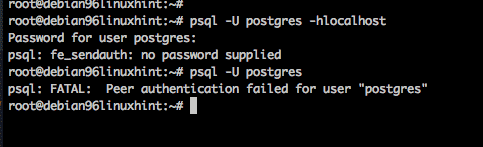
Root access denied
So rather, let us change linux user to the postgres user id, and then we can access the system.
$ psql -l
$ psql postgres
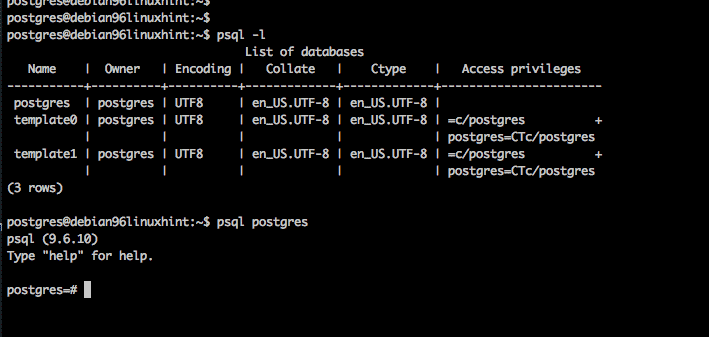
Login as linux user: postgres
To verify the system is working, let us create a database from the command line with the createdb utility. We will then update the pg_hba.conf, restart the database and connect to this database.
As user postgres, create the new database:
As user root, modify the pg_hba.conf to add the authentication for the new database.
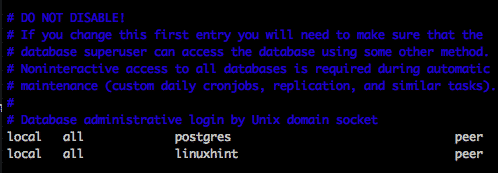
Updated pg_hba.conf as root
Then also as user root, reload the configuration files.
Finally change back to user postgres and test the new database. We will test by logging into linuxhint database, creating a table, adding 2 rows, and then querying the table. As shown below.
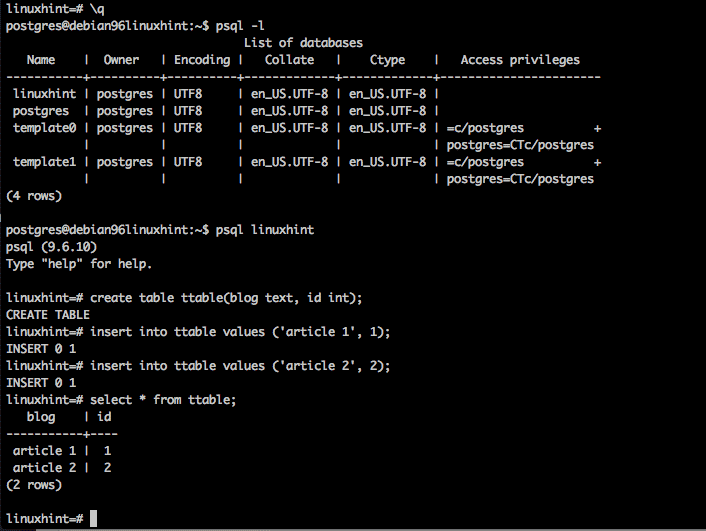
create test table
Conclusion
What you will finally want to do, is design your database schema and configure your pg_hba.conf in order to allow external access to your database and then you are off to the races.