Ubuntu in particular doesn’t have an official way to reset the OS to default state, unlike Windows 10 which comes with a recovery partition or external recovery drive. However there are unofficial ways to do this on Ubuntu, though these methods are not as effective as Windows’ implementation.
Restoring Ubuntu to factory state can mainly be broken into two parts: finding and installing any missing software shipped with the OS and reverting the desktop to default settings. This tutorial will explain both methods, the first one will work with Ubuntu and all of its derivatives while the second one will only work with Ubuntu and other GNOME based derivatives like Ubuntu MATE. Both these methods have some caveats though, which are explained below.
Installing Missing Packages Shipped with the OS
To find and install missing default packages, you will need the installation ISO image, again. If you have an installation image stored somewhere or have access to previously made installation media, it will do the job. Otherwise you will have to download a fresh ISO from distribution’s website.
Now the question is: why do we need the ISO again? The answer is simple, we need a way to find out what packages were shipped by default. Every Ubuntu ISO contains a few “manifest” files. These manifest files tell default installer which packages to install and which to remove once the first run installation finishes.
Difference between these manifest files (diff) will give us exactly what we need: a list of default packages for the current installed version of Ubuntu. Before we move ahead, take heed of the following:
Your ISO image should have the same version and architecture as your installed OS, otherwise a wrong choice may further break your system. For a 64-bit desktop, you need to have a 64-bit ISO image. Example: A 64-bit installation of Ubuntu 19.10 will require Ubuntu 19.10 64-bit ISO only.
To create the diff list, extract Ubuntu ISO image using file or archive manager. In the extracted folder, you will find a “casper” directory that contains our required manifest files. These files are:
- filesystem.manifest
- filesystem.manifest-remove
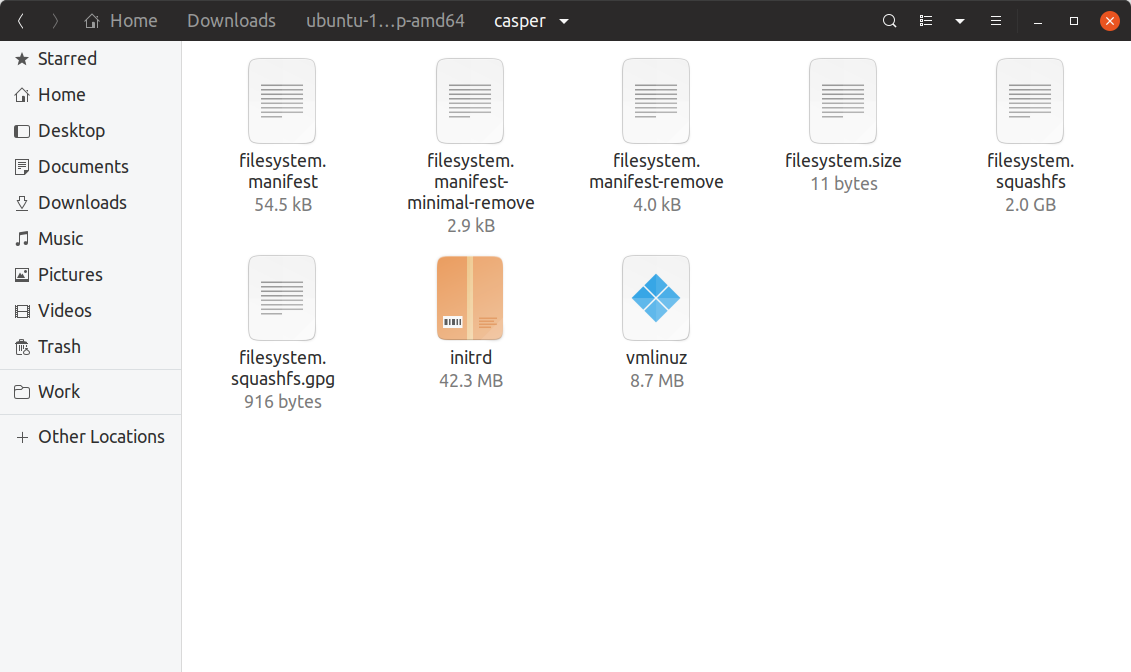
Create a working project directory named “packagelist”.
Manually copy the two manifest files: “filesystem.manifest” and “filesystem.manifest-remove” to “packagelist” folder.
Launch a terminal inside “packagelist” directory and run the command below to create a diff file:
diff.txt
Using the “diff.txt” file obtained from above, we can now finally run command that finds and installs missing default packages:
Ideally a factory reset should reinstall missing and downgrade all packages to stock shipped versions. I have attempted to do that by manipulating above diff.txt file, but the process fails when a required package version simply doesn’t exist in the online archive. It seems Ubuntu sometimes removes oldest version of a package from archive when too many versions pile up or when it becomes outdated. Downgrading all packages to stock versions may also cause multiple dependency conflicts. So it is safe to say that reverting every package to default version is not possible in Ubuntu at this time.
Reverting Ubuntu Desktop to Default Settings
As stated earlier, this method will only work with desktop environments based mostly on GTK and GNOME. The following command will revert all “gsettings” to their default values:
Gsettings works similar to Windows Registry, it acts as a centralized store for application settings. I have personally tested this command with stock Ubuntu (GNOME Shell) and Ubuntu MATE (MATE Desktop). It works like a charm on both.
Apps using other methods to store settings, won’t be affected by the above command. For instance, many third party apps store config files in .config or home directory. Both these desktop environments are fully GTK3 though and settings for stock applications are stored in gsettings only. So you are covered.
The Last Resort
While the methods explained above help in fixing system breakage, some bits and pieces are always left. The only foolproof way to factory reset Ubuntu is to do a fresh install. Just backup your home folder and other required files, make a bootable USB and you are ready to go. Reinstalling Ubuntu probably will be much faster than say Windows 10 doing a factory reset, which can drag on for hours.
Linux users however do need an easier, hassle free way to factory reset or rollback their devices. File systems like BTRFS and ZFS have snapshot and rollback features (somewhat similar to System Restore in Windows, but more sophisticated). Ubuntu 19.10 has added ZFS on root as an experimental installer option for desktop, but widespread adoption for both BTRFS and ZFS is yet to be seen.