Bây giờ tôi sẽ hướng dẫn cách thiết lập đám mây riêng tư từng bước bằng cách sử dụng mã nguồn mở có thể tính toán Apache Cloud Stack . Apache Cloud Stack là một điện toán đám mây mạnh tại thời điểm này. Điều này có nhiều môi trường khác nhau như đám mây riêng tư nhỏ và hệ thống đám mây lớn sử dụng Cloud Stack.
Trong hướng dẫn này, toàn bộ hệ thống đám mây riêng tư sử dụng Apache Cloud Stack. Yêu cầu tối thiểu một máy chủ quản lý, một máy chủ cho kvm. Máy chủ quản lý này sử dụng mysql và nfs. Nhưng nếu bạn muốn sử dụng nfs máy chủ khác nhau.
Trước tiên, hãy xem mô hình mạng đầy đủ cho đám mây riêng bằng Apache Cloud Stack.
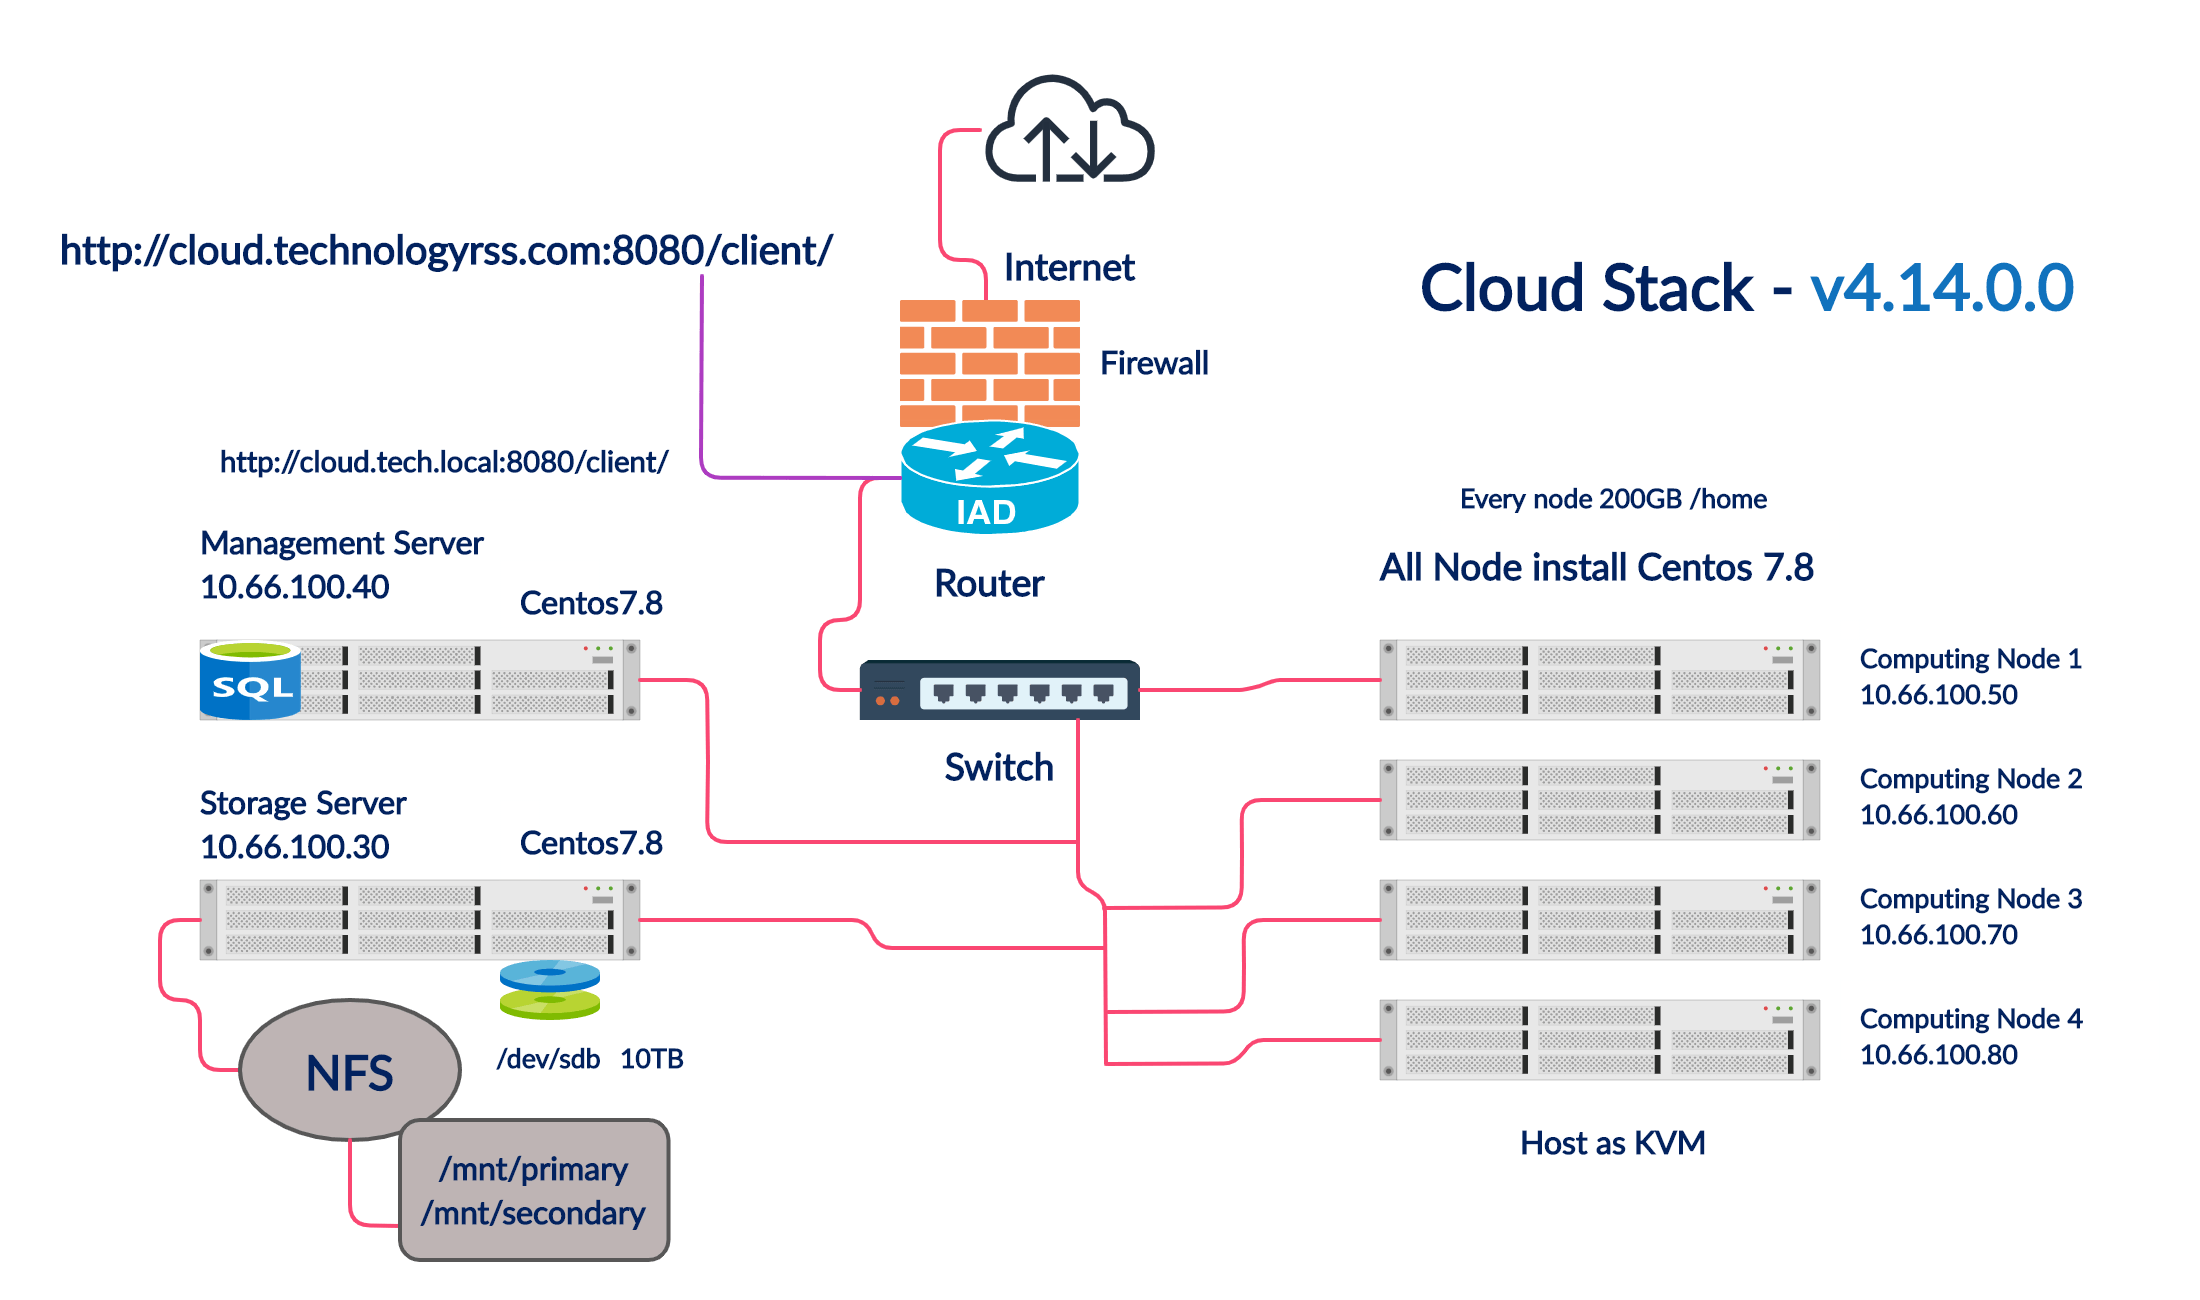
Sơ đồ mạng máy chủ quản lý ngăn xếp đám mây Apache
Quá trình cài đặt:
- Cài đặt máy chủ quản lý Cloud Stack.
- Cài đặt máy chủ lưu trữ (NFS).
- Cài đặt máy chủ KVM.
- Kết nối NFS và tải xuống systemvm với tạo vùng cơ bản.
- Thiết lập tường lửa cho tất cả các máy chủ.
- NTP cài đặt cho tất cả các máy chủ.
- Apache Cloud Stack Upload iso.
- Tạo phiên bản trên CloudStack.
Danh sách ip máy chủ:
- Cloud Stack: 10.66.100.40
- Lưu trữ: 10.66.100.30
- Máy chủ (nút kvm ): 10.66.100.50
# 01. Bước này là quá trình cài đặt máy chủ quản lý Cloud Stack.
Yêu cầu hệ thống:
- Hệ điều hành: vCentos 7.8.
- RAM: Tối thiểu 2 GB để có hiệu suất tốt nhất.
- Đĩa: 50 GB.
- CPU: 2 để có hiệu suất tốt nhất.
- NIC: 1 Ethernet.
- Địa chỉ IP: Thiết lập tĩnh.
Chỉ hiển thị tất cả các chi tiết cấu hình bằng lệnh cat. Vì vậy, bạn có thể chỉnh sửa chi tiết máy chủ của mình giống như máy chủ của tôi. Đầu tiên kết nối máy chủ Cloud Stack thông qua quyền truy cập root ssh bằng putty hoặc MobaxTreem.
Bước # 01: Tên máy chủ đã sẵn sàng để thiết lập Cloud Stack.
[root@localhost ~#] cat /etc/hosts
See example below:
127.0.0.1   localhost localhost.localdomain localhost4 localhost4.localdomain4
10.66.100.40     cloud.technologyrss.local       cloud
10.66.100.50     kvm.technologyrss.local         kvm
10.66.100.30     nfs.technologyrss.local         nfs
Edit hostname file.
[root@localhost ~#] cat /etc/hostname
Like example below:
cloud
After complete change host name then server reboot.
[root@localhost ~#] reboot
Step #02 : Setup static ip address on Cloud Stack server.
[root@cloud ~#] cat /etc/sysconfig/network-scripts/ifcfg-eth1
Example below:
TYPE="Ethernet"
PROXY_METHOD="none"
BROWSER_ONLY="no"
BOOTPROTO="static"
IPADDR="10.66.100.40"
NETMASK="255.255.0.0"
GATEWAY="10.66.11.1"
DNS1="8.8.8.8"
DEFROUTE="yes"
IPV4_FAILURE_FATAL="no"
IPV6INIT="yes"
IPV6_AUTOCONF="yes"
IPV6_DEFROUTE="yes"
IPV6_FAILURE_FATAL="no"
IPV6_ADDR_GEN_MODE="stable-privacy"
NAME="eth1"
UUID="0a840d20-8c94-4e5c-89aa-a96ef2cb908e"
DEVICE="eth1"
ONBOOT="yes"
Check server is connected internet and ping cloudstack.apache.org site.
[root@cloud ~#] hostname --fqdn
cloud.technologyrss.local
[root@cloud ~#] ping cloud.technologyrss.local
[root@cloud ~#] ping cloudstack.apache.org
All firewall service stop and disable. Only use iptables for firewall all servers.
[root@cloud ~#] systemctl stop firewalld
[root@cloud ~#] systemctl disable firewalld
Then edit selinux config must be setup permissive.
[root@cloud ~#] cat /etc/selinux/config
Output like below:
# This file controls the state of SELinux on the system.
# SELINUX= can take one of these three values:
#     enforcing - SELinux security policy is enforced.
#     permissive - SELinux prints warnings instead of enforcing.
#     disabled - No SELinux policy is loaded.
SELINUX=permissive
# SELINUXTYPE= can take one of three values:
#     targeted - Targeted processes are protected,
#     minimum - Modification of targeted policy. Only selected processes are protected.
#     mls - Multi Level Security protection.
SELINUXTYPE=targeted
Reboot Cloud Stack management server for change selinux status otherwise not install Cloud Stack service.
[root@cloud ~#] reboot
Step #03 : Start installation process Apache Cloud Stack.
[root@cloud ~#] yum install wget -y
[root@cloud ~#] yum install ntp -y
[root@cloud ~#] yum install chrony -y
Edit Apache Cloud Stack repo file.
[root@cloud ~#] cat /etc/yum.repos.d/cloudstack.repo
See example below:
[cloudstack]
name=cloudstack
baseurl=http://cloudstack.apt-get.eu/centos/$releasever/4.14/
enabled=1
gpgcheck=0
Add mysql community edition repo.
[root@cloud ~#] wget http://repo.mysql.com/mysql-community-release-el7-7.noarch.rpm
[root@cloud ~#] rpm -ivh mysql-community-release-el7-7.noarch.rpm
Install mysql server on Cloud Stack management server.
[root@cloud ~#] yum install mysql-server -y
Increase some config like timeout maximum connection. Add all line into my.cnf file.
[root@cloud ~#] cat /etc/my.cnf
Like below config
# For advice on how to change settings please see
# http://dev.mysql.com/doc/refman/5.6/en/server-configuration-defaults.html

[mysqld]
#
# Remove leading # and set to the amount of RAM for the most important data
# cache in MySQL. Start at 70% of total RAM for dedicated server, else 10%.
# innodb_buffer_pool_size = 128M
#

innodb_rollback_on_timeout=1
innodb_lock_wait_timeout=600
max_connections=350
log-bin=mysql-bin
binlog-format = 'ROW'

# Remove leading # to turn on a very important data integrity option: logging
# changes to the binary log between backups.
# log_bin
#
# Remove leading # to set options mainly useful for reporting servers.
# The server defaults are faster for transactions and fast SELECTs.
# Adjust sizes as needed, experiment to find the optimal values.
# join_buffer_size = 128M
# sort_buffer_size = 2M
# read_rnd_buffer_size = 2M
datadir=/var/lib/mysql
socket=/var/lib/mysql/mysql.sock

# Disabling symbolic-links is recommended to prevent assorted security risks
symbolic-links=0

# Recommended in standard MySQL setup
sql_mode=NO_ENGINE_SUBSTITUTION,STRICT_TRANS_TABLES

[mysqld_safe]
log-error=/var/log/mysqld.log
pid-file=/var/run/mysqld/mysqld.pid
Edit another file just.
[root@cloud ~#] cat /etc/my.cnf.d/cloudstack.cnf
Example below:
[mysqld]
Start mysql and enable service using below command.
[root@cloud ~#] systemctl start mysql
[root@cloud ~#] systemctl enable mysql
Setup myql root password from mysql terminal. By default not setup root password. So must be setup mysql root password before start Apache Cloud Stack management server.
[root@cloud ~#] mysql -u root -p
Press Enter without any password. Then setup mysql root password. Mysql version is 5.6.
mysql> UPDATE mysql.user SET Password=PASSWORD('passw0rd') WHERE User='root';
Restart mysql service then install Apache Cloud Stack management service.
[root@cloud ~#] systemctl restart mysql
[root@cloud ~#] yum -y install mysql-connector-python
[root@cloud ~#] yum -y install cloudstack-management
After installation done ! Now check java version 11 must be select. For check using below command.
[root@cloud ~#] alternatives --config java
If you see more java version install so you can select java version 11.
Now deploy Cloud Stack database using below command.
[root@cloud ~#] cloudstack-setup-databases cloud:cloud@localhost --deploy-as=root:passw0rd
Mysql user name:cloud                                                           [ OK ]
Mysql user password:******                                                      [ OK ]
Mysql server ip:localhost                                                       [ OK ]
Mysql server port:3306                                                          [ OK ]
Mysql root user name:root                                                       [ OK ]
Mysql root user password:******                                                 [ OK ]
Checking Cloud database files ...                                               [ OK ]
Checking local machine hostname ...                                             [ OK ]
Checking SELinux setup ...                                                      [ OK ]
Detected local IP address as 10.66.100.40, will use as cluster management server node IP[ OK ]
Preparing /etc/cloudstack/management/db.properties                              [ OK ]
Applying /usr/share/cloudstack-management/setup/create-database.sql             [ OK ]
Applying /usr/share/cloudstack-management/setup/create-schema.sql               [ OK ]
Applying /usr/share/cloudstack-management/setup/create-database-premium.sql     [ OK ]
Applying /usr/share/cloudstack-management/setup/create-schema-premium.sql       [ OK ]
Applying /usr/share/cloudstack-management/setup/server-setup.sql                [ OK ]
Applying /usr/share/cloudstack-management/setup/templates.sql                   [ OK ]
Processing encryption ...                                                       [ OK ]
Finalizing setup ...                                                            [ OK ]

CloudStack has successfully initialized database, you can check your database configuration in /etc/cloudstack/management/db.properties
Then check setup management using below command.
[root@cloud ~#] cloudstack-setup-management
Starting to configure CloudStack Management Server:
Configure Firewall ...        [OK]
Configure CloudStack Management Server ...[OK]
CloudStack Management Server setup is Done!
Installation done ! Now check service log file.
[root@cloud ~#] tail -f /var/log/cloudstack/management/management-server.log
After complete initialize database then reboot Cloud Stack management server.
[root@cloud ~#] reboot
Browse Cloud Stack server ip address.
http://10.66.100.40:8080/client/
Default User name : admin
Default password : password
#02. This step is Storage (NFS) server installation process.
System requirements:
- Operating system : vCentos 7.8.
- RAM : Minimum 2 GB for more best performance.
- Disk : 50 GB (This disk for OS).
- Another disk : 500 GB (This disk for share storage).
- CPU : 2 for more best performance.
- NIC : 1 Ethernet.
- IP address : Static setup.
NFS server host name and ip address setup same as Cloud Stack Step #01, #02 & #03.
Step #04 : Install storage (nfs) service before create zone on Cloud Stack.
[root@nfs ~]# yum -y install nfs-utils
[root@nfs ~]# mkdir -p /export/primary
[root@nfs ~]# mkdir -p /export/secondary
[root@nfs ~]# cat /etc/exports
/export  *(rw,async,no_root_squash,no_subtree_check)
NFS4 requires connecting all clients using the local domain name. So must be setup your local domain name into /etc/idmapd.conf file. Add below line into /etc/idmapd.conf this file .
Domain = technologyrss.local
Also add NFS configuration value or uncomment below lines from this /etc/sysconfig/nfs file.
LOCKD_TCPPORT=32803
LOCKD_UDPPORT=32769
MOUNTD_PORT=892
RQUOTAD_PORT=875
STATD_PORT=662
STATD_OUTGOING_PORT=2020
Then save this file and restart all services.
[root@nfs ~]# systemctl stop firewalld
[root@nfs ~]# systemctl disable firewalld
[root@nfs ~]# systemctl enable rpcbind
[root@nfs ~]# systemctl enable nfs
[root@nfs ~]# systemctl start rpcbind
[root@nfs ~]# systemctl restart nfs
[root@nfs ~]# service rpcbind restart
[root@nfs ~]# chkconfig nfs on
[root@nfs ~]# chkconfig rpcbind on
Now check nfs is working properly, so run below command.
[root@nfs ~]# rpcinfo -p
   program vers proto   port  service
    100000    4   tcp    111  portmapper
    100000    3   tcp    111  portmapper
    100000    2   tcp    111  portmapper
    100000    4   udp    111  portmapper
    100000    3   udp    111  portmapper
    100000    2   udp    111  portmapper
    100005    1   udp    892  mountd
    100005    1   tcp    892  mountd
    100005    2   udp    892  mountd
    100005    2   tcp    892  mountd
    100005    3   udp    892  mountd
    100005    3   tcp    892  mountd
    100024    1   udp    662  status
    100024    1   tcp    662  status
    100003    3   tcp   2049  nfs
    100003    4   tcp   2049  nfs
    100227    3   tcp   2049  nfs_acl
    100003    3   udp   2049  nfs
    100003    4   udp   2049  nfs
    100227    3   udp   2049  nfs_acl
    100021    1   udp  32769  nlockmgr
    100021    3   udp  32769  nlockmgr
    100021    4   udp  32769  nlockmgr
    100021    1   tcp  32803  nlockmgr
    100021    3   tcp  32803  nlockmgr
    100021    4   tcp  32803  nlockmgr
Also check share folder using below command.
[root@nfs ~]# showmount -e
Export list for nfs.technologyrss.local:
/export *
If you more help for setup nfs server for Cloud Stack management server so please see my YouTube channle.
#03. This step is KVM server installation process.
KVM server host name and ip address setup same as Cloud Stack Step #01, #02.
Step #05 : For ready kvm host before adding Cloud Stack zone.
[root@nfs ~]# yum install bridge-utils net-tools -y
Add Cloud Stack repo for install agent.
[root@nfs ~]# cat /etc/yum.repos.d/cloudstack.repo
See example below
[cloudstack]
name=cloudstack
baseurl=http://cloudstack.apt-get.eu/centos/$releasever/4.14/
enabled=1
gpgcheck=0
Now run Cloud Stack agent command for installation.
[root@nfs ~]# yum -y install cloudstack-agent
Libvirt file configuration. Add below lines into /etc/libvirt/libvirtd.conf file.
listen_tls = 0
listen_tcp = 1
tcp_port = "16509"
auth_tcp = "none"
mdns_adv = 0
Uncomment below line from /etc/sysconfig/libvirtd file.
LIBVIRTD_ARGS="--listen"
Restart services using below command.
[root@nfs ~]# service libvirtd stop
[root@nfs ~]# service libvirtd start
[root@nfs ~]# systemctl enable libvirtd
Step #06 : Configure network bridge before add Cloud Stack zone.
This is important thing for two bridge interface name like cloudbr0 and cloudbr1. Cloud Stack three interface name is hard coded like
- pubNic=cloudbr1
- prvNic=cloudbr0
- guestNic=cloudbr0
So must be use this interface name.
ifcfg-cloudbr0 : This interface used for Cloud Stack management server and guest traffic.
ifcfg-cloudbr1 : This interface used for public traffic.
KVM host contain 4 interface e.i eth0, eth1, eth2 & eth3. When you use only private cloud setup so you don’t headache ifcfg-cloudbr1. Main focus is cloudbr0 interface.
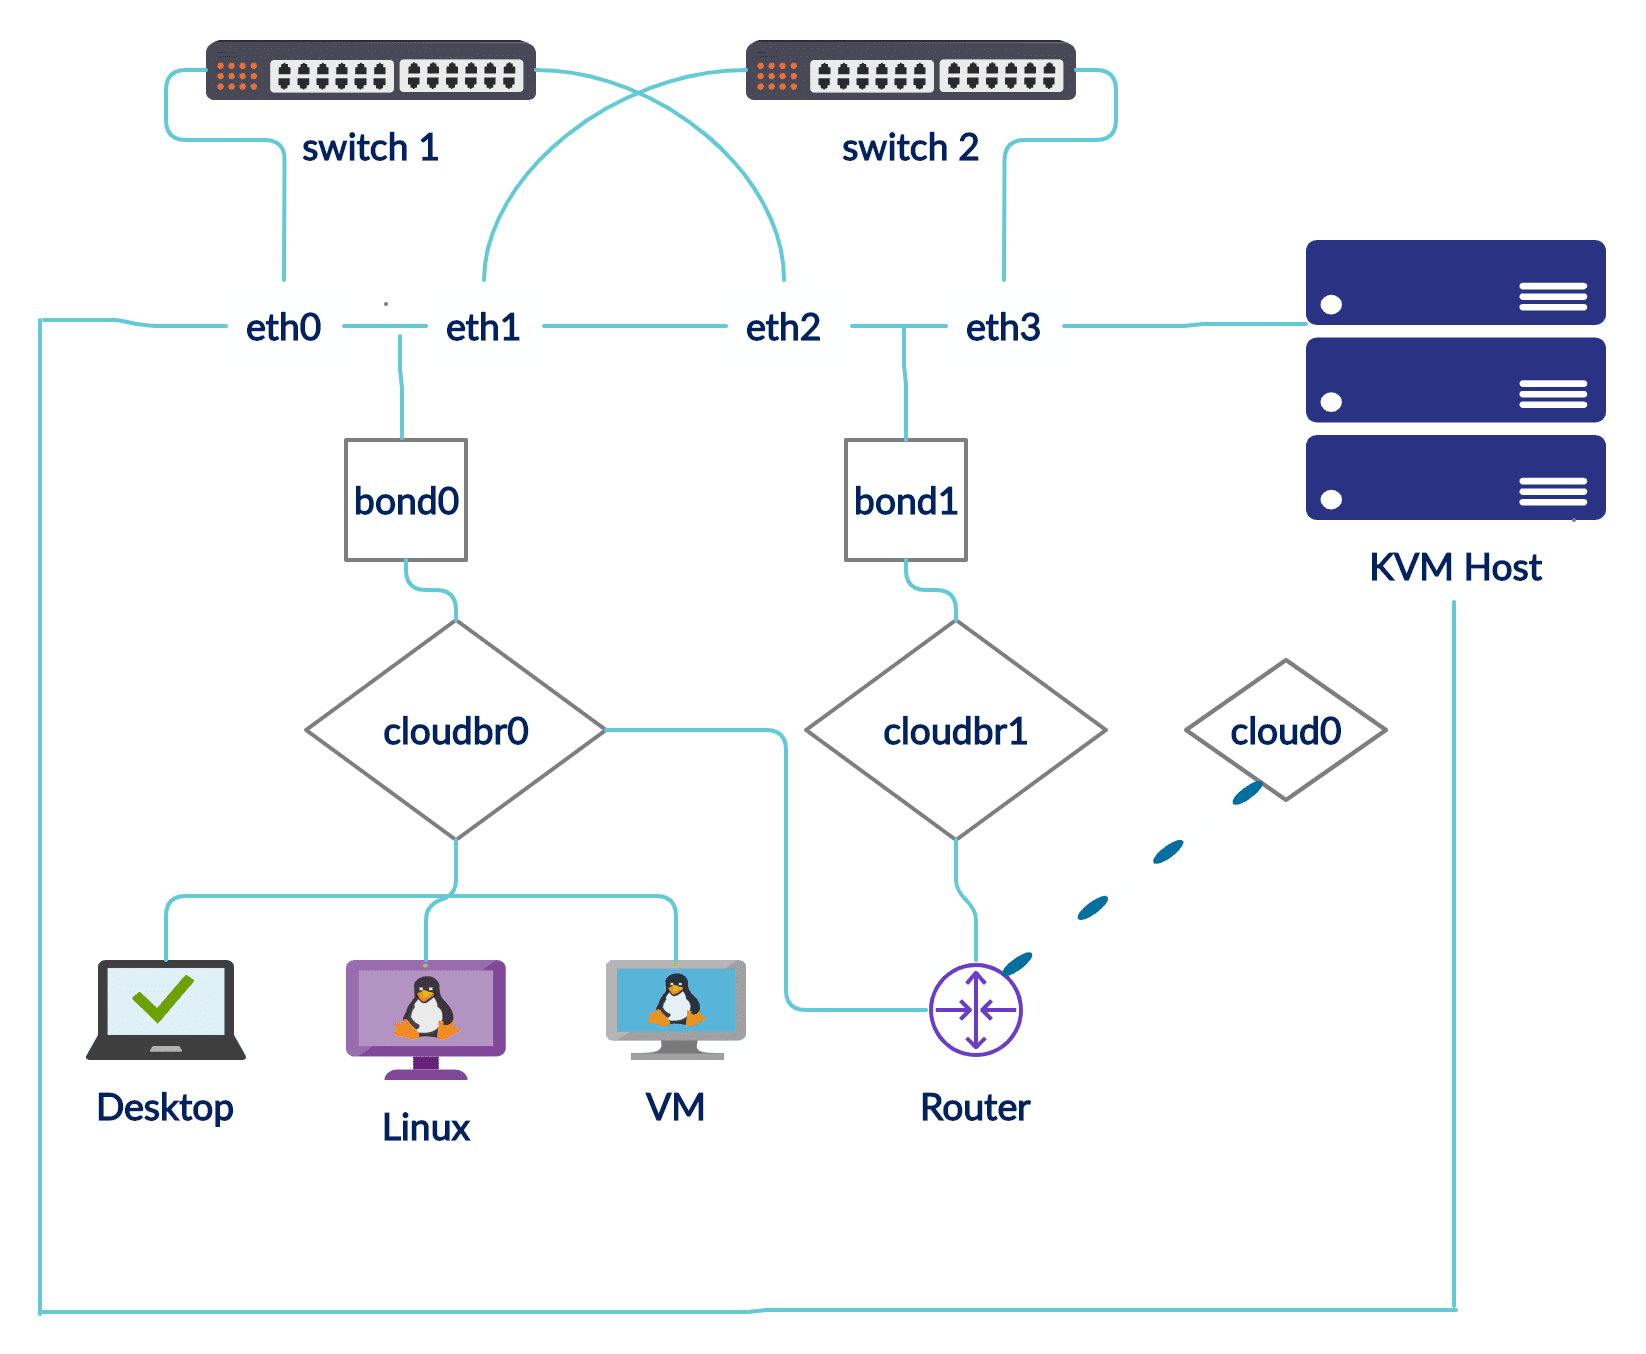
Cloud Stack KVM Network Diagram
My kvm server have two physical interfaces like LAN is ifcfg-enp2s0 and WAN is ifcfg-enp4s0.
[root@kvm ~]# cat /etc/sysconfig/network-scripts/ifcfg-enp2s0
TYPE="Ethernet"
HWADDR="8c:89:a5:5a:f5:54"
BOOTPROTO="none"
DEVICE="enp2s0"
USERCTL="no"
MASTER="bond0"
SLAVE="yes"
NM_CONTROLLED="no"
ONBOOT="yes"
Next bond0 interface details.
[root@kvm ~]# cat /etc/sysconfig/network-scripts/ifcfg-bond0
DEVICE=bond0
ONBOOT=yes
BONDING_OPTS='mode=1 miimon=100'
BRIDGE=cloudbr0
NM_CONTROLLED=no
This is Cloud Stack cloudbr0 LAN interface. You must be setup static ip address in this interface.
[root@kvm ~]# cat /etc/sysconfig/network-scripts/ifcfg-cloudbr0
DEVICE="cloudbr0"
TYPE="Bridge"
ONBOOT="yes"
NM_CONTROLLED="no"
DELAY="0"
IPADDR="10.66.100.50"
GATEWAY="10.66.11.1"
NETMASK="255.255.0.0"
DNS1="10.66.11.9"
DNS2="8.8.8.8"
DOMAIN="technologyrss.local"
This is second physical interface WAN ifcfg-enp4s0.
[root@kvm ~]# cat /etc/sysconfig/network-scripts/ifcfg-enp4s0
DEVICE="enp4s0"
TYPE="Ethernet"
USERCTL="no"
MASTER="bond1"
SLAVE="yes"
BOOTPROTO="none"
HWADDR="00:e0:4a:0b:6a:5a"
NM_CONTROLLED="no"
ONBOOT="yes"
Now see bond1 interface.
[root@kvm ~]# cat /etc/sysconfig/network-scripts/ifcfg-bond1
DEVICE=bond1
ONBOOT=yes
BONDING_OPTS='mode=1 miimon=100'
BRIDGE=cloudbr1
NM_CONTROLLED=no
And Cloud Stack public interface.
[root@kvm ~]# cat /etc/sysconfig/network-scripts/ifcfg-cloudbr1
DEVICE=cloudbr1
ONBOOT=yes
TYPE=Bridge
NM_CONTROLLED=no
DELAY=0
Remember ! Must be disable network manager.
[root@kvm ~]# systemctl stop NetworkManager
[root@kvm ~]# systemctl disable NetworkManager
Install nfs client service.
[root@kvm ~]# yum -y install nfs-common
Add below line into /etc/idmapd.conf file for communication nfs connection.
Domain = technologyrss.local
Sometime change the java version so can’t start Cloud Stack agent service. Which java version running. Using below command to check this.
[root@kvm ~]# alternatives --config java
Must be select the java version 11 otherwise Cloud Stack agent not running.
[root@kvm ~]# service cloudstack-agent start
[root@kvm ~]# systemctl enable cloudstack-agent
Sometimes can’t read this /dev/kvm directory. So setup permission.
[root@kvm ~]# mknod /dev/kvm c 10 232
[root@kvm ~]# chmod 660 /dev/kvm
[root@kvm ~]# chown root:qemu /dev/kvm
All is done !
If needed more help, so please see my YouTube channel.
#04. This step is NFS connection settings for download systemvm template.
Goto Cloud Stack management server create secondary folder and mount secondary share from nfs share.
[root@cloud ~]# mkdir -p /mnt/secondary
[root@cloud ~]# mount -t nfs 10.66.100.30:/export/secondary /mnt/secondary
Now run systemvm template download command.
[root@cloud ~]# /usr/share/cloudstack-common/scripts/storage/secondary/cloud-install-sys-tmplt -m /mnt/secondary -u http://download.cloudstack.org/systemvm/4.14/systemvmtemplate-4.14.0-kvm.qcow2.bz2 -h kvm -F
Wait up to 5-10 minutes for complete download. Then remove mount folder and remove created folder from Cloud Stack server.
[root@cloud ~]# umount /mnt/secondary
[root@cloud ~]# rm -rf /mnt/secondary
Change some global configuration for private Cloud Stack setup. Login to you Cloud Stack UI and change this settings.
system.vm.use.local.storage	     [set false to -> true
ca.plugin.root.auth.strictness	     [set true to -> false
secstorage.allowed.internal.sites    [set value = 10.66.11.9(local server ip using apache web server for download iso
Then stop and start Cloud Stack management serivce using below command then check log file.
[root@cloud ~]# /bin/systemctl stop cloudstack-management.service
[root@cloud ~]# /bin/systemctl start cloudstack-management.service
[root@cloud ~]# tail -f /var/log/cloudstack/management/management-server.log
Please see full video for more details from my YouTube channel.
#05. This step is firewall setup for CloudStack Management and KVM servers.
[root@cloud ~]# yum -y install iptables-services
Then add your network for some port allow.
[root@cloud ~]# iptables -I INPUT -s 10.66.0.0 -m state --state NEW -p tcp -m tcp --dport 22 -j ACCEPT
[root@cloud ~]# iptables -I INPUT -s 10.66.0.0 -m state --state NEW -p tcp -m tcp --dport 111 -j ACCEPT
[root@cloud ~]# iptables -I INPUT -s 10.66.0.0 -m state --state NEW -p tcp -m tcp --dport 662 -j ACCEPT
[root@cloud ~]# iptables -I INPUT -s 10.66.0.0 -m state --state NEW -p tcp -m tcp --dport 875 -j ACCEPT
[root@cloud ~]# iptables -I INPUT -s 10.66.0.0 -m state --state NEW -p tcp -m tcp --dport 892 -j ACCEPT
[root@cloud ~]# iptables -I INPUT -s 10.66.0.0 -m state --state NEW -p tcp -m tcp --dport 1798 -j ACCEPT
[root@cloud ~]# iptables -I INPUT -s 10.66.0.0 -m state --state NEW -p tcp -m tcp --dport 2003 -j ACCEPT
[root@cloud ~]# iptables -I INPUT -s 10.66.0.0 -m state --state NEW -p tcp -m tcp --dport 2049 -j ACCEPT
[root@cloud ~]# iptables -I INPUT -s 10.66.0.0 -m state --state NEW -p tcp -m tcp --dport 3306 -j ACCEPT
[root@cloud ~]# iptables -I INPUT -s 10.66.0.0 -m state --state NEW -p tcp -m tcp --dport 4505:4506 -j ACCEPT
[root@cloud ~]# iptables -I INPUT -s 10.66.0.0 -m state --state NEW -p tcp -m tcp --dport 49152:49216 -j ACCEPT
[root@cloud ~]# iptables -I INPUT -s 10.66.0.0 -m state --state NEW -p tcp -m tcp --dport 5900:6100 -j ACCEPT
[root@cloud ~]# iptables -I INPUT -s 10.66.0.0 -m state --state NEW -p tcp -m tcp --dport 6800:7300 -j ACCEPT
[root@cloud ~]# iptables -I INPUT -s 10.66.0.0 -m state --state NEW -p tcp -m tcp --dport 7689 -j ACCEPT
[root@cloud ~]# iptables -I INPUT -s 10.66.0.0 -m state --state NEW -p tcp -m tcp --dport 8080 -j ACCEPT
[root@cloud ~]# iptables -I INPUT -s 10.66.0.0 -m state --state NEW -p tcp -m tcp --dport 8250 -j ACCEPT
[root@cloud ~]# iptables -I INPUT -s 10.66.0.0 -m state --state NEW -p tcp -m tcp --dport 16514 -j ACCEPT
[root@cloud ~]# iptables -I INPUT -s 10.66.0.0 -m state --state NEW -p tcp -m tcp --dport 16509 -j ACCEPT
[root@cloud ~]# iptables -I INPUT -s 10.66.0.0 -m state --state NEW -p tcp -m tcp --dport 32769 -j ACCEPT
[root@cloud ~]# iptables -I INPUT -s 10.66.0.0 -m state --state NEW -p tcp -m tcp --dport 32803 -j ACCEPT
[root@cloud ~]# iptables -I INPUT -s 10.66.0.0 -m state --state NEW -p udp -m udp --dport 22 -j ACCEPT
[root@cloud ~]# iptables -I INPUT -s 10.66.0.0 -m state --state NEW -p udp -m udp --dport 111 -j ACCEPT
[root@cloud ~]# iptables -I INPUT -s 10.66.0.0 -m state --state NEW -p udp -m udp --dport 662 -j ACCEPT
[root@cloud ~]# iptables -I INPUT -s 10.66.0.0 -m state --state NEW -p udp -m udp --dport 875 -j ACCEPT
[root@cloud ~]# iptables -I INPUT -s 10.66.0.0 -m state --state NEW -p udp -m udp --dport 892 -j ACCEPT
[root@cloud ~]# iptables -I INPUT -s 10.66.0.0 -m state --state NEW -p udp -m udp --dport 1798 -j ACCEPT
[root@cloud ~]# iptables -I INPUT -s 10.66.0.0 -m state --state NEW -p udp -m udp --dport 2003 -j ACCEPT
[root@cloud ~]# iptables -I INPUT -s 10.66.0.0 -m state --state NEW -p udp -m udp --dport 2049 -j ACCEPT
[root@cloud ~]# iptables -I INPUT -s 10.66.0.0 -m state --state NEW -p udp -m udp --dport 3306 -j ACCEPT
[root@cloud ~]# iptables -I INPUT -s 10.66.0.0 -m state --state NEW -p udp -m udp --dport 4505:4506 -j ACCEPT
[root@cloud ~]# iptables -I INPUT -s 10.66.0.0 -m state --state NEW -p udp -m udp --dport 49152:49216 -j ACCEPT
[root@cloud ~]# iptables -I INPUT -s 10.66.0.0 -m state --state NEW -p udp -m udp --dport 5900:6100 -j ACCEPT
[root@cloud ~]# iptables -I INPUT -s 10.66.0.0 -m state --state NEW -p udp -m udp --dport 6800:7300 -j ACCEPT
[root@cloud ~]# iptables -I INPUT -s 10.66.0.0 -m state --state NEW -p udp -m udp --dport 7689 -j ACCEPT
[root@cloud ~]# iptables -I INPUT -s 10.66.0.0 -m state --state NEW -p udp -m udp --dport 8080 -j ACCEPT
[root@cloud ~]# iptables -I INPUT -s 10.66.0.0 -m state --state NEW -p udp -m udp --dport 8250 -j ACCEPT
[root@cloud ~]# iptables -I INPUT -s 10.66.0.0 -m state --state NEW -p udp -m udp --dport 16514 -j ACCEPT
[root@cloud ~]# iptables -I INPUT -s 10.66.0.0 -m state --state NEW -p udp -m udp --dport 16509 -j ACCEPT
[root@cloud ~]# iptables -I INPUT -s 10.66.0.0 -m state --state NEW -p udp -m udp --dport 32769 -j ACCEPT
[root@cloud ~]# iptables -I INPUT -s 10.66.0.0 -m state --state NEW -p udp -m udp --dport 32803 -j ACCEPT
Save iptables settings and restart service.
[root@cloud ~]# service iptables save
[root@cloud ~]# iptables-save > /etc/sysconfig/iptables
[root@cloud ~]# systemctl start iptables
[root@cloud ~]# systemctl enable iptables
#06. This step is NTP install for all servers.
[root@cloud ~]# yum -y install ntp
[root@cloud ~]# systemctl enable ntpd
[root@cloud ~]# systemctl start ntpd
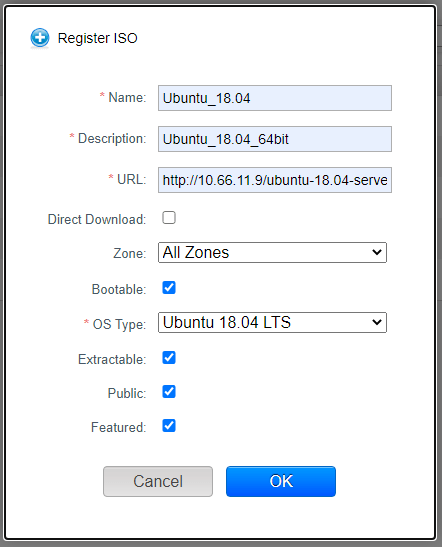
#07. Apache Cloud Stack Upload iso.
This step is to download is in CloudStack system using any web server or public official server. Must be seen Step #04 for allowing your download is served. This is my local web server. I have stored some iso for download in CloudStack system.
Goto your login system http://10.66.100.40:8080/client/ and then goto Template / Select view ISO then click Register ISO on the right side. Now enter your iso name, description, iso link, select zone, OS type select and mark all check mark then click OK. After ISO register, then wait at least 10-20 minutes to download and install on your CloudStack system.
See example from below image.
Check download status click on the register iso name then click Zones now see it download status.
Please see full video for more details from my YouTube channel.
#08. Create Instance on CloudStack.
This step is to create instance using uploaded iso. Before using this Step #08 must be see Step #07 for upload iso.
Goto your login system http://10.66.100.40:8080/client/ and then goto Instances now click Add Instance on the right side.
- Select ISO then click Next.
- Click Ubuntu_18.04 with Hypervisor is KVM then click Next.
- Choose Compute offering like Medium Instance then click Next.
- Choose Disk offering like Medium then click Next.
- Affinity group not needed then click Next.
- Default security group then click Next.
- SSH KeyPair not needed then click Next.
- Now review all information and if needed you can change any option.
Finnaly, click Launch VM. Then wait at least 1 minute for attache iso and start vm console. Now click view console for the complete installation process.
Coming soon …next updates