Arch Linux may not be for everyone. Most new users would probably prefer an out of the box solution like Debian or Fedora. However, having an Arch Linux installation to tinker with and understand the Linux environment a little better is always useful.
Similar to our Gentoo Installation this setup uses VirtualBox for a risk-free installation experience. The distribution is light enough to work inside a Virtual Machine and we would not have to worry with specific hardware driver issues. This is a great way to experiment and, once you are confident enough, you can go ahead and install it on bare metal, if you like.
One difference from the Gentoo Installation will be that it is going to be much much quicker since we are not going to compile the kernel and other utilities from scratch. Instead we will just use the prepackaged binaries to create our new /(root) environment
We would begin by first booting the Arch iso for our virtual machine. Next, we carve a bootable partition from our virtual hard drive and install the base arch linux system on top of it. We then chroot into our would-be new root make some changes such as selecting languages, keyboard mapping, timezone and selecting hardware clock and we boot into the newly installed system getting rid of the .iso disk.
1. Creating the VM
This is easily done using the VirtualBox interface. Select New option and give your VM a name, select the type as Arch Linux 64-bit and allocate at least 2GB of RAM to the VM

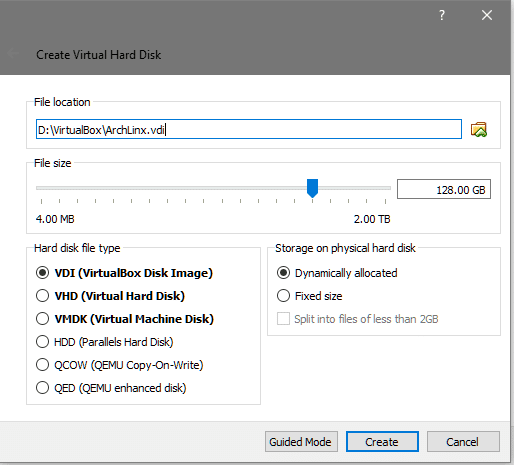
Next, we create a virtual hard disk of at least 8GB in size. This is where the OS will be installed along with root directory and other user data as well.
You can go ahead and boot the VM and it will ask for a bootable medium, because the hard drive we just created is blank and not bootable. So we select an already downloaded Arch Linux iso from our file explorer to boot off of.

This is roughly what you would see, here you have to pick the first option of Booting Arch Linux, because it allows you to format the newly created virtual disk and install Arch on it. Now once we see a shell prompt we can go ahead and update our package database, this is similar to apt update in Debian systems.
Pacman is the package-manager for Arch and the flag -S stands for sync where it tries to sync Arch with official repositories and the flag -yy forces it to download a fresh package of databases even if the system is up-to-data (you can skip -yy if you like).
Since this is a virtual machine, networking is available by default, provided the host system is connected to the internet. Now we can move on to partitioning the hard drive.
2. Partition the Hard Drive
We will be partitioning it not using the gpt scheme but rather the old-school dos label so you can dual-boot if you do decide to run it on your actual machine. To know the disk’s device node run the command:
The output will indicate you which device node represent your target virtual hard disk.

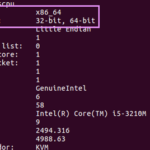
Clearly, the one with size 128GB is our target disk, since that’s the size we selected earlier. It’s device node is /dev/sda which will be used to interface with the disk. Let’s make the disk bootable and for that we would use the cfdisk utility.
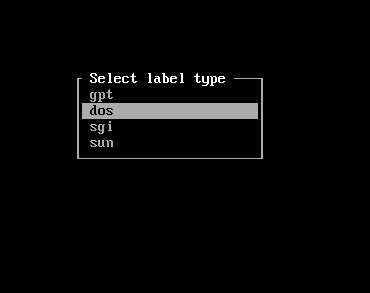
This pops open an interface asking for the label type. We shall go with dos. After this we will see an interactive session to make things easier for us.
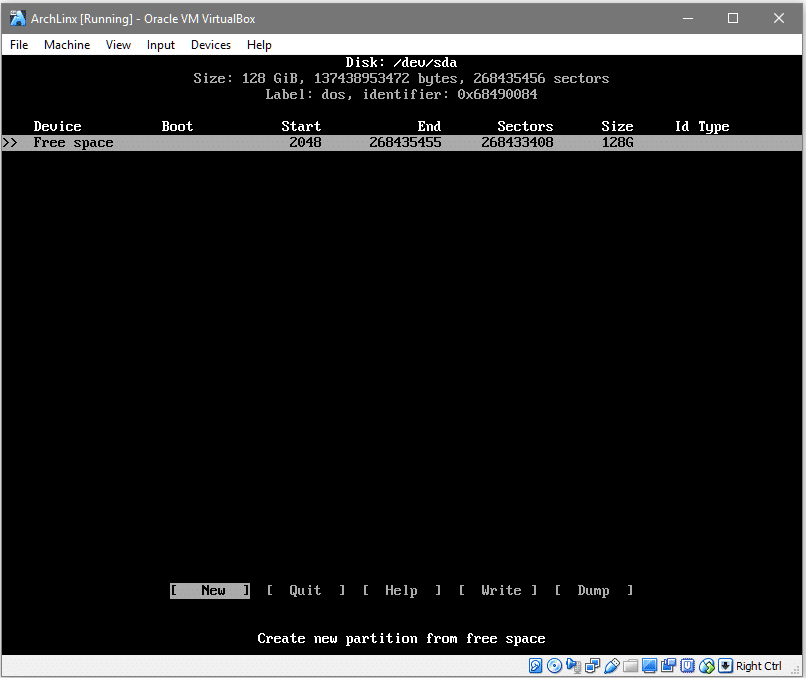
Selecting [New] (by using arrow keys and pressing <Enter>) would promptly create the first (and in our case, the only) partition we need to create.

Hit <Enter> to accept the partition size of your choice and in the next prompt select the partition type to be [primary] . This creates a new partition with the device node /dev/sda1. As shown below:

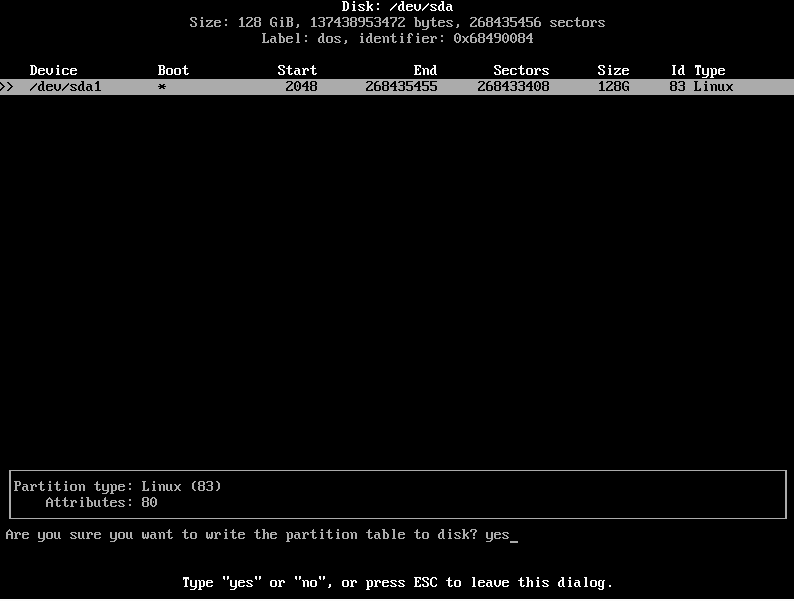
Lastly, select the Bootable option and toggle it to make the partition bootable.The ‘Boot’ column would have an asterisk to indicate that the partition is bootable. Now, to make the changes final, from the bottom-most row go to [Write], hit <Enter> and type yes when the interface prompts you to do so.
You can now quit the partitioning interface. To make sure the changes were successful, run fdisk -l one more time and you would see an entry for /dev/sda1.
We now need to format it with a filesystem, which in our case is going to be ext4.
Mount the device so we can write data to it, this would be needed for installing the base system onto it.
Now, the data that is being written in /mnt folder would be stored in sda1 partition.
3. Installing the base system
To install the base system and core-utilities, we will use the pacstrap utility which comes with the Arch Linux iso. Let’s install base and base-devel packages for our new Arch environment.
After syncing the databases, it would prompt the user to select the necessary packages from a list of available ones. The default option is to install all, which is what we will be using. Go ahead with that by hitting <Enter> and proceed with the installation. This would take some time as the base package will be downloaded (~300MB of download) and unpacked.
Okay, before we go any further, let’s understand that the /mnt/ is going to be our new /(root). This means all the directories that you would expect under the / directory like /etc is under /mnt/etc for the time being. This is important to understand, because when making modifications here we would be going inside /mnt directory a lot.
First we would need to generate an fstab file, which stands for Filesystem Table which tells your OS what partitions and disks need to be mounted automatically during the boot process.
This would make an entry for the /dev/sda1 to get mounted in the boot process. You can check the contents of /mnt/etc/fstab to see that the partition is addressed by its UUID. Now we chroot into /mnt to set language preferences, key-mapping and timezones.
Once into this new root, open the file /etc/locale.gen:
And uncomment the line “en-US.UTF-8 UTF-8”

Once you have saved the file, you can run the command:
And the changes would take place. Next to set timezone, we need to create the following symlink:
Your timezone would be different and to locate the correct time zone you can explore the zoneinfo directory using tab completion.
Next enable the hardware clock and let the OS understand that it is running in UTC.
We also need to set the hostname and fill in the hosts files. We chose the name to be ArchLinux but you can pick whatever name you prefer.
#nano /etc/hosts
In the hosts file add the following lines to the bottom (replacing “ArchLinux” with whatever hostname you chose above):
127.0.1.1 ArchLinux
::1 localhost
We would also like to enable dhcp client so it can talk to your home router (or the host machine):
Finally, we need to create a password for our root user.
Enter and re-enter the password as prompted by the system.
4. Installing bootloader
As a final step, we will be installing grub as our bootloader. It would be responsible for choosing which OS to boot from, in case you have multiple operating systems installed, and a configuration file will be generated as well, for grub to understand the system layout. To install grub run:
Run grub-install command to make it /dev/sda’s boot-loader (not /dev/sda1, but the entire disk /dev/sda !)
Now, we can generate and save a grub configuration file in /boot directory.
Finally, we exit our chroot-ed environment and unmount /dev/sda1 before rebooting into our newly installed Arch Linux environment.
#umount /dev/sda1
#reboot
From here, you can go ahead and explore the Arch environment. You can install a GUI or run it as a custom file server, depending on your preferences.