How to use triggers in MariaDB
A trigger is a procedure that is fired automatically when any modification is done to a database table. There is no option to call or execute any trigger manually. The main purpose of using triggers is to maintain database integrity and it can be used with the referential integrity constraints which forces integrity rules. In a DBMS, when any insert, update, and delete event occurs then trigger procedure associated with the effected table will be executed automatically and does the required actions. Different types of triggers are supported by the database. Triggers are mainly categorized two ways. One is before trigger and another is after trigger. Before triggers are called before any event is executed in the table and after triggers are called after executing any event in the table. How you install MariaDB and apply different types of triggers in MariaDB database server on Ubuntu is shown in this tutorial.
MariaDB Installation:
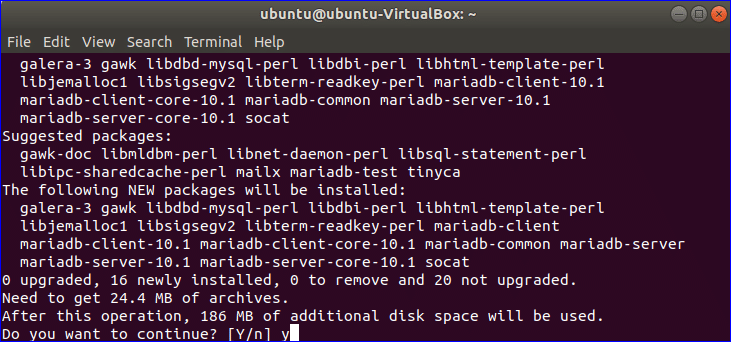
Run the command below to update the system and install MariaDB server and client.

Type ‘y’ and press enter to complete the installation process.
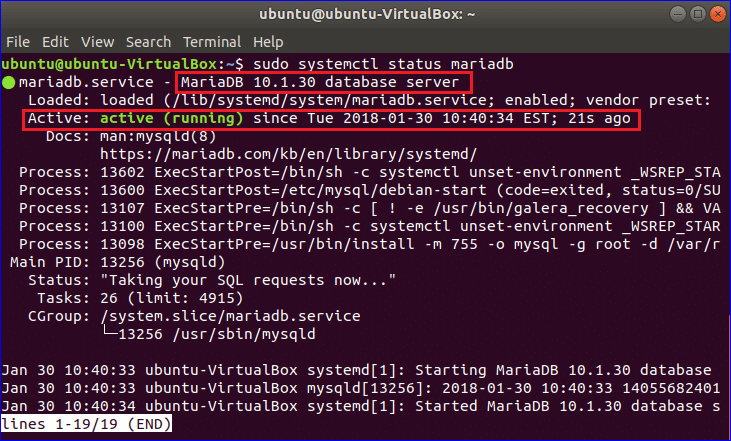
Run the following command to start MariaDB server.

Check the server is working properly or not. The output of the following command will show the details status of the server. The output indicates that MariaDB 10.1.30 verion is running.
Run the following command if you want to stop the server. Don’t run this command now.
Setup the database and tables
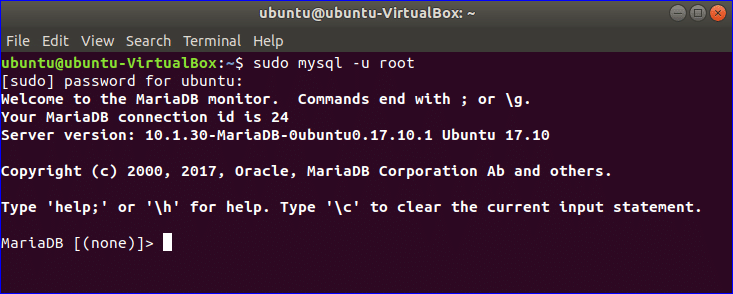
You have to create a database and two or more tables to check how triggers work. First of all, run the mysql client to setup the database. It will ask for root password to access the database server.
Create a database named store.
Select this new database:

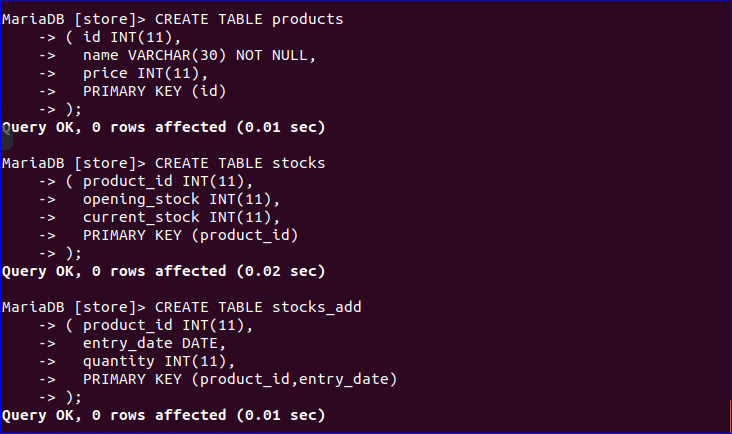
Create three tables in store database to apply trigger actions on these. Here, products, stock and stock_add tables are created.
( id INT(11),
name VARCHAR(30) NOT NULL,
price INT(11),
PRIMARY KEY (id)
);
CREATE TABLE stocks
( product_id INT(11),
opening_stock INT(11),
current_stock INT(11),
PRIMARY KEY (product_id)
);
CREATE TABLE stocks_add
( product_id INT(11),
entry_date DATE,
quantity INT(11),
PRIMARY KEY (product_id,entry_date)
);
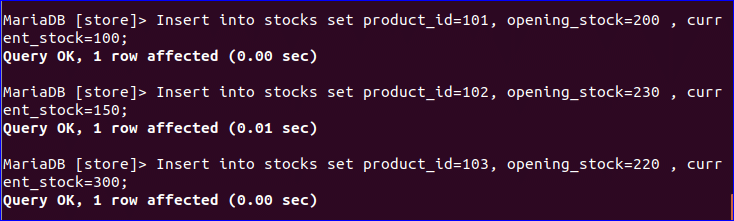
Now, insert some data in these three tables.
Products:
Insert into products set id=102, name=’Pen’ , price=100;
Insert into products set id=103, name=’Pencil’ , price=50;

stocks:
Insert into stocks set product_id=102, opening_stock=230 , current_stock=150;
Insert into stocks set product_id=103, opening_stock=220 , current_stock=300;
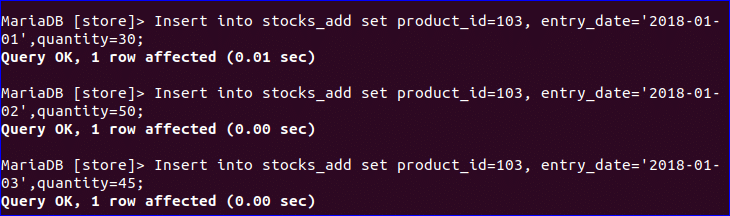
stocks_add:
Insert into stocks_add set product_id=103, entry_date=’2018-01-02′,quantity=50;
Insert into stocks_add set product_id=103, entry_date=’2018-01-03′,quantity=45;
Create After Trigger
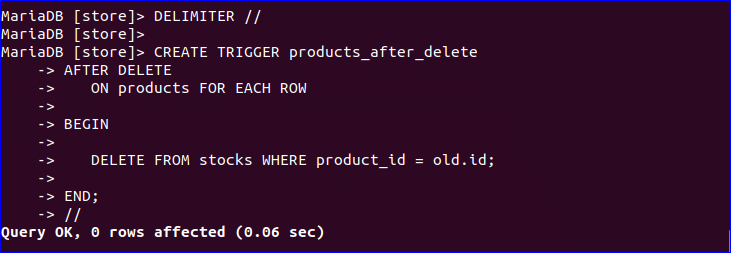
You can create after trigger to do any action automatically after inserting or updating or deleting records of a particular table. Here, products and stocks tables are selected to create after delete trigger. The data of stock table depends on the data of products table. So if any record is removed from the products table then the related records of stocks table need to be removed. Create the following trigger procedure to delete any related record from stocks table automatically when any record is removed from the products table. In this trigger, the deleted id is recognized by old.id.
CREATE TRIGGER products_after_delete
AFTER DELETE
ON products FOR EACH ROW
BEGIN
DELETE FROM stocks WHERE product_id = old.id;
END;
//
After trigger is created for products table. Now you have to test that trigger is working properly or not. Run the following query to remove a record from products where id is 101 and check the data of both products and stocks tables. After executing the query you will find that related record of stock table is removed by after trigger. No record for id value, 101, will be found in both tables.
> select * from products;
> select * from stocks;
Create Before Triggers
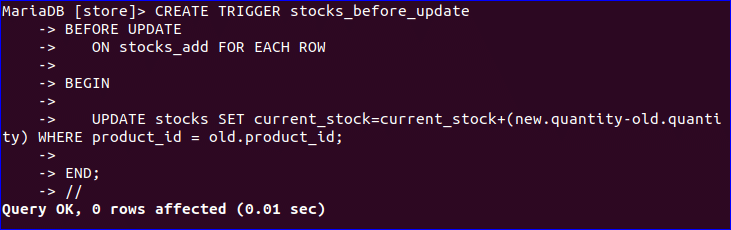
Before trigger is used to take any action before inserting or updating or deleting any or more records from a particular table. Here, stocks and stocks_add table are used to create before trigger. The value of current_stock of stocks table depends on quantity value of stocks_add table. If you update any quantity value of the stocks_add table then current_stock of stocks table need to be updated. So if any existing quantity value of stocks_add table decreases then current_stock of stocks will be decreased and if quantity value increases then current_stock will be increased. Create before update trigger for stocks_add table. In this trigger, the changed quantity value is calculated by subtracting old quantity from new quantity.
CREATE TRIGGER stocks_before_update
BEFORE UPDATE
ON stocks_add FOR EACH ROW
BEGIN
UPDATE stocks SET current_stock=current_stock+(new.quantity-old.quantity)
WHERE product_id = old.product_id;
END;
//
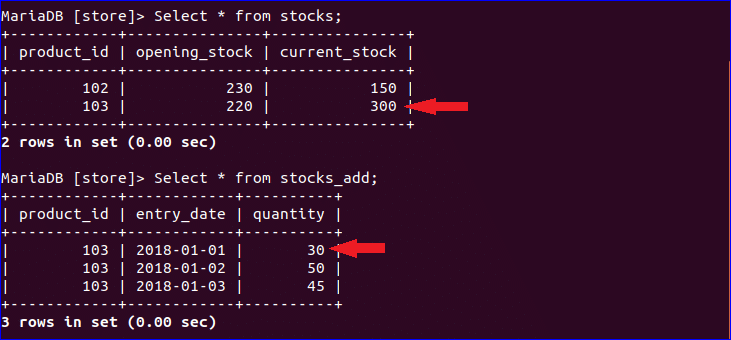
Before updating, check the current values of both stocks and stocks_add tables.
> select * from stocks_add;
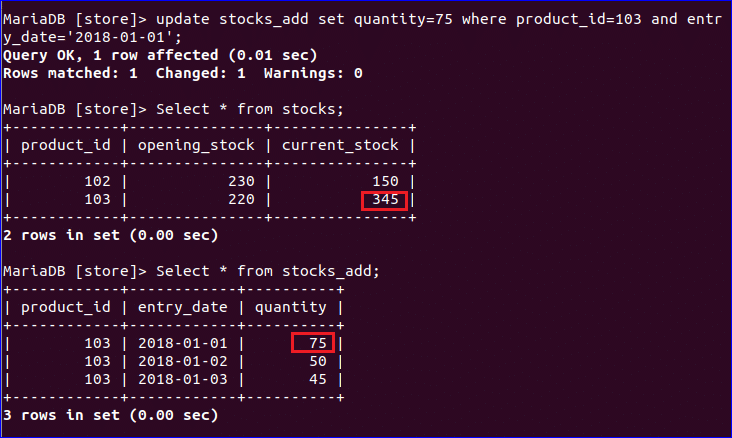
Suppose, you need to update quantity value of stocks_add table where product_id is 103 and entry_date is 2018-01-01 which is 30 now. If you want to update the value by 75 then run the following update query and check both tables again. The increased quantity is, 75-30=45. So, after update, the trigger will be fired and current_stock of stocks table will be set as, 300+45=345.
> select * from stocks;
> select * from stocks_add;
The use of two types of triggers are shown in this tutorial. In the similar way, you can create others types of before and after trigger for your database tables based on your requirements.