Networking and Storage for Docker Containers
The first thing people look for after running Apache in a container is how to expose that web server via the host’s public IP. The same is true for most other conceivable application. Once it is running inside the container, we need to poke holes in that layer of abstraction and allow it to communicate with the rest of the world.
Docker Port Forwarding
With Docker setting port forwarding rules is relatively simple. If you want the requests from port number 8080 of the host to be listened on the port number 80 of your Apache container, all you need to do is run it this way:
$docker run -p 8080:80 container_image
That’s it! Any web server listening on port 80, from inside the container, will receive all the requests actually coming on port 8080 on the host system. Most of the networking is provided via DockerNAT which is a part of the host system and is indeed very minimalist in terms of functionality. If you don’t know what a NAT is, it is similar to what a typical home router does. As a NAT device, it faces the Internet with usually a single IP address and then communicates with the reset of the world on behalf of the various devices connected to it. DockerNAT can be visualized as a similar gateway for all your various containers. However, other than this docker0 interface there is also two other options that you can use.
$docker network ls
This lists all the docker related network, by default there are three of them:

Lists all the docker related network
The bridge links to the docker0 interface on your host machine. This is the default option. Next is the host option, where the container uses the host’s networking stack without any restrictions nor requiring any port forwarding to expose services. Last option, which is none, just spins up an isolated container with no networking facilities. You can still attach to it, using the docker attach command but no true networking is made available.
Docker Volumes
With the rise of stateless services Docker containers are being designed to be more and more disposable. Removing a service and going back to a clean state has become commonplace.
Docker offers a nice environment for them to run but the uncomfortable truth is that, there is always some persistent data that needs to be stored, no matter how “stateless” the service. Volumes are the best and most commonly used method:
To create a volume:
$docker volume create volume_name
To mount it you would need to provide the source path, which is the path to the volume on your host machine. If you just use the volume name, then Docker goes to the default path /var/lib/docker/volumes/volume_name and uses that. Along with this, you will need a target path, which is where the volume will be mounted inside the container.
$docker run --mount source=volume_name target=/app image_name
The rest of the volume management is similar to container. They are:
$docker volume rm volume_name
$docker volume ls
Remember to stop all the containers using that volume before un-mounting or removing a volume.
LXD Networking
LXD containers, by default, are connected to each other and the host machine via a private network with IP addresses along the lines of 10.0.X.X. For example, this is ideal for running multiple websites on the same IP address by directing all the web traffic through a reverse proxy container. However, you can do much more. Since each LX container gets its own networking stack, you can expose it to the outside world. Give it a public IP address, if you are running it on the cloud, connect it to your home router so all the devices on your home network can talk to the container. To do this you may have to create a new lxc profile or edit the default one, to share the host network adapter. First, on your host machine run:
$ifconfig
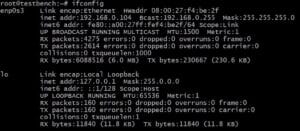
This is where you look for the network interface name (the left-hand column). In our case, it is enp0s3. Your interface’s name may differ, substitute that name instead of enp0s3.
Next edit the lxc profile by running the command:
$lxc profile edit default
I’d recommend you comment out every line that is not already commented out, and then paste in the following:
config: {} description: Default LXD profile devices: eth0: name: eth0 nictype: bridged parent: enp0s3 type: nic name: default
Again, make sure that the value of parent matches with your host system’s interface that you may want to use, and now if you run a new container:
$lxc launch ubuntu:16.04 container_name
That new container will use the default profile, and will have a network interface named eth0 with a completely different MAC and IP address. The home router (acting here as a DHCP server) will show you the following network devices:
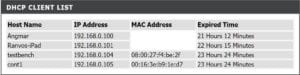
DHCP Client List
Where the last entry is an LX container, running inside the second to last entry, a Ubuntu host.
LXD with ZFS
One positive outcome of the container revolution is that the Linux folks realized the importance of ZFS. If you don’t know about it, we urge you to research a bit more. ZFS deserves several blog posts of its own, but suffice it to say that using it for LX containers will give you an insane amount of flexibility and reliability. You can rollback to a previous state, you can migrate your containers easily and take incremental backups without an insane amount of storage overhead. To use ZFS on Ubuntu 16.04, run:
$apt install zfsutils-linux $lxd init
When prompted for a storage backend option, pick zfs and you are good to go.