Python shutil
Python shutil module allows a developer to use file objects very easily and without going into deeper detail about how things work under the covers. This module basically abstracts away the low-level semantics of creating and managing file objects, cleaning them once there use is complete and allows us to focus on the business logic of the application. We will see many examples here, let’s get started.
Examples with Python shutil module
We will study various examples demonstrating the use of Python shutil module here.
Copying a file
With the copyfile() function in shutil module, we can make an exact copy of an existing file anywhere on the machine. Let’s look at a sample program to demonstrate how this can be done:
import shutil
file_directory = ‘./Files’
print(‘Files before:’, os.listdir(file_directory))
shutil.copyfile(‘./Files/hello.txt’, ‘./Files/hello_again.txt’)
print(‘Files after:’, os.listdir(file_directory))
We just copied a file which exists in the given directory to clone the file in the same directory. Here is what we get back with this command:

Python shutil file copy
The good thing about this function is that the mentioned function also takes as input the name to the new file to be created.
Copying Files to another directory
It is possible to copy a file to a new directory with shutil’s copy() function. Let’s look at it in action:
import shutil
print(‘Making a new directory.’)
os.mkdir(‘LinuxHint’)
print(‘Files before: ‘, os.listdir(‘LinuxHint’))
shutil.copy(‘./Files/hello.txt’, ‘LinuxHint’)
print(‘Files after: ‘, os.listdir(‘LinuxHint’))
Let’s see the output for this command:

Copying file to a new directory
Note that when a file is copied using the copy() function, permissions for the file are also cloned but metadata of the file is not copied. This means when you check when this file was made, it will show the fresh time when you ran this script.
Copying file with Metadata
In the last section, we saw how we could make a copy of the file. What if you want to make an exact clone of a file which involves cloning its metadata as well like when the file was made etc. This is possible too but this may not work on a POSIX based system. Let’s look at an example on how this can be done:
import shutil
import time
new_directory = ‘LinuxHint’
src_file = ‘./Files/hello.txt’
dest_file = ‘./LinuxHint/hello.txt’
def file_metadata(file):
stat_info = os.stat(file)
print(‘ Mode :’, oct(stat_info.st_mode))
print(‘ Created :’, time.ctime(stat_info.st_ctime))
print(‘ Accessed:’, time.ctime(stat_info.st_atime))
print(‘ Modified:’, time.ctime(stat_info.st_mtime))
os.mkdir(new_directory)
print(‘Metadata for source file:’)
file_metadata(src_file)
shutil.copy2(src_file, new_directory)
print(‘Metadata for destination file:’)
file_metadata(dest_file)
Here is what we get back with this command when we run this on a POSIX based system (metadata is not cloned completely):

Copy file with metadata
On non-POSIX based systems, even the created and accessed time would have matched exactly.
Cloning complete directory
In last section, we saw how we could make a copy of the file. Here, we will see how we can clone a complete directory recursively. This means that if another directory exists in the directory we want to clone, those will be cloned as well.
import shutil
import os
src_directory = ‘./Files’
dest_directory = ‘./LinuxHint’
shutil.copytree(src_directory, dest_directory)
print(‘Contents of Source:’)
pprint.pprint(os.listdir(src_directory))
print(‘Contents of Destination:’)
pprint.pprint(os.listdir(dest_directory))
Let’s see the output for this command:

Duplicating a directory
Note that the directory we pass to copytree() function as destination directory must not exist before we run this program.
Deleting a Directory
Deleting a directory is very simple with the rmtree() function in the module. Let’s see this function in action here:
import shutil
import os
delete_directory = ‘LinuxHint’
current_directory = ‘.’
print(‘Content before removal:’)
pprint.pprint(os.listdir(current_directory))
shutil.rmtree(delete_directory)
print(‘Content after removal:’)
pprint.pprint(os.listdir(current_directory))
After running the script, LinuxHint directory is deleted along with the contents. Here is what we get back with this command:

Delete directory
Finding files
If you want to find a file which is present on the PATH variable on your machine, we can use the which() function to find that file by name. Let’s look at a demonstration example for this function:
print(shutil.which(‘bsondump’))
print(shutil.which(‘no-file-found’))
Here is what we get back with this command:

Find file on PATH
Monitoring File-system Space
With the shutil module, we have a function disk_usage() through which we can get disk space information about our machine as well. Let’s look at an example which shows this data in a human-readable manner:
total_b, used_b, free_b = shutil.disk_usage(‘.’)
gb = 10 ** 9 # GB == gigabyte
print(‘Total: {:6.2f} GB’.format(total_b / gb))
print(‘Used : {:6.2f} GB’.format(used_b / gb))
print(‘Free : {:6.2f} GB’.format(free_b / gb))
Here is what we get back with this command:
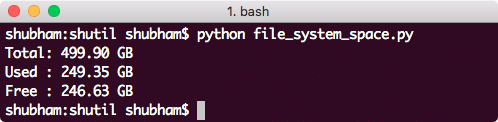
Finding file system space
Archiving directories
As a final example, we will see how we can archive a directory shutil module make_archive() function. Let’s look at the sample program:
import os
archive_directory =
os.path.expanduser(os.path.join(‘destination-directory-path’, ‘linuxhint’))
root_dir = os.path.expanduser(os.path.join(‘~’, ‘.ssh’))
shutil.make_archive(archive_directory, ‘gztar’, root_dir)
Here is what we get back with this command:

Archiving directory
If you unarchive the TAR file and have a look, it will contain all the .ssh directory files in it.
Conclusion
In this lesson, we looked at how we can manage file objects with high-level file operations easily with shutil module in Python. Operations like copying contents of a file, create a new copy of a file etc. looked easy with this module.