Update System
We recommend you to upgrade all the packages and repositories before installing any new package on the system. Execute the following command and it will do the job for you.
Install Docker
We will be running consul server using docker so, we will need to install docker before installing consul. First of all, remove the older version of docker if there is any installed. Execute the following command to do so.
Next, execute the following command to install the required packages.
curl software-properties-common
Next, you will need to add the docker’s official GPG key. Execute the following command and it will do the job for you.
Now we are ready to install the docker so, execute the following command to do so.
You can verify this installation using the following command. sudo systemctl status docker You should see the following output.
● docker.service – Docker Application Container Engine
Loaded: loaded (/lib/systemd/system/docker.service; enabled; vendor preset: enabled)
Active: active (running) since Wed 2019-07-10 12:04:28 UTC; 57s ago
Docs: https://docs.docker.com
Main PID: 4310 (dockerd)
CGroup: /system.slice/docker.service
└─4310 /usr/bin/dockerd -H fd:// –containerd=/run/containerd/containerd.sock
Jul 10 12:04:26 testconsul1 dockerd[4310]: time="2019-07-10T12:04:26.296629644Z"
level=warning msg="Your kernel doe
Jul 10 12:04:26 testconsul1 dockerd[4310]: time="2019-07-10T12:04:26.296913361Z"
level=warning msg="Your kernel doe
Jul 10 12:04:26 testconsul1 dockerd[4310]: time="2019-07-10T12:04:26.297249324Z"
level=warning msg="Your kernel doe
Jul 10 12:04:26 testconsul1 dockerd[4310]: time="2019-07-10T12:04:26.299409872Z"
level=info msg="Loading containers
Jul 10 12:04:26 testconsul1 dockerd[4310]: time="2019-07-10T12:04:26.437281588Z"
level=info msg="Default bridge (do
Jul 10 12:04:26 testconsul1 dockerd[4310]: time="2019-07-10T12:04:26.501563121Z"
level=info msg="Loading containers
Jul 10 12:04:28 testconsul1 dockerd[4310]: time="2019-07-10T12:04:28.798610779Z"
level=info msg="Docker daemon" com
Jul 10 12:04:28 testconsul1 dockerd[4310]: time="2019-07-10T12:04:28.799513575Z"
level=info msg="Daemon has complet
Jul 10 12:04:28 testconsul1 systemd[1]: Started Docker Application Container Engine.
Jul 10 12:04:28 testconsul1 dockerd[4310]: time="2019-07-10T12:04:28.821957315Z"
level=info msg="API listen on /var
lines 1–18/18 (END)
Install Consul
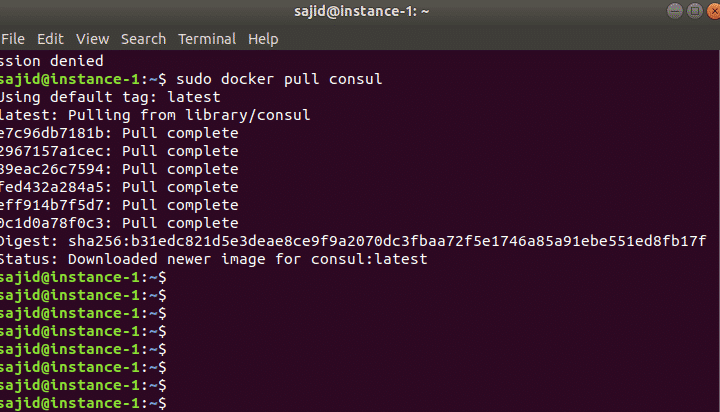
We have successfully installed docker on your system. Now we will be installing consul using the docker image. First of all, you will need to get the docker image of consul. If you have the image local workstation then good but here we will download the image from docker hub. Execute the following command to download the image. sudo docker pull consul You should see the following output:
Once you get the consul image, now you are ready to start the consul server using the following command.
-server -bootstrap -ui -client=0.0.0.0
You will see the following output:
consul:v0.6.4 agent -server -bootstrap -ui -client=0.0.0.0
==> WARNING: Bootstrap mode enabled! Do not enable unless necessary
==> Starting Consul agent…
==> Starting Consul agent RPC…
==> Consul agent running!
Node name: ’14aafc4bdaee’
Datacenter: ‘dc1’
Server: true (bootstrap: true)
Client Addr: 0.0.0.0 (HTTP: 8500, HTTPS: –1, DNS: 8600, RPC: 8400)
Cluster Addr: 172.17.0.2 (LAN: 8301, WAN: 8302)
Gossip encrypt: false, RPC-TLS: false, TLS-Incoming: false
Atlas: <disabled>
Next, you can check the container logs using the following command.
Replace the Container ID with your actual container in our case it is:
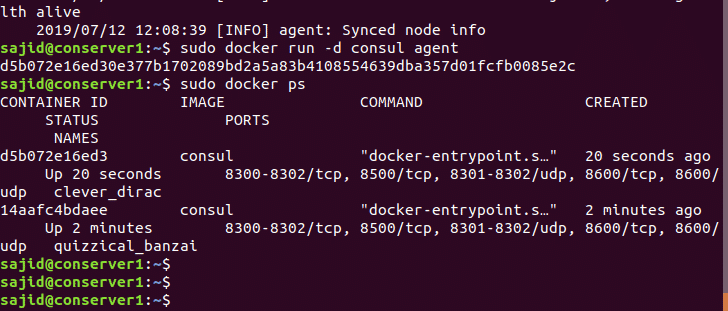
Now we know that Consul is a distributed application so there is no point of running consul server alone. Next, you will need to run the consul again in client mode. Execute the following command to start the consul agent in client mode.
You can check all the available containers using the following command. sudo docker ps The above command will list all the running containers. Here, in our case, there should be two containers running. You can deploy many consul agents in client mode and on many other nodes also if you want.
Next, you will need to connect the client to the server. Execute the following command to join the server node.
Now we can check the logs of client and server container and confirm the connection between the consul server and consul client using the following command.
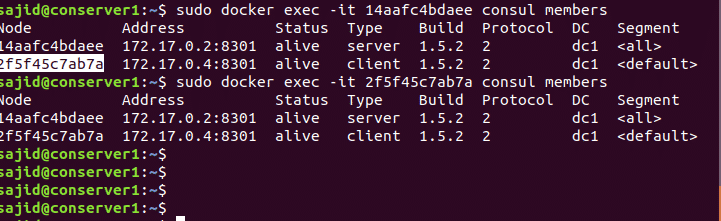
Now if you see the consul members on both consul client and server node then they should show us both the containers. You can do so using the following commands.
On the server node: sudo docker exec -it <container ID> consul members
Change Bind Interface of Consul Server
Now we are going to start the consul in host mode. When we will start consul in host mode then there will be more interfaces on the host machine. To resolve this issue you will need to change the binding interface. Start the consul in host mode using the following command.
-bootstrap-expect=1
Next, start a consul in client mode but on a different machine and join the above consul server. Execute the following command and it will do the job for you.
Now we can verify this by checking consul members on the consul server.
Next, start the consul agent with bind interface IP address using the following command.
–retry-join=192.168.99.100 -bind=192.168.99.101
We have changed the bind interface successfully but Consul UI is still not available to us. You will need to make port 8500 listen on eth1 interface to get the UI. Execute the following command and it will do the job for you.
-d consul agent -ui -server -bootstrap-expect=1
Conclusion
In this guide, you have learned to Install Docker and Consul on your system. You also learned to configure the consul server using docker containers.