Introduction to Ubuntu 17.04
Following the release of Ubuntu 17.04 (Zesty Zapus) on April 13, 2017, people want to know how to upgrade their system. Please note that Ubuntu 17.04 is a non LTS release so we do not recommend those running Ubuntu 16.04 LTS in a production environment to upgrade now, but to wait for 18.04 in April 2018, for a long term support version of Ubuntu. That being said, those who want to get a freshly updated system to the latest release 17.04 we will show you how with ease. Before we begin the upgrade to ubuntu 17.04, lets take a quick look at Ubuntu 17.04 new features.
Ubuntu 17.04 Features And Changes
- The 32-bit PowerPC support had been dropped. According to the release notes, the powerpc port is no longer included in the 17.04 release. But support for ppc64el still continues
- The default DNS resolver is now systemd-resolved
- For new installs, a swap file will now be used instead of a swap partition
- Ubuntu 17.04 is based on the Linux release series 4.10, so expect it to be shipped with Linux Kernel 4.10
- There is support for driverless printing, meaning you can now print without printer-specific drivers. These printers are IPP Everywhere and Apple AirPrint printers, but also some PDF, Postscript, and PCL printers work
- LibreOffice has been updated to version 5.3
- Apps provided by GNOME have been updated to v3.24. Exceptions are the Nautilus file manager (3.20), Terminal (3.20), Evolution (3.22), as well as Software (3.22)
- The Calendar app now has a Week view
- gconf is no longer installed by default since it has long been superseded by gsettings. Note that statistics and preferences for the Aisleriot card games will be reset when upgrading to 17.04
- Unity 8 is available as an alternative session
- Qemu has been updated to the 2.8 release
How to upgrade to Ubuntu 17.04 from Ubuntu 16.04
Backup System (Install Duplicity)
Before any system upgrades are carried out, we always recommend that you backup your files and folders and move it to a secure external location. To achieve this, install Duplicity, a backup tool that allows you to backup directories by producing encrypted tar-format volumes and uploading them to a remote or local file server. Run the following commands to install duplicity:
sudo add-apt-repository ppa:duplicity-team/ppa
sudo apt-get update
sudo apt-get install duplicity python-gi
- Next open Dash, search for “Deja” and click on backup
- Click “Folders to save” and add the desired folders you want to backup
- Go back to Overview and click on Back up Now… and backup with or without password protection

Upgrade to Ubuntu 17.04
Please note that by default, LTS releases are always set to only upgrade to other LTS releases. Since we are upgrading from an LTS to a non LTS instance, we need change settings so we get automatic notification. Note, we are bypassing this safety feature in order to install 17.04. Follow the steps below:
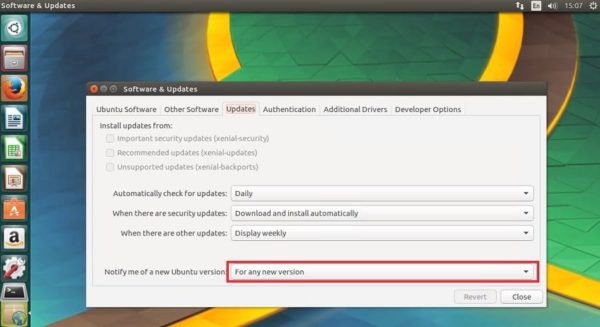
- Open “Software & Updates” from dash
- Click on the “Updates” tab
- Under “Notify me of a new Ubuntu version”, click the dropdown menu and select “For any new version”
- Close for changes to take effect
Run the following commands to upgrade from Ubuntu 16.04LTS to Ubuntu 16.10 first:
sudo do-release-upgrade -d
After the first upgrade is completed, you will be prompted to restart the system. Go ahead and reboot the machine, and then log back in. Next run the same upgrade command to upgrade this time to Ubuntu 17.04:
sudo do-release-upgrade -d
Verify the upgrade by running the following command:
lsb_release -a
Post Upgrade Tasks
We will quickly look at some post upgrade tasks:
- Do a quick update check for security / kernel patches and app updates
- Install graphics drivers via software & updates center
- Install some media codecs to help you listen to music and watch movies. Ubuntu does not include these 3rd party softwares due to legal restrictions. You can install media codecs by running the following command:
sudo apt install ubuntu-restricted-extras
- Now install latest Unity Tweak Tool
- Also install System Load Indicator – This is a graphical system load indicator for CPU, ram, etc. Follow steps below to install it
sudo add-apt-repository ppa:indicator-multiload/stable-daily
sudo apt-get update && sudo apt-get install indicator-multiload
- Disable Guest Session from Login Screen – You can disable guest login by editing the file “50-no-guest.conf” and adding the code below. Restart your machine for changes to take effect
sudo apt install gksu
gksudo gedit /etc/lightdm/lightdm.conf.d/50-no-guest.conf

# Add following lines
[SeatDefaults]
allow-guest=false
Troubleshooting
One issue sometimes reported by users after upgrading to Ubuntu 17.04 is the wi-fi not working anymore due to mac address keep changing. To fix this issue, follow the steps below – source
- Open a terminal and run the following command
sudo -H gedit /etc/NetworkManager/NetworkManager.conf
- Enter the following lines at the end of the file
[device]
wifi.scan-rand-mac-address=no
- Save changes and close the file. then run command for changes to take effect
sudo service network-manager restart
Conclusion And More Information
This article will get you started with upgrading to Ubuntu 17.04. Please be sure you want to change away from a LTS release before following the guide.
Fore more details on keeping you Ubuntu System up to date, see How to Upgrade Ubuntu From the Command Line.
Now that your Ubuntu System is up to date, see 22 Best Ubuntu Applications Recommended for 2017.
See release notes for more details